Chapter 1: Functional Description
Introduction
Service Manual 1-7
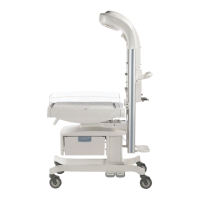
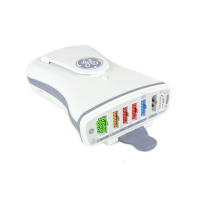
1.1.2 Controls and Displays
Feature
Number
Description
1 Power stand-by switch - On the left below the display turns the power to the warmer on
and off.
2 SpO
2
logo (optional) - Indicates which SpO
2
system is installed:
3 Oximetry key (optional) - This key retains the same function at all times and toggles SpO
2
on and off.
4 Mode key - To select manual or baby mode. This key retains the same function at all times
5 Temperature/power increase/decrease key - This key retains the same function at all
times
6 Baby temperature - Can be displayed in degrees Celsius or degrees Fahrenheit. The default
setting is degrees Celsius.
7 Alarm silence key - Alarms can be silenced by pushing the key above the display or by a
wave of your hand directly in front of the alarm light.
8 Help key - The key with the “?” in the upper right corner brings up the help screen that
explains alarms and functions.
9 Task keys - The five keys on the right are “soft” keys that change their function depending
on what task you wish to perform. They control equipment settings and options.
10 Dimmer knob - Controls the brightness of the observation lights.
11-12 Date and time - Displayed at the bottom of the screen.
13 Moving arrow - indicates that the processor is active
Masimo SET (1 or 2) Nellcor