Home
Kyocera
All in One Printer
Ecosys M6526cdn
Kyocera Ecosys M6526cdn Service Manual
4
of 1
of 1 rating
375 pages
Give review
Manual
Specs
To Next Page
To Next Page
To Previous Page
To Previous Page
Loading...
2PV/2PW
1-5-19
1-5-4
Developing section
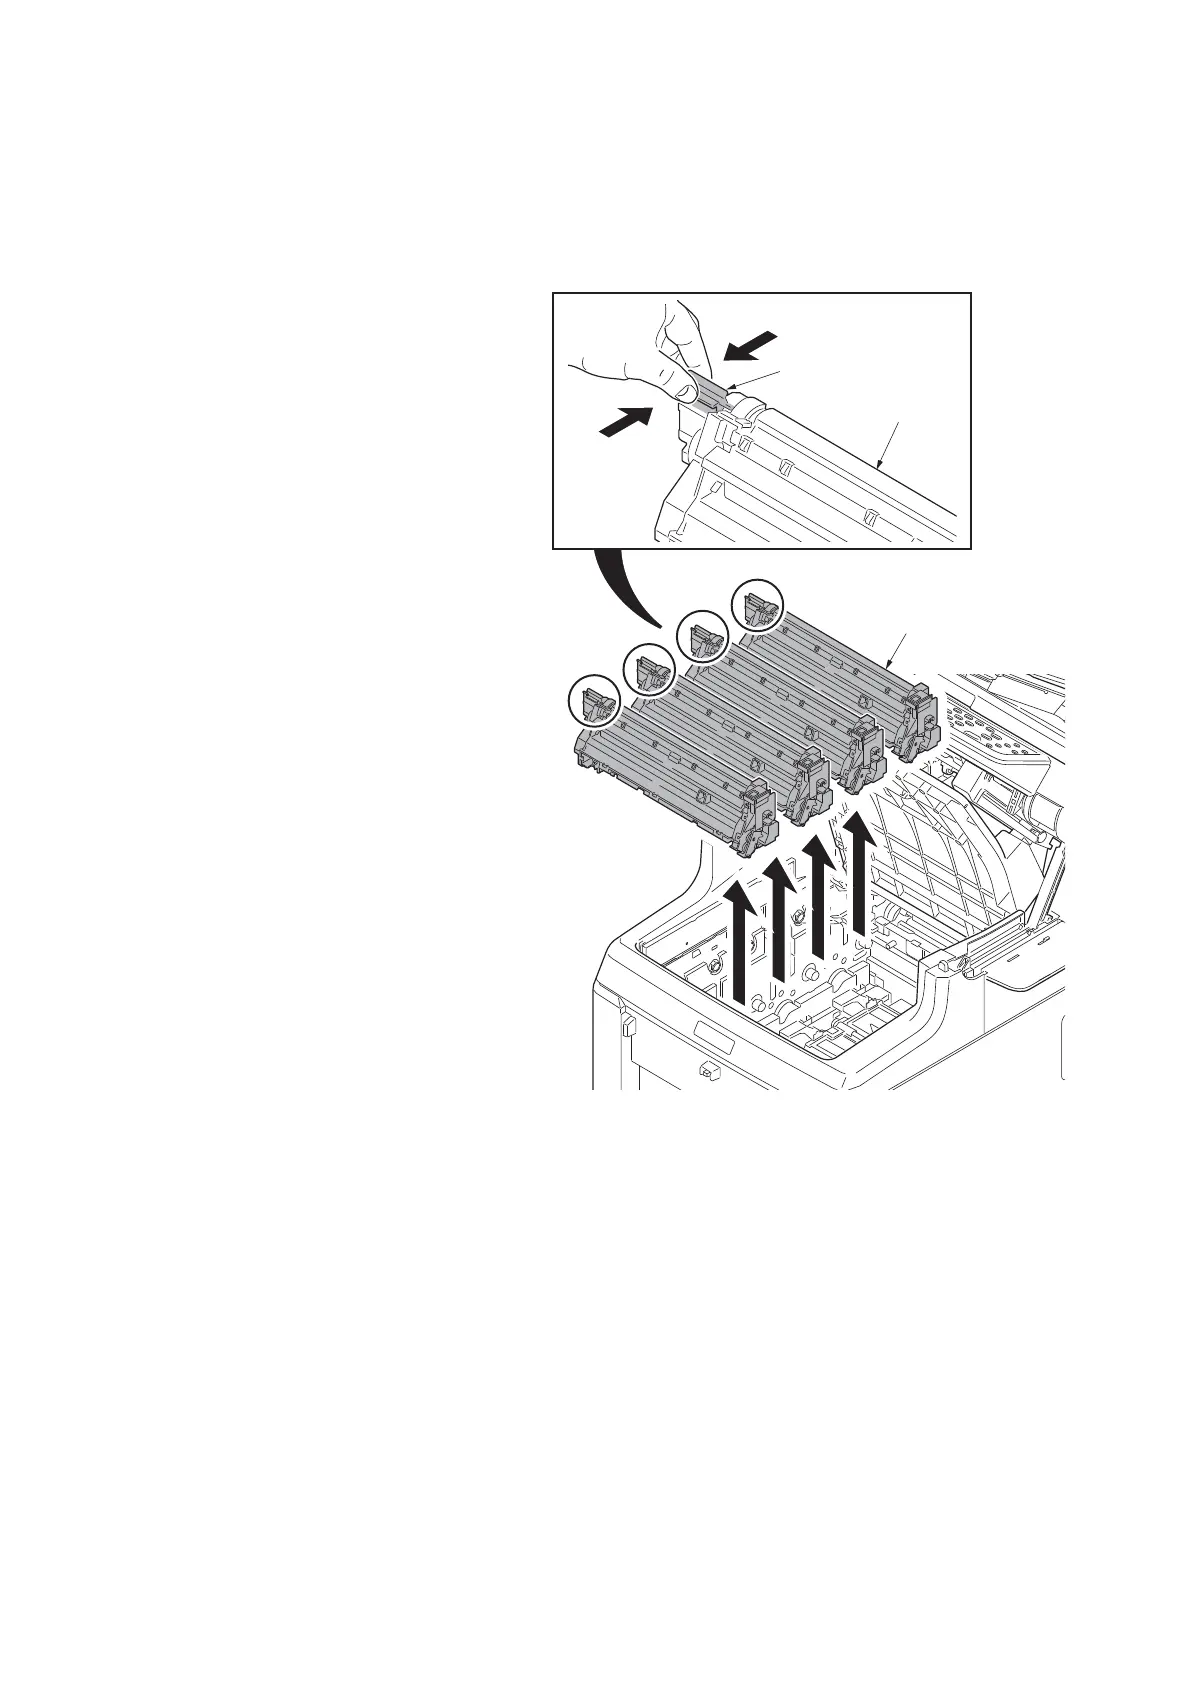
(1)
Detaching an
d refitt
ing the developing unit
Procedure
1.
Remove the intermed
iate transfer unit
(see p
age 1-5-22).
2.
Remove drum units (K, M, C, Y).
3.
Pinch
the lever of
developing unit.
4.
Remove developing unit
s (K, M, C, Y).
Figure 1-5-28
Developing unit
(K,M,C,Y)
Developing unit
Lever
208
210
Table of Contents
Default Chapter
5
Safety Precautions
5
Symbols
6
Installation Precautions
7
Precautions for Maintenance
8
Table of Contents
11
Specifications
15
Machine (Front Side)
15
Product View and Parts Identification
20
Machine (Rear Side)
21
Document Processor View
22
Operation Panel
23
Machine Cross Section
24
1-2 Installation
25
Installation Environment
25
Unpacking
26
Removing the Tapes and Pads
28
Installing the Toner Containers
32
Installing the Waste Toner Box
33
Loading Paper
34
Connecting the Interface Cable
35
Connecting the Power Cord
35
Installing the Expansion Memory (Option)
36
Maintenance Mode
39
Executing a Maintenance Item
39
Maintenance Modes Item List
40
Contents of the Maintenance Mode Items
44
Outputting an Own-Status Report
44
Event Log
45
Exit Maintenance Mode
50
Setting the Factory Default Data
50
Setting the Machine Number
51
Set Mainte ID
52
Firmware Version
53
Memory Initializing
54
Adjust Paper Timing Data
55
Caution
56
Adjust Scanner Motor Speed
57
Adjustment: [Sub Scan]
58
Adjust Table Leading Edge Timing
59
Adjust Table Center
60
Adjust DP Scan Position
61
Adjust DP Motor Speed
62
Adjust DP Leading Edge Timing
63
Adjustment: Leading Edge Registration
64
Adjustment: Trailing Edge Registration
64
Adjust DP Original Center
65
Checking DP Operation
66
Setting the IC Card Type
67
Setting the Maintenance Cycle
68
Checking/Clearing the Maintenance Count
69
Setting the Destination
70
Switching between Double and Single Counts
71
Selecting the Timing for Copy Counting
71
Setting Service Status Page
72
Setting the Size Conversion Factor
73
Setting the Value for Maintenance Due Indication
74
Selecting Sleep Mode
75
Adjust Print Margin
76
Adjust Scanning Margin (Table)
77
Adjust Scanning Margin (DP)
78
Adjusting the Halftone Automatically
79
Auto Adj Scn
80
Set Target
83
Setting: [Adjust Original]
84
Setting: [DP]
85
Initializing All Data
86
Initializing Permanent Data
87
Setting User Data 1
87
Setting User Data 2
88
Clearing Data
88
Setting System 1
89
Setting the Number of Lines to be Ignored When Receiving a Fax
90
Setting System 2
91
Setting System 3
92
Setting How Trailing Edge Margins Are Detected
93
Setting the Remote Switching Mode
93
Setting the Transmission System 1
94
Setting Communication Control 1
95
Setting the Waiting Period to Prevent Echo Problems at the Sender
96
Setting Communication Control 2
97
Setting ECM Transmission
97
Setting ECM Reception
97
Setting the Frequency of the CED Signal
97
Setting Communication Control 3
98
Setting Communication Control 4
99
Setting the Number of Times of DIS Signal Reception
100
Setting Communication Control 5
100
Setting Communication Time 1
101
Setting Communication Time 2
102
Setting the T2 Time-Out Time
103
Setting the Tb2 Time-Out Time
104
Setting the Tc Time-Out Time
104
Setting the Td Time-Out Time
104
Setting Modem 1
105
Setting Modem 2
106
Setting the NCU
107
Setting the Connection to PBX/PSTN
107
Setting PSTN Dial Tone Detection
107
Setting Busy Tone Detection
108
Outputting Lists
109
FAX Function Customize
110
Setting the Software Switches
111
Communication Time Setting
112
Modem Setting
112
NCU Setting
112
Calling Time Setting
112
Clearing the Print Coverage Data
113
Setting Backup Data Reading/Writing
114
Supplement
116
Checking the Copy Counts
116
Clearing the All Copy Counts and Machine Life Counts (One Time Only)
117
Checking Machine Life Counts
117
Data Capture Mode
118
Memory Data Individual Setting
118
Service Mode
119
Executing a Service Mode
119
Description of Service Mode
120
Service Status Page
121
Detail of Service Status Page
123
Printing a Status Page for Network
127
Printing a Test Page
128
Entering Initial Value for Replacing the Developing Unit
129
Performing Developer Refresh
130
Performing Drum Surface Refreshing
131
Performing LSU Cleaning
131
Setting Altitude Adjustment
132
Setting Main Charger Output
132
FAX Country Code
133
FAX Call Setting
134
Setting Remote Diagnostics
135
1-4 Troubleshooting
137
Paper Misfeed Detection
137
Paper Misfeed Detection Condition
138
Self-Diagnostic Function
142
Self Diagnostic Codes
143
Image Formation Problems
164
No Image Appears (Entirely White)
164
No Image Appears (Entirely Black)
164
No Image Appears (Entirely Black)
165
No Image Appears (Entirely White)
165
A Specific Color Is Printed Solid
166
The Back Side Gets Dirty
166
Image Is too Light
166
The Background Is Colored
167
White Streaks Are Printed Vertically
167
Black Streaks Are Printed Vertically
167
Streaks Are Printed Horizontally
168
Spots Are Printed
168
The Leading Edge of Image Begins to Print too Early or too Late
168
Paper Is Wrinkled
168
Offset Occurs
169
Part of Image Is Missing
169
Fusing Is Loose
169
Colors Are Printed Offset to each Other
170
Electric Problems
171
Mechanical Problems
176
Send Error Code
178
Scan to SMB Error Codes
178
Scan to FTP Error Codes
179
Scan to E-Mail Error Codes
181
Error Codes
183
Table of General Classification
184
U004XX Error Code Table: Interrupted Phase B
186
U006XX Error Code Table: Problems with the Unit
186
U008XX Error Code Table: Page Transmission Error
186
U009XX Error Code Table: Page Reception Error
186
U010XX Error Code Table: G3 Transmission
187
U011XX Error Code Table: G3 Reception
188
U017XX Error Code Table: V.34 Transmission
189
U018XX Error Code Table: V.34 Reception
189
1-5 Assembly and Disassembly
191
Precautions for Assembly and Disassembly
191
Drum
191
Toner
191
How to Tell a Genuine Kyocera Toner Container
192
Outer Covers
193
Detaching and Refitting the Rear Upper Cover, Right Upper Cover, Left Upper Cover and
193
Detaching and Refitting the Right Rear Cover, Right Cover and Right Lower Cover
196
Detaching and Refitting the Left Rear Cover, Left Cover and Left Lower Cover
199
Detaching and Refitting the Inner Cover
201
Paper Feed Section
203
Detaching and Refitting the Retard Roller Unit
203
Detaching and Refitting the Paper Feed Roller Unit
205
Detaching and Refitting the MP Paper Feed Roller
207
Developing Section
209
Detaching and Refitting the Developing Unit
209
Drum Section
211
Detaching and Refitting the Drum Unit
211
Transfer/Separation Section
212
Detaching and Refitting the Intermediate Transfer Unit
212
Detaching and Refitting the Transfer Roller Unit
215
Fuser Section
216
Detaching and Refitting the Fuser Unit
216
Pwbs
217
Detaching and Refitting the Engine PWB
217
Detaching and Refitting the Power Source PWB
219
Detaching and Refitting the Main PWB
220
Detaching and Refitting the High Voltage PWB
225
Detaching and Refitting the FAX Control PWB (4 in 1 Model (with FAX) Only)
226
Drive Section
227
Detaching and Refitting the MP Feed Drive Unit
227
Detaching and Refitting the Drum/Developing Drive Unit
228
Detaching and Refitting the Paper Feed Drive Unit
230
Detaching and Refitting the Fuser Pressure Drive Unit
231
Detaching and Refitting the Middle Transfer Drive Unit
233
Optical Section
235
Detaching and Refitting the Laser Scanner Unit
235
Detaching and Refitting the Scanner Unit
238
Detaching and Refitting the Image Scanner Unit
242
Detaching and Refitting the Document Processor
268
Detaching and Refitting the DP Paper Feed Pulley Unit
272
Detaching and Refitting the DP Separation Pad
276
Detaching and Refitting the DP Drive PWB
277
Detaching and Refitting the Paper Conveying Unit
278
Others
278
Detaching and Refitting the Operation Panel
280
Detaching and Refitting the Power Source Inlet
281
Direction of Installing the Principal Fan Motors
283
Upgrading the Firmware
285
Remarks on Engine PWB Replacement
287
Paper Feed/Conveying Section
288
Cassette Paper Feed Section
288
Cassette Paper Feed Section Block Diagram
289
MP Tray Paper Feed Section
290
Paper Conveying Section
292
Drum Section
294
Drum Section Block Diagram
295
Developing Section Diagram
296
Image Scanner Section
298
Optical Section Diagram
298
Image Scanner Unit (ISU)
299
Scanner Unit Block Diagram
300
Laser Scanner Section
301
Laser Scanner Unit (LSU)
301
Laser Scanner Unit Block Diagram
302
Intermediate Transfer Unit Section
303
Transfer/Separation Section Diagram
303
Intermediate Transfer Unit Section Block Diagram
304
Secondary Transfer Roller Section
305
Fuser Section Diagram
306
Eject/Feedshift Section
308
Duplex Conveying Section
310
Document Processor
312
Original Feed Section
312
Original Feed Section Block Diagram
313
Original Conveying Section
314
Original Conveying Section Block Diagram
315
Original Switchback/Eject Sections
316
Original Switchback/Eject Sections Block Diagram
317
Electrical Parts Layout
318
Pwbs Location
318
List of Correspondences of PWB Names
320
Switches and Sensors
321
Motors
323
Others
325
Document Processor Diagram
326
Pwbs Diagrams
328
1-6 Requirements on PWB Replacement
285
2-1 Mechanical Construction
288
2-2 Electrical Parts Layout
318
2-3 Operation of the Pwbs
328
Power Source PWB
328
Main PWB
340
Drum Relay PWB
347
DP Drive PWB
350
Maintenance Kits
354
2-4 Appendixes
354
Appendixes
354
Repetitive Defects Gauge
355
Firmware Environment Commands
356
Using FRPO Commands for Reprogramming Firmware
356
Maintenance Commands
362
Adjusting the Scanner Magnification
363
Adjusting the Scanner Leading Edge Registration
364
Adjusting the Scanner Center Line
365
Adjusting the Scanning Position for Originals from the DP
366
Adjusting the DP Magnification
367
Adjusting the DP Scanning Timing
368
Adjusting the DP Center Line
369
Wiring Diagram
370
Other manuals for Kyocera Ecosys M6526cdn
Operation Guide
579 pages
4
Based on 1 rating
Ask a question
Give review
Questions and Answers:
Need help?
Do you have a question about the Kyocera Ecosys M6526cdn and is the answer not in the manual?
Ask a question
Kyocera Ecosys M6526cdn Specifications
General
Brand
Kyocera
Model
Ecosys M6526cdn
Category
All in One Printer
Language
English
Related product manuals
Kyocera ECOSYS M6526cidn
375 pages
Kyocera ECOSYS M6530cdn
426 pages
Kyocera ECOSYS M6535cidn
433 pages
Kyocera ECOSYS M6026
6 pages
Kyocera ECOSYS M6030cdn
409 pages
Kyocera ECOSYS M6035cdn
426 pages
Kyocera ECOSYS M6035cidn
433 pages
Kyocera ECOSYS M6026cidn
375 pages
Kyocera ECOSYS M6026cdn Type B
579 pages
Kyocera ecosys M2735DW
438 pages
Kyocera ECOSYS M5526cdw
426 pages
Kyocera ECOSYS M3540idn
427 pages