User Guide
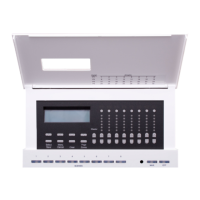
Leviton D4200 LCD Ver 2.0 Architectural Lighting Controller Page 34 of 80
Step 9: Press the Select/Save button to record the new setting.
Step 10: Exit the Programming and Configuration Level menu.
1.4 - Setting the Time Master Flag
This flag allows this D4200 station to take over as the Time Master. In
this mode, a Time Master is the unit on the network that emits the
time of day / date settings every 60 seconds. This helps all products
that use the time / date information to stay synchronized.
The automatic operating rules for this feature are as follows:
Step 1: Any unit which is active can be used to set the time and
thus send the time broadcast to synchronize the clocks in
all the other stations.
Step 2: If the station that has it’s clock set manually and has it’s
Time Master Flag set, it becomes the Time Master and
continues to automatically send the time every 60
seconds.
Step 3: If any station that is the current time master hears the
time broadcast, it gives up being the time master.
Step 4: If any station that has it’s Time Master Flag set and it
doesn’t hear the time broadcast for 120 seconds, it
attempts to become the time master by sending out a
time broadcast of it’s own internal clock data.
To enable this feature:
Step 1: Access the Programming and Configuration Level menu.
Step 2: Press the Menu/Cancel button.
Step 3: Press the Up and Down buttons until MISC.
SETTINGS? flashes on the LCD display.
Step 4: Press the Select/Save button.
FLAGS
flashes on the LCD display.
Step 5: Press the Select/Save button.
The Dimmer Readback value flashes.
Step 6: Press the Right button three times to move to the
next field.
The Time Master value flashes.
Step 7: Press the Up and Down buttons to change the
value.
“T” means the Time Master is ON.
“t” means the Time Master is OFF.