Do you have a question about the Leviton D4200 and is the answer not in the manual?
Essential safety guidelines for installation and operation, covering electrical codes, qualified electricians, and power safety.
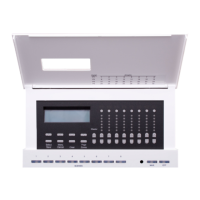
A step-by-step guide to properly install the D4200 Architectural Lighting Controller system.
Planning the lighting control system, considering power supply and wire size for optimal performance.
Details on calculating unit loads and maximum wire run lengths for the Luma-Net network.
Instructions for correctly terminating Luma-Net III wiring, including cable specifications and connection points.
Step-by-step instructions for connecting leads and securing the Phoenix connector for the D4200 unit.
Recommended procedures for testing wire pairs for shorts and opens to ensure proper system startup.
Guidance on energizing and setting up dimmer cabinets before connecting control stations to prevent conflicts.
Instructions for physically mounting the D4200 controller unit to the wall, including faceplate and cover attachment.
Initial power-up procedure and mandatory network ID assignment for the D4200 station.
Procedure to display the software version number and the assigned network ID of the D4200 station.
Overview of features accessible from the Main Menu Level, including schedules, sequencers, and settings.
Overview of features accessible from the Programming and Configuration Level, including zones, network, and settings.
Guide to using the programming/navigation buttons for menu interaction and value adjustment.
Step-by-step instructions to access the advanced Programming and Configuration Level menu for detailed setup.
Critical procedure for assigning a unique network ID (001-127) to each control station.
Explanation of how master and remote LCD stations interact and exchange information on the network.
Procedure for assigning dimmer circuit channel numbers to zones and setting the starting channel.
Entry point to the Miscellaneous Settings menu, covering Flags, Astro Time, and Max Zones.
Explanation of individually settable option flags like Dimmer Readback, Double Bump, LCD Backlight, Time Master, etc.
Guide to setting up the D4200 to control lights based on sunrise and sunset times using latitude.
Procedure to set the maximum number of zones supported by the station (8, 16, 24, or 32).
How to set up and manage different "personalities" for varied preset scenes and configurations.
Guide to programming up to 64 timed events using scenes, sequencers, or photocells.
How to set up timed sequences of scenes, which can run once or continuously.
Instructions for programming alphanumeric labels for scenes, MAX, OFF, or Zone ID buttons.
How to edit which zones are not included in recorded preset/scenes.
Procedure for setting the date and time, crucial for scheduler and astronomical time event accuracy.
How to configure the station for Daylight Saving Time based on geographic region.
Overview of Record Lock and Station Lock features for data protection and access control.
Procedure to set a code to prevent alteration of stored data like scenes and settings.
Procedure to set a code that restricts access to the controller for recording and editing data.
Steps to enable or disable the Record Lock feature after setting the code.
Steps to enable or disable the Station Lock feature after setting the code.
Instructions on how to enter a code to temporarily unlock the station for operation.
Explains the programming capabilities, including scenes, channels, and locking the station.
Details the function of the SCENE, MAX, and OFF buttons accessible with the cover closed.
Methods for changing lighting levels, either overall or for individual zones.
Using the MAX and OFF buttons to gradually or immediately set all lights to maximum or minimum levels.
How to adjust lighting levels for all zones concurrently using Master Up/Down buttons.
How to adjust lighting levels for specific zones using Zone Up/Down buttons.
Procedure to check programmed zone names and their current lighting levels.
Steps to record current lighting levels and fade times for a scene.
How to record or snapshot light levels from an entry station to a scene.
Customizing the MAX and OFF lighting levels to extend lamp life or for safety.
Instructions for operating the unit using the optional remote control.
Procedure to view currently scheduled events for the system.
Procedure to view programmed sequences and their associated commands.
Instructions for clearing the unit's memory and resetting it to factory default values.
| Voltage | 120 VAC |
|---|---|
| Neutral Required | Yes |
| Color | White |
| Product Type | Dimmer |
| Load Type | Incandescent |
| Wiring | 3-wire |
| Standards and Certifications | UL |
| Voltage Rating | 120V |
| Maximum Load | 600W Incandescent |
| Operating Temperature | 32°F to 104°F (0°C to 40°C) |
| Warranty | 5 Years |