Operation ProtoMat S
82 HB V0.9/Mrz-11 © 2011 LPKF AG
6
5. Remove the upper closure cap of the solder paste cartridge and plug in
the coupling of the plastic hose /3/. Turn the coupling to fix it on the
solder paste cartridge.
6. Loosen the lower fastening nut and plug the dispense adapter into the
fixing device on the right side of the mill/drill head.
7. Plug the dispense adapter connection cable into the jack on the camera
lighting system /1/.
♦ The dispense device is ready to operate.
6.9.2 Dispense process
Note
A production file with the prepared solder paste layer must be
created before the dispense process can start.
■ Dispense process
1. Click on File>Open to open the project file.
➨ The project file will be loaded and the project data is displayed in the window
“CAM view”.
2. Click on Toolpath>Dispense.
➨ The following window is shown:
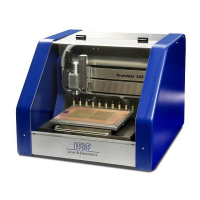
Fig. 56: Window
Dispense
3. Use the default values or enter new dispense parameters for the current
project.
4. Click [Run].
➨ The program is assigning the solder paste points.
5. Click on Wizards>Dispense preparation wizard.