Do you have a question about the LPKF ProtoMat S62 and is the answer not in the manual?
Document must be available and legible for all persons working on the machine.
Explains how different notations are used for better document orientation.
Explains warning symbols like danger to life/health and risk of material damage.
Details the machine's design purpose and compatible materials.
Lists prohibited materials and applications to prevent damage or injury.
Outlines critical safety measures for operation, tools, dust, and electricity.
Provides essential guidelines for machine operation, protection, and maintenance.
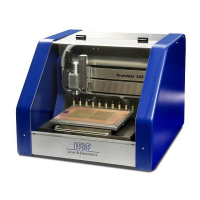
Identifies the main components of the plotter like acoustic cabinet and milling/drilling head.
Identifies optional components such as StatusLight, Camera, and Vacuum table.
Details the components of the basic milling/drilling head and with camera.
Identifies the traversing table, tool magazine, and vacuum table.
Explains main switch, fuse holder, mains connection, and rating plates.
Details the LPKF dust extraction unit and its operation.
Explains the movement and positioning of the milling/drilling head.
Explains how to adjust milling depth and width using the setting wheel.
Explains the movement of the traversing table in the Y direction.
Describes the tool magazine, its capacity, and tool loading.
Lists and categorizes the types of tools supported by the ProtoMat S62.
Explains the 2.5 D function for milling contours and cut-outs.
Describes manual operation for creating bores, structures, and post-processing.
Explains using CAD data with CircuitCAM for production.
Provides step-by-step instructions for powering on the ProtoMat S62.
Guides on how to launch and start the BoardMaster software.
Explains the procedure for safely shutting down the ProtoMat S62.
Explains the different parts of the BoardMaster user interface.
Details frequently used functions callable from the function bar.
Move or copy projects on the work area using mouse.
Save and move to focus positions using SetFocus and Focus.
Describes how to activate the 2.5 D processing mode.
Explains moving the head to pause, home, or zero positions.
How to move the head incrementally using arrow buttons in X/Y.
How to move the head directly using mouse input.
How to move the head vertically using Z axis controls.
Step-by-step guide for removing the plastic base/brush head.
Details loading and positioning base material on the traversing table.
Explains how to define the work area by setting corners.
How to input material thickness and underlay height in BoardMaster.
How to select and assign specific tools to magazine positions.
Details the physical insertion of tools into the magazine holders.
Step-by-step guide for adjusting the camera focus.
Steps to create a milling track with selected tools and movements.
How to adjust milling depth and width for optimal results.
Steps to prepare the plotter for creating pass holes.
Instructions for drilling pass holes into the plastic strips.
Steps to prepare the plotter and vacuum table for pass hole creation.
Details drilling pass holes into strips on the vacuum table.
How to drill pass holes into the sinter plate after parameter adjustment.
Assumes plotter is on, material fixed, and work area set up.
How to select the correct phase file for the desired production type.
How to open or create a new job containing production data.
How to save the current job under a new name or overwrite the existing one.
Explains displaying and setting up required tools in the Tool Positions window.
How to select and assign specific tools for each position in the magazine.
Details the physical insertion of tools into the magazine holders.
How to select and set up the next production phase.
How to activate data elements (all, areas, segments) for production.
Conditions and considerations for setting up 2.5 D processing.
How to start the production phase after setup.
How to adjust milling depth and width during production.
How to interrupt or stop the current production phase.
How to end the production process, save status, or abort.
How to clean surfaces and perform visual inspections of the machine.
Details cleaning procedures for the milling depth limiter and collet chuck.
Instructions for replacing fuses in the circuit board plotter.
How to configure tool holder positions for correct tool changes.
How to adjust the camera if the image is not focused or results are incorrect.
How to recalibrate fiducial recognition if needed.
Lists causes and remedies for connection errors during BoardMaster startup.
Lists causes and remedies for common system errors like lighting or dust extraction.
Steps for safely switching off and disconnecting the ProtoMat S62.
Instructions for transporting the ProtoMat S62, including fitting braces.
Guidance on disposing of the machine and its components responsibly.
| Positioning accuracy | ± 0.01 mm |
|---|---|
| Spindle speed | up to 60, 000 rpm |
| Tool change | Automatic |
| Tool changer capacity | up to 6 tools |
| Interface | USB |
| Type | PCB Plotter |
| Tool Types | Milling tools, drilling tools |
| Software | CircuitPro |
| Travel speed | 150 mm/s |
| Supported materials | FR4, aluminum |
| Power supply | 100-240 V, 50/60 Hz |