STARTING AND DRIVING
ALLISON TRANSMISSION
Oil and Filter Change
WARNING
Avoid contact with the hot uid or the
sump when draining transmission uid.
Direct contact with the hot uid or the hot
sump may result in bodily injury.
NOTE
Do not drain the transmission uid if only
lters are being replaced.
NOTE
At each uid change, examine the drained
uid for evidence of dirt or water. A normal
amount of condensation appears in the
uid during operation.
Drain Fluid
1 Drain the uid when the transmission
is at operating temperature of 71–
93°C (160–200°F). Hot uid ows
quicker and drains more completely.
2 Remove the drain plug from the
control module and allow the uid to
drain into a suitable container.
3 Examine the uid for contamination.
CAUTION
Do not use the bolts to draw the lter
covers to the control module. Do not use
an impact wrench to tighten the bolts.
Using an impact wrench to tighten the
bolts may cause stripped threads and
expensive parts replacement. Use a
torque wrench to tighten the bolts.
Replace Filters
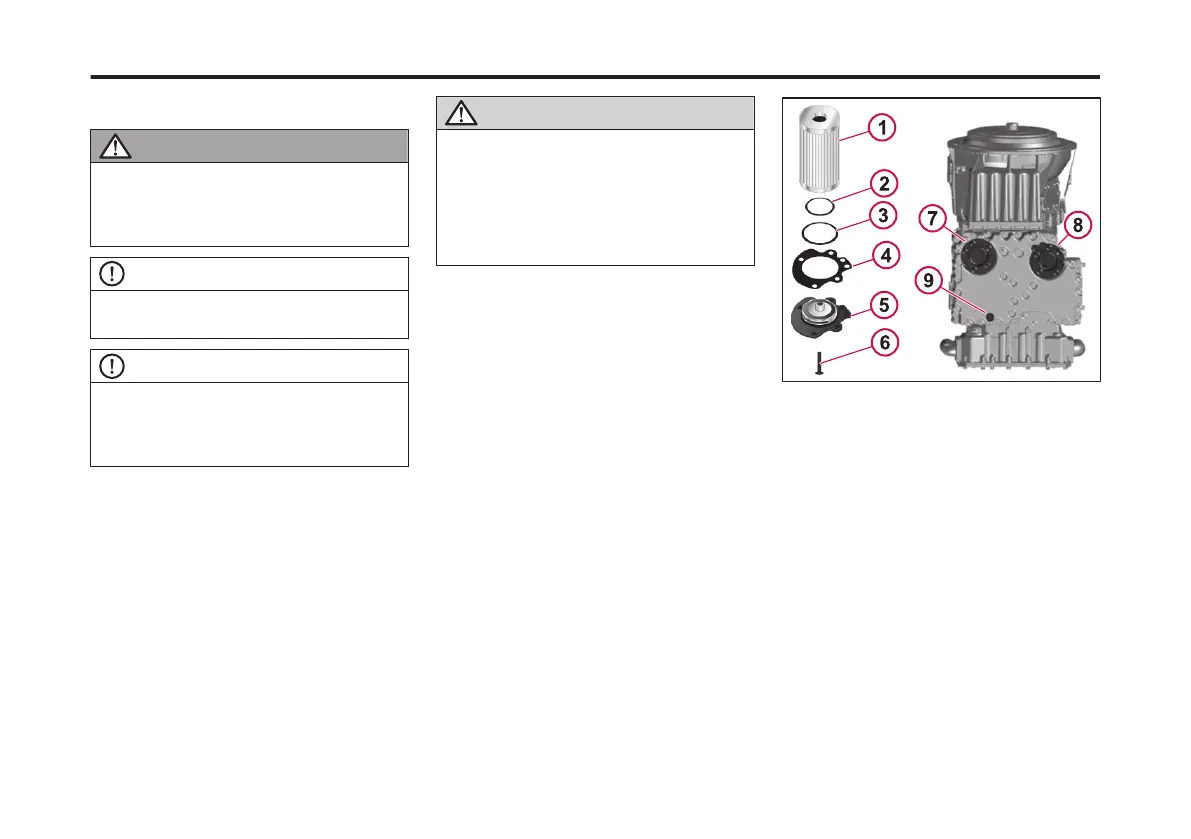
1 Remove 12 bolts (6), two lter covers
(5), two gaskets (4), four O-rings (2
and 3), and two lters (1) from the
bottom of the control module.
2 When reinstalling parts, lubricate and
install new O-rings (2 and 3) on each
lter cover (5). Lubricate O-ring
inside lter (1) and push lter onto
cover (5). Install new gaskets (4) on
cover (5) and align holes in gaskets
with holes in cover.
3 Install lter and cover assemblies
into the lter compartment. Align
each lter/cover assembly with the
holes in the channel plate/sump.
Push the cover assemblies in by
hand to seat the seals.
4 Install 12 bolts into lter cover and
tighten to 51–61 Nm (38–45 lb ft).
5 Replace the drain plug O-ring. Install
the plug and tighten to 25–32 Nm
(18–24 ft-lb).
1 Filter
2 O-ring
3 O-ring
4 Gasket
5 Filter Cover
6 Bolt
7 Lube Filter
8 Main Filter
9 Drain Plug
168
X Publication_PC28