Home
NEC
Telephone
UX5000
Resource Manual
Page 154 (Figure 6-8 Data Backup Screen)
NEC UX5000 - Figure 6-8 Data Backup Screen; Figure 6-9 Data Backup Destination
220 pages
Manual
To Next Page
To Next Page
To Previous Page
To Previous Page
Loading...
UX5000 IP Data Maintenance
6 - 10
Data Maintenance T
ool
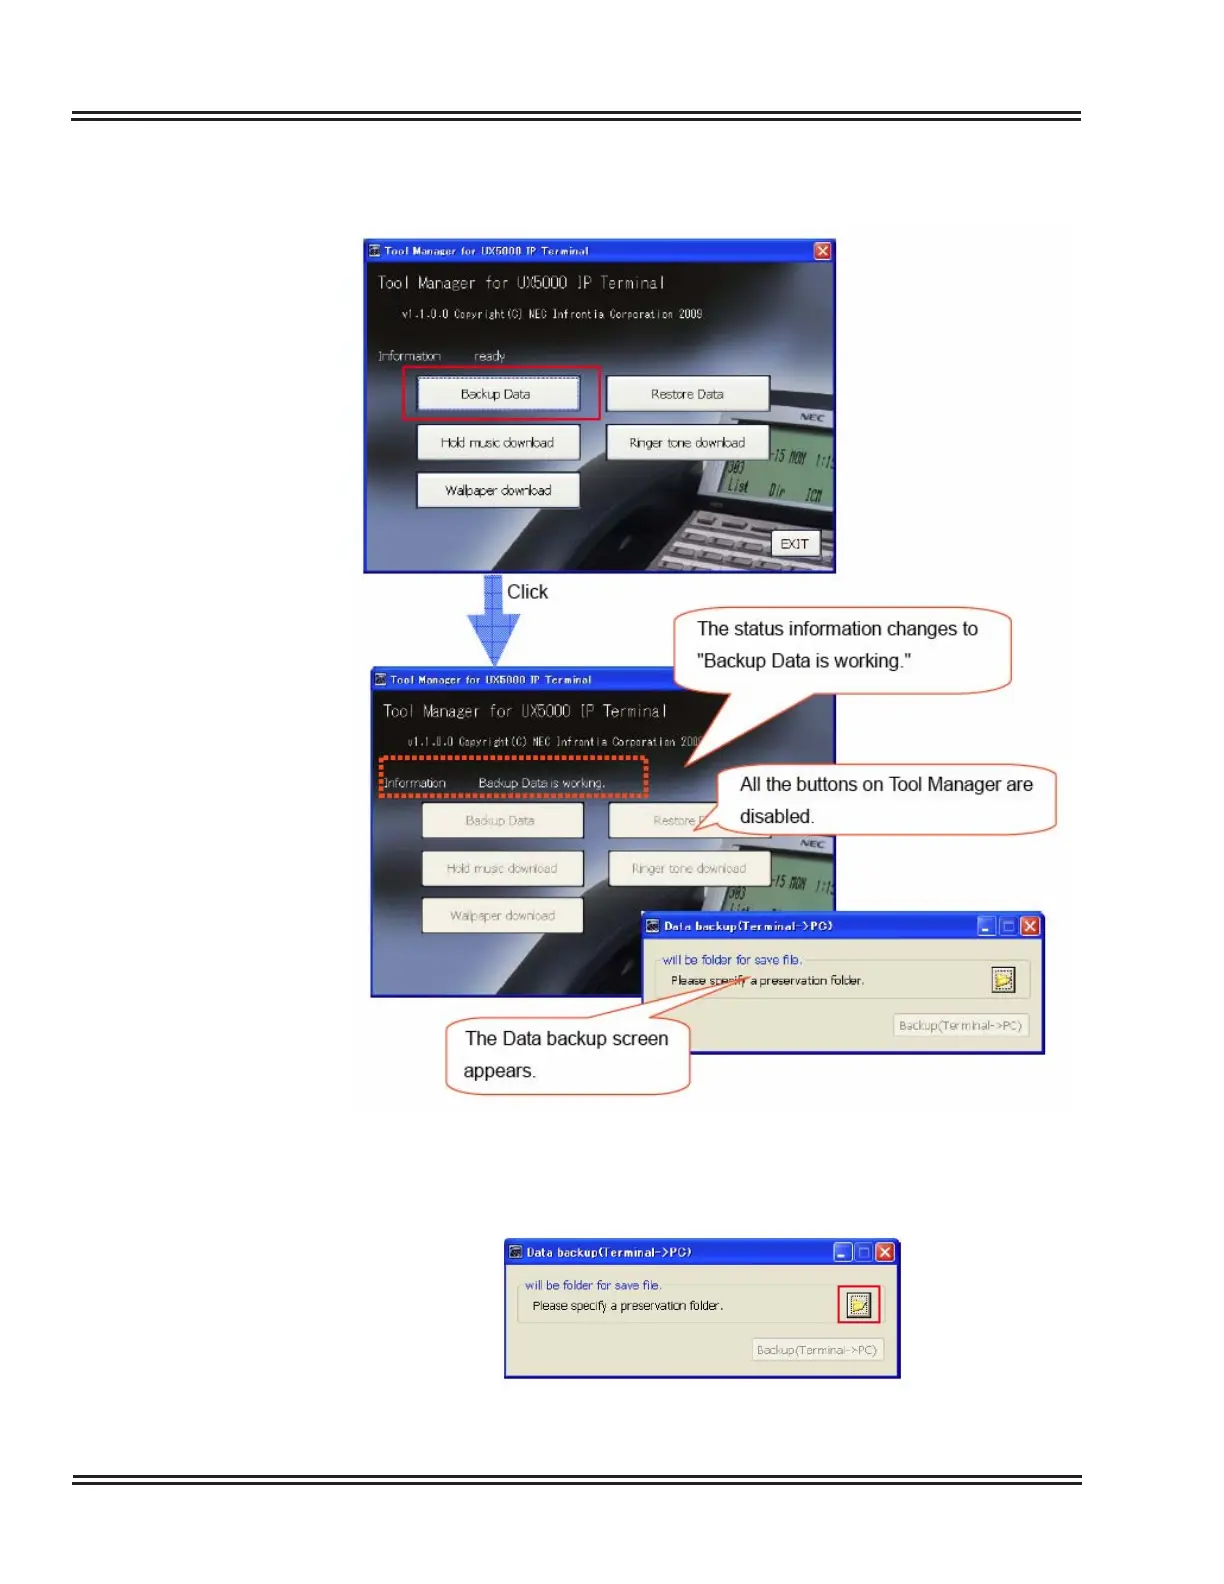
[Procedure]
1.
Click the [Backup Data] button on T
ool Manager
.
2.
Click the folder icon on the Data Backup screen.
Figure 6-8 Data Backup Screen
Figure 6-9 Data Backup Destination
153
155
Table of Contents
Main Page
Default Chapter
3
Table of Contents
3
Chapter 1 IP Phone Manager
13
Introduction
13
Installation
14
Figure 1-1 Select Interface Screen
14
Figure 1-2 IP Phone Manager Screen
15
Main Screen
16
Figure 1-3 Main Screen
16
Searching for Terminals
19
Figure 1-4 Searching for Terminals
19
Figure 1-5 Search Results
20
Figure 1-6 Input IP Address Screen
21
Figure 1-7 Direct Terminal Update Results
21
Figure 1-8 Import File Screen
22
Figure 1-9 Import Process
23
Figure 1-10 Terminal Connection Screen
25
IP Phone Manager Commands
26
Figure 1-11 IP Phone Manager Commands Screen
26
Figure 1-12 Send until Successful Method
27
Figure 1-13 Transmit IP Phone Screen
27
Figure 1-14 Command Drop-Down List
29
Figure 1-15 Switchportctrl Screen
30
Figure 1-16 Command Drop-Down List
31
Figure 1-17 Terminal Reset Screen
32
Figure 1-18 Command Drop-Down List
33
Figure 1-19 Securitylock Feature Screen
34
Figure 1-20 Command Drop-Down List
35
Figure 1-21 Data Reset Screen
36
Figure 1-22 Command Drop-Down List
37
Figure 1-23 Download Option Screen
37
Figure 1-24 Ipphone Edit Screen
40
Figure 1-25 Download Process Screen
41
Figure 1-26 Download Process Completed
42
Figure 1-27 Command Drop-Down List
43
Figure 1-28 Backup/Restore Screen
44
Figure 1-29 Backup Process Screen
46
Figure 1-30 Restore Process Screen
46
Figure 1-31 Backup Process Completed
47
Figure 1-32 Restore Process Completed
48
Figure 1-33 Command Drop-Down List
49
Figure 1-34 Error Log Screen
50
Figure 1-35 Error Log Process Screen
52
Figure 1-36 Error Log Complete
53
Config Application
54
Figure 1-37 Web Config Application Screen
54
Status Messages
55
IP Terminal Autoconfig Setup
59
Introduction
59
Figure 2-1 Network Operation and Topology
59
Dhcp Setup and Configuration
60
Figure 2-2 Selecting Server
60
Figure 2-3 Defining Vendor Class
61
Figure 2-4 Enter Name
61
Figure 2-5 Select Server
62
Figure 2-6 Select Option Class
63
Figure 2-7 Add NEC Option Codes
63
Figure 2-8 141 FTP Server Settings
64
Figure 2-9 151 File Name Settings
64
Figure 2-10 163 Protocol Settings
65
Figure 2-11 Scope Options
65
Figure 2-12 Scope Options - Advanced
66
Figure 2-13 Scope Advanced Tab - FTP IP Address
67
Figure 2-14 Scope Advanced Tab - File Name
68
Figure 2-15 Scope Advanced Tab - FTP Byte Data
69
Figure 2-16 Vendor Options Available to UX5000 IP Terminals
70
Auto Configuration Application File Setup
71
Figure 2-17 Home Screen
71
Figure 2-18 Build Configuration File - Select Auto Config or Full Config
72
Figure 2-19 Configuration Screen
73
Figure 2-20 Manual Version Entry
74
Figure 2-21 Multiple Configuration Screen
75
Figure 2-22 Data Entry Field Screen
77
Figure 2-23 Value Screens for Multiple Configurations
78
Figure 2-24 Single Configuration Save Screen
79
Figure 2-25 Multiple Configuration Save Screen
80
Figure 2-26 Save Existing File Screen
82
Figure 2-27 Data Restore Screen
83
Auto Config Setup Example
84
Figure 2-28 Build Configuration File - Auto Config Tab
84
Figure 2-29 Build Configuration File - Select Terminal
85
Figure 2-30 Build Configuration File - Select Auto Config or Full Config
85
Figure 2-32 Build Configuration File - Assign 1St Server Address
86
Figure 2-31 Build Configuration File - Select Server IP Address/Server Port
86
Figure 2-33 Build Configuration File - Assign 1St Server Port
87
Figure 2-34 Build Configuration File - Save Config Setup File
88
Figure 2-35 Anonymous FTP Server Configuration Settings Example
89
Figure 2-36 Anonymous FTP Server Configuration Settings Example - Advanced Tab
90
Figure 2-37 Anonymous FTP Server Configuration Settings Example
91
XML Applications
95
Introduction
95
Figure 3-1 UX5000 Terminal with XML
95
Installation Setup
96
Figure 3-2 XML Server Installation - Add Remove Components
96
Figure 3-3 XML Server Installation - Windows Component Screen
97
Figure 3-4 XML Server Installation - Add ISS
97
Figure 3-5 XML Server Installation - Sample SYSOC.INF File
98
Figure 3-6 XML Server Installation - Firewall
99
Figure 3-7 XML Server Installation - Run Window
99
Figure 3-8 XML Server Installation - Command Window
100
Figure 3-9 XML Server Installation - Framework Window
100
Figure 3-10 XML Server Installation - Installing ASP.NET
101
Figure 3-11 XML Application Setup - Download and Unzip .ZIP File
102
Figure 3-12 XML Application Setup - License Agreement
103
Figure 3-13 XML Application Setup - Installation Status
103
Figure 3-14 XML Application Setup - SQL Server Express Installation
104
Figure 3-15 XML Application Setup - XML Application Setup Wizard
105
Figure 3-16 XML Application Setup - Software License Agreement
106
Figure 3-17 XML Application Setup - Select Installation Folder Location
106
Figure 3-18 XML Application Setup - Confirm Installation
107
Figure 3-19 XML Application Setup - Installation Complete
107
Figure 3-20 XML Suite Web Configuration - Login Form
109
Figure 3-23 XML Suite Web Configuration - User List
112
Figure 3-24 XML Suite Web Configuration - Add User
113
Figure 3-27 XML Suite Web Configuration - Alarm Clock
116
Figure 3-28 XML Suite Web Configuration - Weather
117
Figure 3-29 XML Suite Web Configuration - Photo Album
118
Figure 3-30 XML Suite Web Configuration - Outlook Integration
119
Figure 3-31 XML Suite Web Configuration - Outlook Synchronization
120
Figure 3-32 XML Suite Web Configuration - Icon in System Tray
120
Figure 3-37 Terminal Web Configuration - Home URL
125
Figure 3-38 Enable XML Application on Terminal
126
Figure 3-39 Enable XML Application on Terminal - Enter Pin
126
Figure 3-40 Terminal Display Screen - Home
127
Figure 3-41 Terminal Display Screen - System
128
Figure 3-42 Terminal Display Screen - Clock & Calendar
129
Figure 3-43 Terminal Display Screen - Alarm
130
Figure 3-44 Terminal Display Screen - Weather Display
131
Figure 3-45 Terminal Display Screen - Weather Zip Code Assignment
131
Figure 3-46 Terminal Display Screen - Photo Album Display
132
Chapter 4 Download Ring Tones and MOH
133
Ring Tone Specifications
133
Figure 4-1 Ring Tone Upload - Save to Local Directory
134
Figure 4-2 Ring Tone Upload - Start TFTP/FTP on PC
135
Figure 4-3 Ring Tone Upload - Point TFTP/FTP to Ring Tone File
135
Figure 4-4 Ring Tone Upload - Enter File Name
136
Figure 4-5 Ring Tone Terminal Settings
137
Music on Hold (Moh) Tone Format
138
Figure 4-6 Music on Hold - Save to Local Directory on PC
138
Figure 4-7 Music on Hold - Start TFTP/FTP on PC
139
Figure 4-8 Music on Hold - Point TFTP/FTP to Ring Tone File
139
Figure 4-9 Music on Hold - Enter File Name
140
Figure 4-10 Music on Hold - Download
141
Figure 4-11 Sound Recorder - Start Program
142
Figure 4-12 Sound Recorder - Sound Selection
142
DT Archiver
143
Introduction
143
Figure 5-1 DT Archiver - Compress Files
143
Figure 5-2 DT Archiver - Decompress Files
144
Figure 6-1 Main Screen Layout
146
DT Archiver Introduction
143
Usage Restrictions
147
Before Use
148
Figure 6-2 Installation Screen
148
Figure 6-3 Microsoft .NET Framework 2.0 Installation
149
Figure 6-4 Visual C++ Runtime Library (X86) Installation
149
Figure 6-5 Add/Remove Program Control Panel Window
150
Figure 6-6 Remove Program Screen
150
Tool Manager
151
Figure 6-7 Main Screen
152
Figure 6-8 Data Backup Screen
154
Figure 6-9 Data Backup Destination
154
Figure 6-10 Backup Directory
155
Figure 6-11 Creating a New Directory Folder
155
Figure 6-12 Backup Directory Path
155
Figure 6-13 Upload Selection Screen
156
Figure 6-14 Upload Progress Screen
156
Figure 6-15 Upload Successful
157
Figure 6-16 Error Screen
157
Figure 6-17 Restore Data Screen
158
Figure 6-18 Select Download File Screen
159
Figure 6-19 Select Download File
159
Figure 6-20 Restore File Directory Path
159
Figure 6-21 Upload Selection Screen
160
Figure 6-22 Download Progress Screen
160
Figure 6-23 Download Successful
161
Figure 6-24 Error Screen
161
Figure 6-25 Download Hold Music Screen
162
Figure 6-26 Download Type
163
Figure 6-27 File Selection
163
Figure 6-28 File Selection Screen with Sample Entries
164
Data Maintenance Tool
166
Figure 6-29 Optimization Button
168
Figure 6-30 after Clicking [Optimization] Button
169
Figure 6-31 Verify Audio File
170
Figure 6-32 Download (PC -> Terminal) Button
170
Figure 6-33 Upload Selection Screen
171
Figure 6-34 Download Progress Screen
172
Figure 6-35 Download Successful
172
Figure 6-36 Error Screen
173
Figure 6-37 Download Ringer Tone
174
Figure 6-38 Download Screen
175
Figure 6-39 Volume Adjustment
176
Figure 6-40 Wallpaper Download Screen
177
Figure 6-41 Wallpaper Download Type
178
Figure 6-42 Select File
178
Figure 6-43 after Selecting Wallpaper File
179
Figure 6-44 Wallpaper Optimization
183
Figure 6-45 after Selecting Optimization for Wallpaper
184
Figure 6-46 Optimized/Transmittance Example
184
Figure 6-47 Wallpaper Download
185
Figure 6-48 Upload Selection Screen
186
Figure 6-49 Download Progress Screen
187
Figure 6-50 Download Successful
187
Figure 6-51 Error Screen
188
Chapter 7 IP Terminal Features
195
Introduction
195
Display: Ability to Turn off Display
196
Multilingual Language Support for IP Terminal Displays
199
Wallpaper Graphic for IP-CTS Terminals
207
XML: Automatic Launch of XML Application
209
Xml: Pop -U P of Station Display Information for Ip-Cts
210
Section 11 Xml: Xml Application Always Displayed
217
Other manuals for NEC UX5000
Manual
588 pages
User Guide
24 pages
Hardware Manual
370 pages
Feature Handbook
180 pages
Easy Setup Guide
68 pages
Installation Manual
86 pages
User Manual
2 pages
Quick Setup Guide
22 pages
Adjustment Instructions
4 pages
Related product manuals
NEC UT880
100 pages
NEC Univerge SV9100
766 pages
NEC Univerge SV 9500
263 pages
NEC UNIVERGE ITK-6D-1U
94 pages
NEC UNIVERGE DTK-24D-1P
94 pages
NEC UNIVERGE DTK-12D-1P
94 pages
NEC UNIVERGE SV9100 DT750
122 pages
NEC Univerge SV8100 DT310
78 pages
NEC UNIVERGE SV9300 DT410
100 pages
NEC UNIVERGE DT920 Series
94 pages
NEC UNIVERGE DT300 Series
41 pages
NEC SoundTel NEC Univerge SV9100
8 pages