165
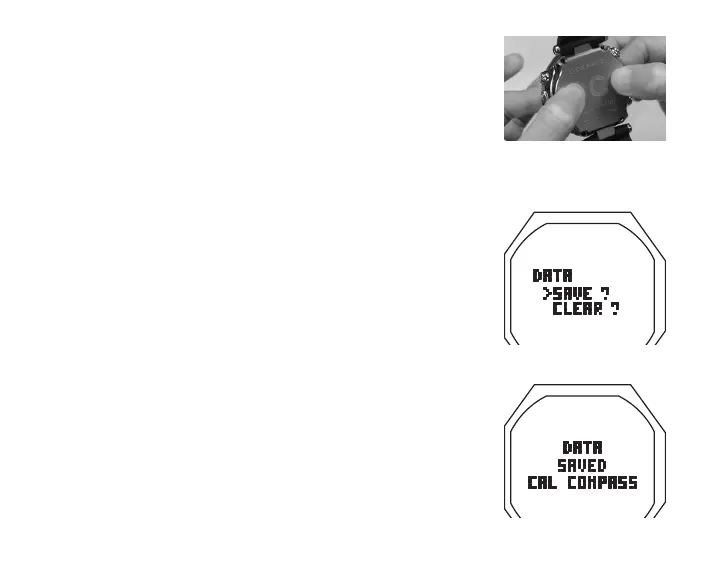
• While ensuring that the front and back of the case or
properly aligned, firmly press them evenly and completely
together (Fig. 167).
• While holding the sections firmly together, insert the (4)
retaining screws and tighten them until secure by turning
them clockwise with a small flat tip 3mm screw driver.
Fig.167-PRESSFRONT
ANDBACKTOGETHER
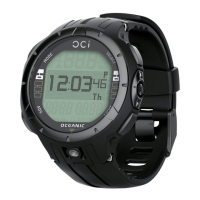
Fig.168-SELECT
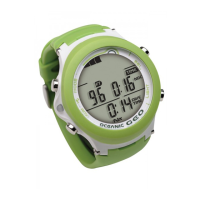
Fig.169-DATASAVED
Testing
> Ensure that the LCD is clear and sharp in contrast. If any
portions are missing or appear dim, or if a Low Battery
condition is indicated, return the OC1 with TMTs to an
Authorized Oceanic Dealer for evaluation before use.
> During 24 hours after completion of a dive, the graphic
DATA with selections SAVE ? and CLEAR ? will be
displayed (Fig. 168) giving you the option to retain or
delete Ni-O2 calculations for repetitive dives.
• A (< 2 sec) to toggle between SAVE and CLEAR
• S (< 2 sec) to save the selection
> Graphics DATA SAVED (or CLEARED) with CAL COMPASS
appear for 3 seconds (Fig. 169), then operation reverts to
the Compass CAL screen.
> Calibrate the Compass. Refer to page 146.
> Verify all Set Points prior to diving.
• Pressurize the Regulator Assembly (and Transmitter).
• Verify that the Link icon is displayed.
• Check the TMT Status screens. Refer to page 75.