i
Table of Contents
Precautions before Use ............................ iv
List of Menu Options .................................. v
1 Names and Descriptions ................... 9
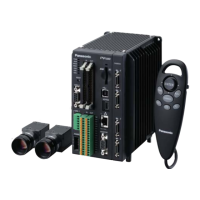
1.1 PV500 ........................................................................ 10
1.2 Camera ...................................................................... 12
1.2.1 Camera Type and Precautions for Use ................ 12
1.2.2 Quad-speed/ 2-Mega-pixel Digital Camera ......... 13
1.2.3 Ultra Compact Double Speed Digital Camera ..... 14
1.2.4 0.3-Mega Compact Gray Camera (ANPVC5030)15
1.2.5 Camera Cable ........................................................ 15
1.3 Keypad ....................................................................... 17
1.4 XGA Monitor .............................................................. 18
2 Installation and Wiring ..................... 19
2.1 Basic System Configurations .................................... 20
2.2 PV500 Installation ...................................................... 21
2.2.1 Mounting Arrangement .......................................... 21
2.2.2 Note on Mounting ................................................... 22
2.3 Mounting a Camera ................................................... 23
2.3.1 Selecting a Lens (View Range Table) .................. 23
2.3.2 Mounting a Camera ............................................... 27
2.3.3 Note on Mounting ................................................... 28
2.4 XGA Monitor Installation ............................................ 29
2.5 Connecting Cables .................................................... 30
2.5.1 Connecting Peripherals ......................................... 30
2.5.2 Connecting Power to XGA Monitor ...................... 31
2.5.3 Connecting Power to PV500 ................................. 32
2.6 Supplying Power ........................................................ 34
3 Basic Operation................................ 35
3.1 About Windows.......................................................... 36
3.1.1 Language Selecting Window (Ver.1.10 or later) .. 36
3.1.2 SETUP Menu and RUN Menu .............................. 37
3.2 Basic Key Operation .................................................. 40
3.2.1 Selecting Items and Inputting Values or
Characters .............................................................. 40
3.2.2 Selecting a Display Image (Image Menu) ............ 42
3.2.3 Zooming In/out Image (Image Menu) ................... 46
3.2.4 Specifying Checker Area ....................................... 47
3.2.5 Copying the Screen Display (Print Screen) ......... 52
4 Setting Inspection Conditions ........ 53
4.1 Procedure for Setting Inspection ............................... 54
4.2 Selecting a Product Type No..................................... 55
4.2.1 What Is a Product Type? ....................................... 55
4.2.2 Selecting a Product Type ...................................... 55
4.3 Setting Capturing Conditions of Camera .................. 58
4.3.1 Selecting a Camera Type (ENVIRONMENT) ..... 59
4.3.2 Setting Individual Capturing Condition by Type .. 60
4.3.3 Selecting Capture Timing (Camera Trigger) ....... 61
4.3.4 Setting Capturing Condition for Each Camera .... 64
4.3.5 Error if Checker Area Outside Image ................... 73
4.4 Inspecting Divided Type (Execution Mode) .............. 74
4.4.1 Selecting an Execution Mode ............................... 74
4.4.2 Inspecting in “Execute All” Mode .......................... 75
4.4.3 Inspecting in “Automatic Switch” Mode ................ 75
4.4.4 Inspecting in “User Defined” Mode ....................... 78
4.5 Capturing an Image ................................................... 79
4.6 Image Preprocessing (Slice Level / Preprocess) ..... 80
4.6.1 Binarizing an Image (Slice Level) ......................... 80
4.6.2 Setting Preprocess ................................................ 81
4.7 Setting Inspection Area and Conditions (Checker) .. 89
4.7.1 Types and Overview of Checkers ........................ 89
4.7.2 Creating a Checker ................................................ 92
4.7.3 Moving Checkers in Group ................................... 96
4.7.4 Line .......................................................................... 97
4.7.5 Binary Window ..................................................... 101
4.7.6 Gray Window........................................................ 104
4.7.7 Binary Edge .......................................................... 106
4.7.8 Gray Edge ............................................................ 110
4.7.9 Feature Extraction ................................................ 115
4.7.10 Smart Matching .................................................... 121
4.7.11 Flaw Detection ..................................................... 136
4.7.12 Connector (Binary Window) and Connector
(Gray Window) ..................................................... 146
4.7.13 Connector (Gray Edge) ....................................... 151
4.7.14 Smart Edge (Circle) ............................................. 165
4.7.15 Smart Edge (Line) ................................................ 183
4.8 Adjusting Area Position (Position Adjustment) ....... 198
4.8.1 What Is Position Adjustment? ............................. 198
4.8.2 Position Adjustment Type ................................... 199
4.8.3 Setting a Position Adjustment ............................. 202
4.8.4 Applying Position Adjustment to Checkers ........ 207
4.9 Adjusting Area Size (Area Size Adjustment) .......... 208
4.10 Geometry Calculation of Detected Data ................. 211
4.10.1 What is Geometry Calculation? .......................... 211
4.10.2 Setting a Geometry Calculation .......................... 212