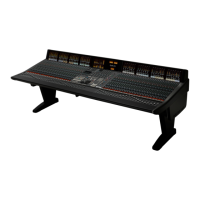
EasyManua.ls Logo

Solid State Logic Matrix2 Delta User Manual

Solid State Logic Matrix2 Delta
180 pages
To Next Page IconTo Next Page
To Previous Page IconTo Previous Page
Page #98 background image
Utility Buttons
ξ˜’ξ˜’ξ˜†ξ˜£ξ˜ƒξ˜ˆξ˜‰ξ˜ξ˜ƒξ˜ˆξ˜‰ξ˜Œξ˜‹ξ˜“ξ˜”ξ˜žξ˜†ξ˜Œξ˜‰ξ˜ˆξ˜…ξ˜†ξ˜“ξ˜‰ξ˜Œξ˜†ξ˜„ξ˜”ξ˜œξ˜ˆξ˜‰ξ˜ξ˜ƒξ˜Œξ˜ƒξ˜ˆξ˜‹ξ˜Œξ˜ƒξ˜ˆξ˜‹ξ˜“ξ˜†ξ˜‰ξ˜ξ˜ƒξ˜Œξ˜ˆξ˜‰ξ˜™ξ˜†ξ˜ˆξ˜Œξ˜†ξ˜™ξ˜”ξ˜ˆξ˜†ξ˜–ξ˜ˆξ˜ξ˜£ξ˜ƒξ˜ˆξ˜’ξ˜•ξ˜‰ξ˜‰ξ˜†ξ˜“ξ˜”ξš
The
BANK cursors cycle through the tracks in the DAW session 16 at a time. The
CHANNEL cursors cycle through the tracks in the DAW session one at a time.
ξ˜‚ξ˜ƒξ˜„ξ˜…ξ˜‡ξ˜„ξ˜—ξ˜ˆξ˜„ξ˜‡ξ˜›ξ˜—ξ˜…ξ˜‘ξ˜‡ξ˜Šξ˜†ξ˜ξ˜‘ξ˜£ξ˜‡ξ˜¬ξ˜ƒξ˜£ξ˜ξ˜ξ˜™ξ˜‡ξ˜„ξ˜—ξ˜…ξ˜‡ξ˜„ξ˜‰ξ˜ˆξ˜ξ˜œξ˜†ξ˜‡ξ˜ξ˜‘ξ˜‡ξ˜„ξ˜—ξ˜…ξ˜‡ξ˜†ξ˜…ξ˜†ξ˜†ξ˜ξ˜ƒξ˜‘ξ˜‡ξ˜ξ˜ˆξ˜’ξ˜‡ξ˜‘ξ˜ƒξ˜„ξ˜‡ξ˜ˆξ˜”ξ˜”ξ˜…ξ˜ˆξ˜‰ξ˜‡ξ˜ƒξ˜‘ξ˜‡ξ˜¦ξ˜ˆξ˜„ξ˜‰ξ˜ξ˜ͺξ˜‡ξ˜ξ˜‘ξ˜‡ξ˜„ξ˜—ξ˜…ξ˜‡ξ˜ƒξ˜‰ξ˜‹ξ˜…ξ˜‰ξ˜‡ξ˜„ξ˜—ξ˜ˆξ˜„ξ˜‡ξ˜„ξ˜—ξ˜…ξ˜’ξ˜‡ξ˜ˆξ˜‰ξ˜…ξ˜‡ξ˜‹ξ˜ξ˜†ξ˜”ξ˜Žξ˜ˆξ˜’ξ˜…ξ˜‹ξ˜‡ξ˜ξ˜‘ξ˜‡ξ˜„ξ˜—ξ˜…ξ˜‡
ARRANGE WINDOWξ˜‡ξ˜Šξ˜‘ξ˜Žξ˜…ξ˜†ξ˜†ξ˜‡ξ˜„ξ˜—ξ˜…ξ˜‡ARRANGEξ˜‡ξ˜₯ξ˜—ξ˜ˆξ˜‘ξ˜‘ξ˜…ξ˜Žξ˜‡ξ˜€ξ˜„ξ˜‰ξ˜ξ˜”ξ˜‡ξ™…ξ˜ξ˜…ξ˜›ξ˜‡ξ˜ξ˜ƒξ˜‹ξ˜… ξ˜ξ˜†ξ˜‡ξ˜†ξ˜…ξ˜Žξ˜…ξ˜ξ˜„ξ˜…ξ˜‹ξ˜‡ξ˜ξ˜‘ξ˜‡ξ˜„ξ˜—ξ˜…ξ˜‡ξ˜¬ξ˜ƒξ˜£ξ˜ξ˜ξ˜‡ξ˜ξ˜ƒξ˜‘ξ˜„ξ˜‰ξ˜ƒξ˜Žξ˜‡ξ˜†ξ˜Šξ˜‰ξ˜Œξ˜ˆξ˜ξ˜…ξ˜‡ξ˜†ξ˜…ξ˜„ξ˜‡ξ˜Šξ˜”ξ˜‡
ξ˜ξ˜…ξ˜‘ξ˜Šξ˜•ξ˜‡
ξ˜‚ξ˜ƒξ˜„ξ˜…ξ˜‡ξ˜„ξ˜—ξ˜ˆξ˜„ξ˜‡ξ˜„ξ˜—ξ˜…ξ˜‡ξ˜‘ξ˜žξ˜΄ξ˜‡ξ˜ˆξ˜‘ξ˜ˆξ˜Žξ˜ƒξ˜£ξ˜Šξ˜…ξ˜‡ξ˜ξ˜‘ξ˜”ξ˜Šξ˜„ξ˜†ξ˜‡ξ˜„ξ˜ƒξ˜‡ξ˜¦ξ˜ˆξ˜„ξ˜‰ξ˜ξ˜ͺξ˜‡ξ˜ˆξ˜‰ξ˜…ξ˜‡ξ˜ξ˜ͺξ˜…ξ˜‹ξ˜•ξ˜‡ξ˜₯ξ˜’ξ˜ξ˜Žξ˜ξ˜‘ξ˜£ξ˜‡ξ˜„ξ˜—ξ˜‰ξ˜ƒξ˜Šξ˜£ξ˜—ξ˜‡ξ˜„ξ˜—ξ˜…ξ˜‡ξ˜‘ξ˜žξ˜΄ξ˜‡ξ˜„ξ˜‰ξ˜ˆξ˜ξ˜œξ˜†ξ˜‡ξ˜›ξ˜ξ˜Žξ˜Žξ˜‡ξ˜„ξ˜—ξ˜…ξ˜‰ξ˜…ξ˜Œξ˜ƒξ˜‰ξ˜…ξ˜‡ξ˜‰ξ˜…ξ˜†ξ˜Šξ˜Žξ˜„ξ˜‡ξ˜ξ˜‘ξ˜‡ξ˜ˆξ˜‘ξ˜’ξ˜‡ξ˜”ξ˜—ξ˜’ξ˜†ξ˜ξ˜ξ˜ˆξ˜Žξ˜‡
ξ˜ˆξ˜Žξ˜ξ˜£ξ˜‘ξ˜ξ˜…ξ˜‘ξ˜„ξ˜‡ξ˜ƒξ˜Œξ˜‡ξ˜„ξ˜—ξ˜…ξ˜‡ξ˜„ξ˜‰ξ˜ˆξ˜ξ˜œξ˜†ξ˜‡ξ˜ξ˜‘ξ˜‡ξ˜„ξ˜—ξ˜…ξ˜‡ξ˜‘ξ˜žξ˜΄ξ˜‡ξ˜ˆξ˜‘ξ˜‹ξ˜‡ξ˜„ξ˜—ξ˜…ξ˜‡ξ˜ˆξ˜‘ξ˜ˆξ˜Žξ˜ƒξ˜£ξ˜Šξ˜…ξ˜‡ξ˜‰ξ˜…ξ˜„ξ˜Šξ˜‰ξ˜‘ξ˜†ξ˜‡ξ˜„ξ˜ƒξ˜‡ξ˜¦ξ˜ˆξ˜„ξ˜‰ξ˜ξ˜ͺξ˜‡ξ˜„ξ˜ƒξ˜‡ξ˜šξ˜…ξ˜‡ξ˜Žξ˜ƒξ˜†ξ˜„ξ˜•
ξ™œξ˜ξ˜ƒξ˜ˆξ˜Šξ˜†ξ˜—ξ˜ξ˜ξ˜ƒξ˜Œξ˜ˆξ˜šξ˜ƒξ˜˜ξ˜”ξ˜ˆξ™
SHIFT, CTRL, OPT/ALL and ๏/ALT) as well as the ESC and ENTER keys
ξ˜‹ξ˜Œξ˜ƒξ˜ˆξ˜žξ˜Œξ˜†ξ˜‰ξ˜†ξ˜…ξ˜†ξ˜„ξ˜‘ξ˜”ξ˜žξ˜ƒξ˜…ξ˜ξ˜ξ˜…ξ˜ˆξ˜‹ξ˜“ξ˜—ξ˜ˆξ˜‹ξ˜Œξ˜ƒξ˜ˆξ˜”ξ˜ξ˜†ξ˜™ξ˜“ξ˜ˆξ˜†ξ˜“ξ˜ˆξ˜‰ξ˜ξ˜ƒξ˜ˆξ˜–ξ˜Œξ˜†ξ˜“ξ˜‰ξ˜ˆξ˜žξ˜‹ξ˜“ξ˜ƒξ˜„ξ˜ˆξ˜™ξ˜ξ˜‰ξ˜ξ˜ˆξ˜‰ξ˜ξ˜ƒξ˜ξ˜Œξ˜ˆξ˜—ξ˜ƒξ˜–ξ˜‹ξ˜•ξ˜„ξ˜‰ξ˜ˆξš‘ξ™ ξ™€ξ˜ˆξ˜„ξ˜‹ξ˜’ξ˜ƒξ˜„ξ˜”ξ˜ξ˜ˆξ™€ξ˜“ξ˜ˆξ˜‹ξ˜—ξ˜—ξ˜ξ˜‰ξ˜ξ˜†ξ˜“ξ˜ˆ
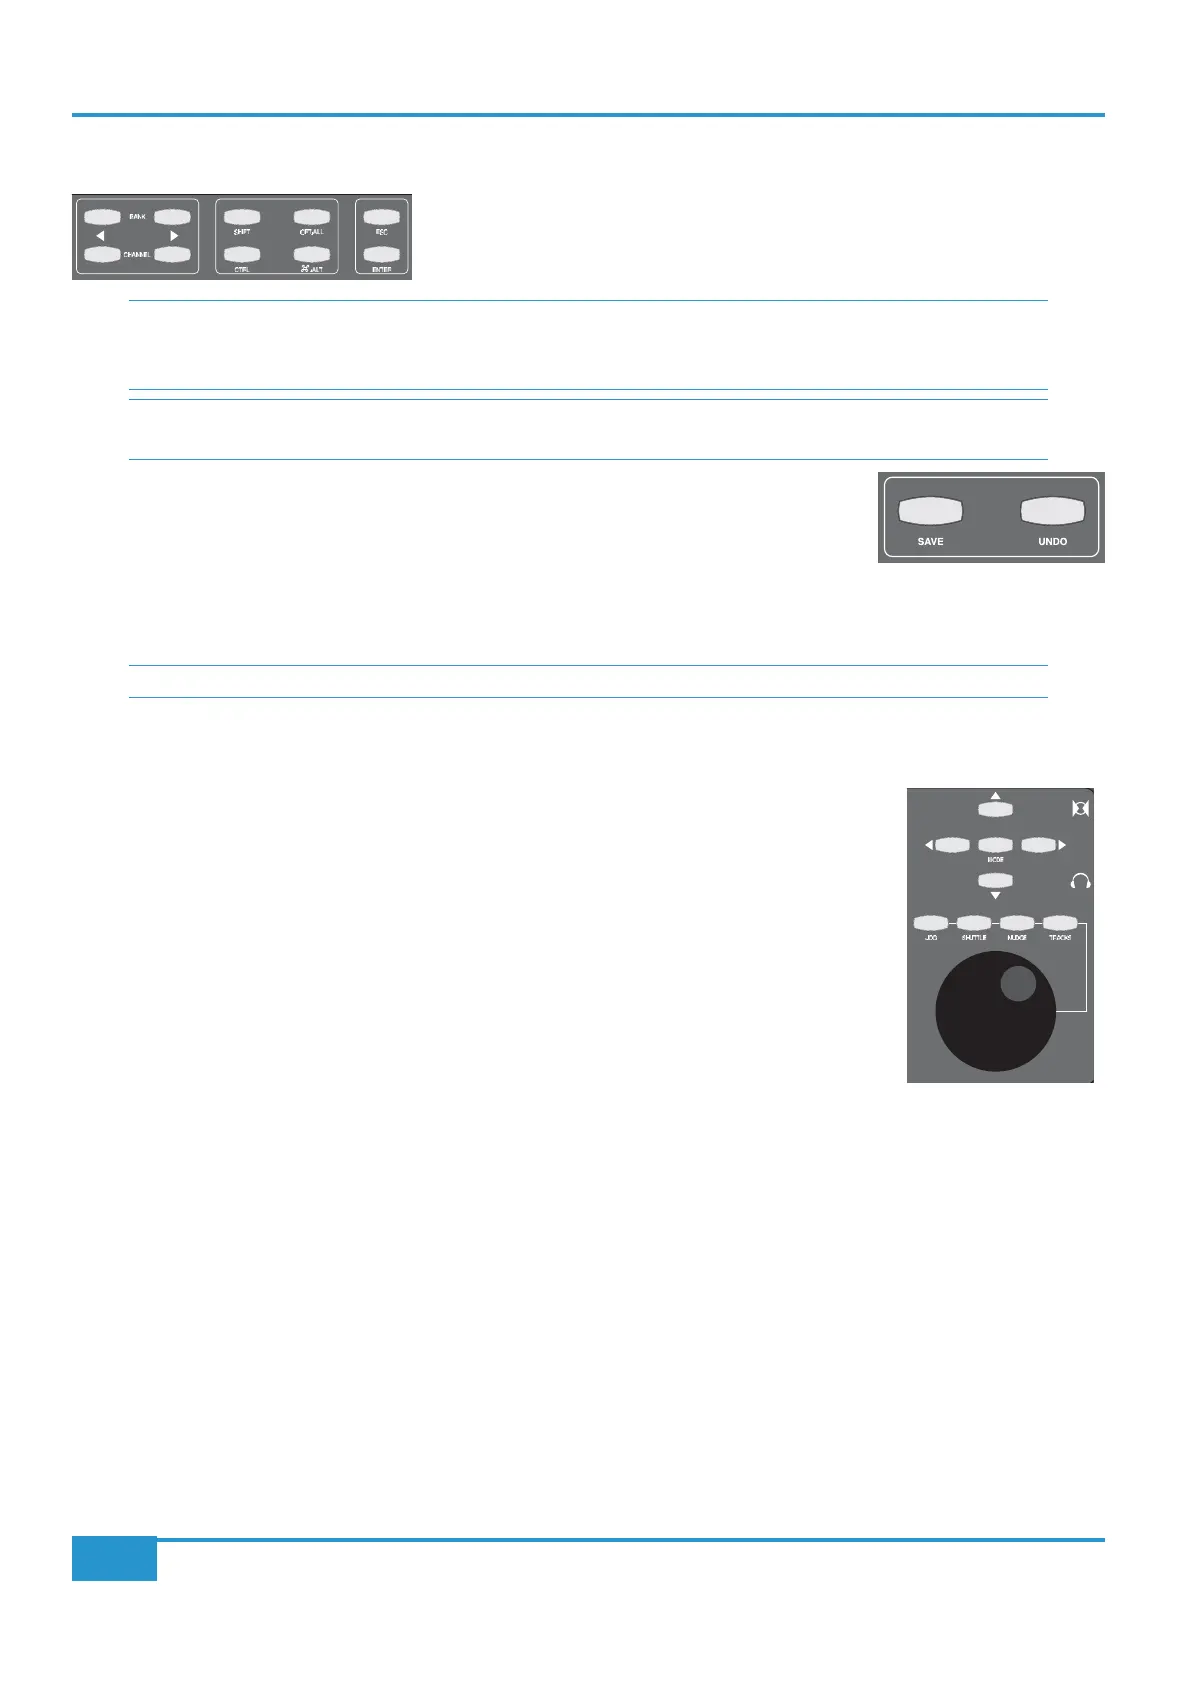
to these buttons there are two further utility buttons,
SAVE and UNDO, located to the right of
the main session counter. These simply replicate the DAW Save and Undo functions.
ξ™œξ˜ξ˜ƒξ˜ˆξ˜–ξ˜•ξ˜“ξ˜…ξ˜‰ξ˜ξ˜†ξ˜“ξ˜”ξ˜ˆξ˜‹ξ˜”ξ˜”ξ˜ξ˜‘ξ˜“ξ˜ƒξ˜—ξ˜ˆξ˜‰ξ˜†ξ˜ˆξ˜‰ξ˜ξ˜ƒξ˜”ξ˜ƒξ˜ˆξ˜šξ˜ƒξ˜˜ξ˜”ξ˜ˆξ˜ξ˜“ξ˜ˆξ˜‰ξ˜ξ˜ƒξ˜ˆξ™›ξ˜Œξ˜†ξ˜ˆξ™œξ˜†ξ˜†ξ˜„ξ˜”ξ˜œξ˜ˆξ˜¦ξ˜†ξ˜‘ξ˜ξ˜…ξ˜ˆξ˜‹ξ˜“ξ˜—ξ˜ˆξ™šξ˜•ξ˜ƒξ˜“ξ˜—ξ˜†ξš’ξ˜»ξ˜•ξ˜’ξ˜‹ξ˜”ξ˜ƒξ˜ˆξ˜—ξ˜ƒξ˜–ξ˜‹ξ˜•ξ˜„ξ˜‰ξ˜ˆξ™›ξ˜Œξ˜†ξ˜ξ˜„ξ˜ƒξ˜”ξ˜ˆξ˜‹ξ˜Œξ˜ƒξ˜ˆξ˜„ξ˜ξ˜”ξ˜‰ξ˜ƒξ˜—ξ˜ˆξ˜ξ˜“ξ˜ˆξ˜‰ξ˜ξ˜ƒξ˜ˆξ˜–ξ˜•ξ˜“ξ˜…ξ˜‰ξ˜ξ˜†ξ˜“ξ˜ˆξ˜‡ξ˜‹ξ˜žξ˜ˆ
in Appendix Aξ˜ˆξ˜‹ξ˜“ξ˜—ξ˜ˆξ˜…ξ˜‹ξ˜“ξ˜ˆξ˜’ξ˜ƒξ˜ˆξ˜…ξ˜ξ˜‹ξ˜“ξ˜‘ξ˜ƒξ˜—ξ˜ˆξ˜•ξ˜”ξ˜ξ˜“ξ˜‘ξ˜ˆξ˜‰ξ˜ξ˜ƒξ˜ˆξ˜Όξ˜’ξ˜‚ξ˜ˆξ™›ξ˜Œξ˜†ξ˜ξ˜„ξ˜ƒξ˜ˆξ˜‰ξ˜‹ξ˜’ξ˜ˆξ˜ξ˜“ξ˜ˆξ˜‰ξ˜ξ˜ƒξ˜ˆξ˜Šξ˜‹ξ˜‰ξ˜Œξ˜ξ˜Žξ˜ˆξ™‡ξ˜ƒξ˜‡ξ˜†ξ˜‰ξ˜ƒξ˜
ξ˜‚ξ˜ƒξ˜„ξ˜…ξ˜‡ξ˜„ξ˜—ξ˜ˆξ˜„ξ˜‡ξ˜†ξ˜ƒξ˜ξ˜…ξ˜‡ξ˜ƒξ˜Œξ˜‡ξ˜„ξ˜—ξ˜…ξ˜†ξ˜…ξ˜‡ξ˜œξ˜…ξ˜’ξ˜†ξ˜‡ξ˜›ξ˜ξ˜Žξ˜Žξ˜‡ξ˜‘ξ˜ƒξ˜„ξ˜‡ξ˜Œξ˜Šξ˜‘ξ˜ξ˜„ξ˜ξ˜ƒξ˜‘ξ˜‡ξ˜›ξ˜ξ˜„ξ˜—ξ˜‡ξ˜†ξ˜ƒξ˜ξ˜…ξ˜‡ξ˜‘ξ˜žξ˜΄ξ˜†ξ˜•ξ˜‡
Navigation Controls
Matrix’s navigation controls can be used to navigate around the DAW
session and to enable additional
transport monitoring functions such as Scrub and Shuttle (HUI only)
. They consist of the large navigation
ξ˜™ξ˜ξ˜ƒξ˜ƒξ˜„ξ˜ˆξ˜ξ˜“ξ˜ˆξ˜‰ξ˜ξ˜ƒξ˜ˆξ˜’ξ˜†ξ˜‰ξ˜‰ξ˜†ξ˜‡ξ˜ˆξ˜Œξ˜ξ˜‘ξ˜ξ˜‰ξ˜ˆξ˜ξ˜‹ξ˜“ξ˜—ξ˜ˆξ˜…ξ˜†ξ˜Œξ˜“ξ˜ƒξ˜Œξ˜ˆξ˜†ξ˜–ξ˜ˆξ˜‰ξ˜ξ˜ƒξ˜ˆξ˜…ξ˜†ξ˜“ξ˜”ξ˜†ξ˜„ξ˜ƒξ˜ˆξ˜™ξ˜ξ˜‰ξ˜ξ˜ˆξ˜–ξ˜†ξ˜•ξ˜Œξ˜ˆξ˜‡ξ˜†ξ˜—ξ˜ƒξ˜ˆξ˜’ξ˜•ξ˜‰ξ˜‰ξ˜†ξ˜“ξ˜”ξ˜ˆξ˜‹ξ˜’ξ˜†ξ˜£ξ˜ƒξ˜ˆξ˜ξ˜‰ξ˜œξ˜ˆξ˜‹ξ˜“ξ˜—ξ˜ˆξ˜‰ξ˜ξ˜ƒξ˜ˆξ˜ξ˜£ξ˜ƒξ˜ˆ
buttons above them known as Cursor keys, comprising four directional keys and a central
MODE
selector.
The navigation wheel performs a number of different functions, depending on which mode has been
selected using the four mode buttons above the wheel.
For DAW’s controlled via the MCU protocol, the default mode of operation for the wheel is to
scroll the timeline through the session.
JOG mode selects the MCU SCRUB mode to audibly
monitor tracks by β€˜scrubbing’ them in the timeline.
TRACKS re-assigns the wheel to scroll the
Matrix faders through all the tracks in the session. It is provided as an alternative to the utility
BANK and CHANNEL keys (see above). SHUTTLE and NUDGE are not supported.
When controlling Pro Tools, with no Mode selected, the Wheel will also scroll through the session timeline with a resolution
and speed derived from the Timeline display format in use. Selecting
NUDGE allows timeline control using the current β€˜nudge’
value and can also be used to nudge a selected clip(s).
JOG and SHUTTLE engage the corresponding Pro Tools functions as
detailed in the Pro Tools Control Surfaces manual. However please note that a number of Pro Tools functions are disabled when
either
JOG or SHUTTLE are active. To exit a mode, either deselect the function or press the transport Stop key. TRACKS
re-assigns the wheel to scroll the Matrix faders through all the tracks in the session. It is provided as an alternative to the utility
BANK and CHANNEL keys.
ξ™œξ˜ξ˜ƒξ˜ˆξ˜»ξ˜•ξ˜Œξ˜”ξ˜†ξ˜Œξ˜ˆξ˜šξ˜ƒξ˜˜ξ˜”ξ˜ˆξ˜žξ˜ƒξ˜Œξ˜–ξ˜†ξ˜Œξ˜‡ξ˜ˆξ˜‹ξ˜ˆξ˜“ξ˜•ξ˜‡ξ˜’ξ˜ƒξ˜Œξ˜ˆξ˜†ξ˜–ξ˜ˆξ˜Όξ˜’ξ˜‚ξ˜ˆξ˜”ξ˜žξ˜ƒξ˜…ξ˜ξ˜ξ˜…ξ˜ˆξ˜†ξ˜žξ˜ƒξ˜Œξ˜‹ξ˜‰ξ˜ξ˜†ξ˜“ξ˜”ξ˜ˆξ˜ξ˜“ξ˜ˆξ˜…ξ˜†ξ˜“ξ˜Ÿξ˜•ξ˜“ξ˜…ξ˜‰ξ˜ξ˜†ξ˜“ξ˜ˆξ˜™ξ˜ξ˜‰ξ˜ξ˜ˆξ˜‰ξ˜ξ˜ƒξ˜ˆ
MODE key located in the centre of
the Cursor key group. Note that
MODE function is a single level control in the MCU protocol and has two levels of operation
in the HUI protocol, indicated by the
MODEξ˜ˆξ˜’ξ˜•ξ˜‰ξ˜‰ξ˜†ξ˜“ξ˜ˆξ˜’ξ˜ƒξ˜ξ˜“ξ˜‘ξ˜ˆξ˜„ξ˜ξ˜‰ξ˜ˆξ˜”ξ˜‰ξ˜ƒξ˜‹ξ˜—ξ˜˜ξ˜‘ξ˜”ξ˜‰ξ˜‹ξ˜‰ξ˜ƒξ˜ˆξ˜†ξ˜Œξ˜ˆξ˜›ξ˜‹ξ˜”ξ˜ξ˜ξ˜“ξ˜‘ξ˜
Chapter 5 - DAW Control
90
Matrix
2
Owner’s Manual

Table of Contents

Question and Answer IconNeed help?

Do you have a question about the Solid State Logic Matrix2 Delta and is the answer not in the manual?

Solid State Logic Matrix2 Delta Specifications

General IconGeneral
Faders16
TalkbackYes
Computer ConnectivityEthernet
Channels40
EQ4-band parametric per channel
Aux Sends8
Busses/Groups4 stereo
Inserts16 channel inserts
SoftwareSSL Delta Control
PowerInternal PSU
Inputs - Line16 line inputs
Outputs - Main2 (stereo)
Control SurfaceYes
AutomationDAW Automation via Delta Control
ConnectivityEthernet
TypeAnalog/Digital Hybrid Mixer

Summary

Chapter 1 - Installation and Setup

Matrix Rear Panel Connections

Details the audio and digital connections on the Matrix rear panel, including XLR, DB25, and digital I/O.

Data Connections

Explains network and USB connections between the Matrix and a computer for control and data transfer.

Matrix Network Connection Examples

Illustrates direct connection and router/switch connection methods for network setup.

Software Installation and Configuration

Guides through installing Matrix Remote, ipMIDI, and SSL Delta Control plugins for Mac and PC.

Chapter 2 - Getting Started

Important Concepts

Introduces fundamental operating principles of the Matrix console, including Master Channel and Focus Modes.

Focus Modes

Explains Analogue Focus and DAW Focus modes and their effect on channel controls and metering.

STEP 1: Bringing Signal into the Channel

A step-by-step guide to bringing an audio signal into a Matrix channel via D-connectors.

STEP 5: Global Control of your DAW

Details how to use Matrix transport controls and DAW LAYER SELECT buttons for DAW operation.

STEP 11: Inserting Signal Processing into the Channel

Explains how to insert outboard signal processing using the Insert Matrix via the Matrix Remote.

Chapter 3 - Analogue Signal Flow

Introduction to Focus Modes

Explains the two operational modes, Analogue Focus and DAW Focus, and their effects on the console.

The Master Channel Strip

Describes the Master Channel strip and its role in accessing and controlling channel strip functions.

The Digital Scribble Strip

Details the function and display of the digital scribble strip in Analogue and DAW Focus modes.

Monitoring

Covers control room monitor controls, including volume, DIM, CUT, and source selection.

SSL Soft Keys

Explains the function and assignment of SSL soft keys for accessing various console settings.

Matrix Automation

Introduces the three methods of analogue automation: Delta Control, MIDI, and A-FADA.

Chapter 4 - The Matrix Remote

Introduction to the Matrix Remote

Overview of the Matrix Remote software and its six main tabs for console configuration.

The Projects Tab

Explains how to manage projects and titles, store session notes, and navigate project files.

Managing Projects

Details creating, backing up, restoring, renaming, and deleting projects within the Matrix Remote.

The Total Recall Tab

Covers storing and recalling console settings, taking, naming, and deleting TR snapshots.

The Channels Tab

Explains how to label analogue channels and manage channel name presets.

The Insert Matrix Tab

Guides on routing external signal processing, naming devices, and creating chains.

Chapter 5 - DAW Control

Introduction

Explains Matrix's DAW control capabilities using HUI, MCU, and CC protocols.

Layers

Describes how Matrix connects to DAWs via virtual layers and assigns profiles.

Focus Modes

Details Analogue Focus and DAW Focus modes and their impact on console operation.

DAW Track Control

Explains control of DAW track parameters using the Matrix channel strip sections.

SEL Key Modes

Details modes like Default, Rec Arm, Plug-in, Param, and Auto Set for DAW control.

Transport Controls

Covers the operation of Matrix's dedicated transport controls for DAW playback.

Standard Profile Soft Key Assignments

Lists the default assignments for Pro Tools soft keys on the Matrix console.

Chapter 6 - DAW and CC Configuration

Matrix Console Layer Selection

Explains how to select the active DAW layer on the Matrix console.

Assigning DAW Layers

Guides on selecting and assigning DAW Profiles for different layers and protocols.

Soft Keys

Details the soft key areas, DAW control protocols, and available soft key sets.

Programming Soft Keys

Explains how to program soft keys, save assignments, and manage soft key sets.

Assigning QWERTY Keystrokes

Details how to assign QWERTY keyboard shortcuts to Matrix soft keys.

Configuring CC Layers

Explains how to map CC (Continuous Controller) messages for MIDI devices.

Related product manuals