December 2006
3-18
WorkCentre M20, 4118, FaxCentre 2218 Family
IQ16, IQ17
Image Quality
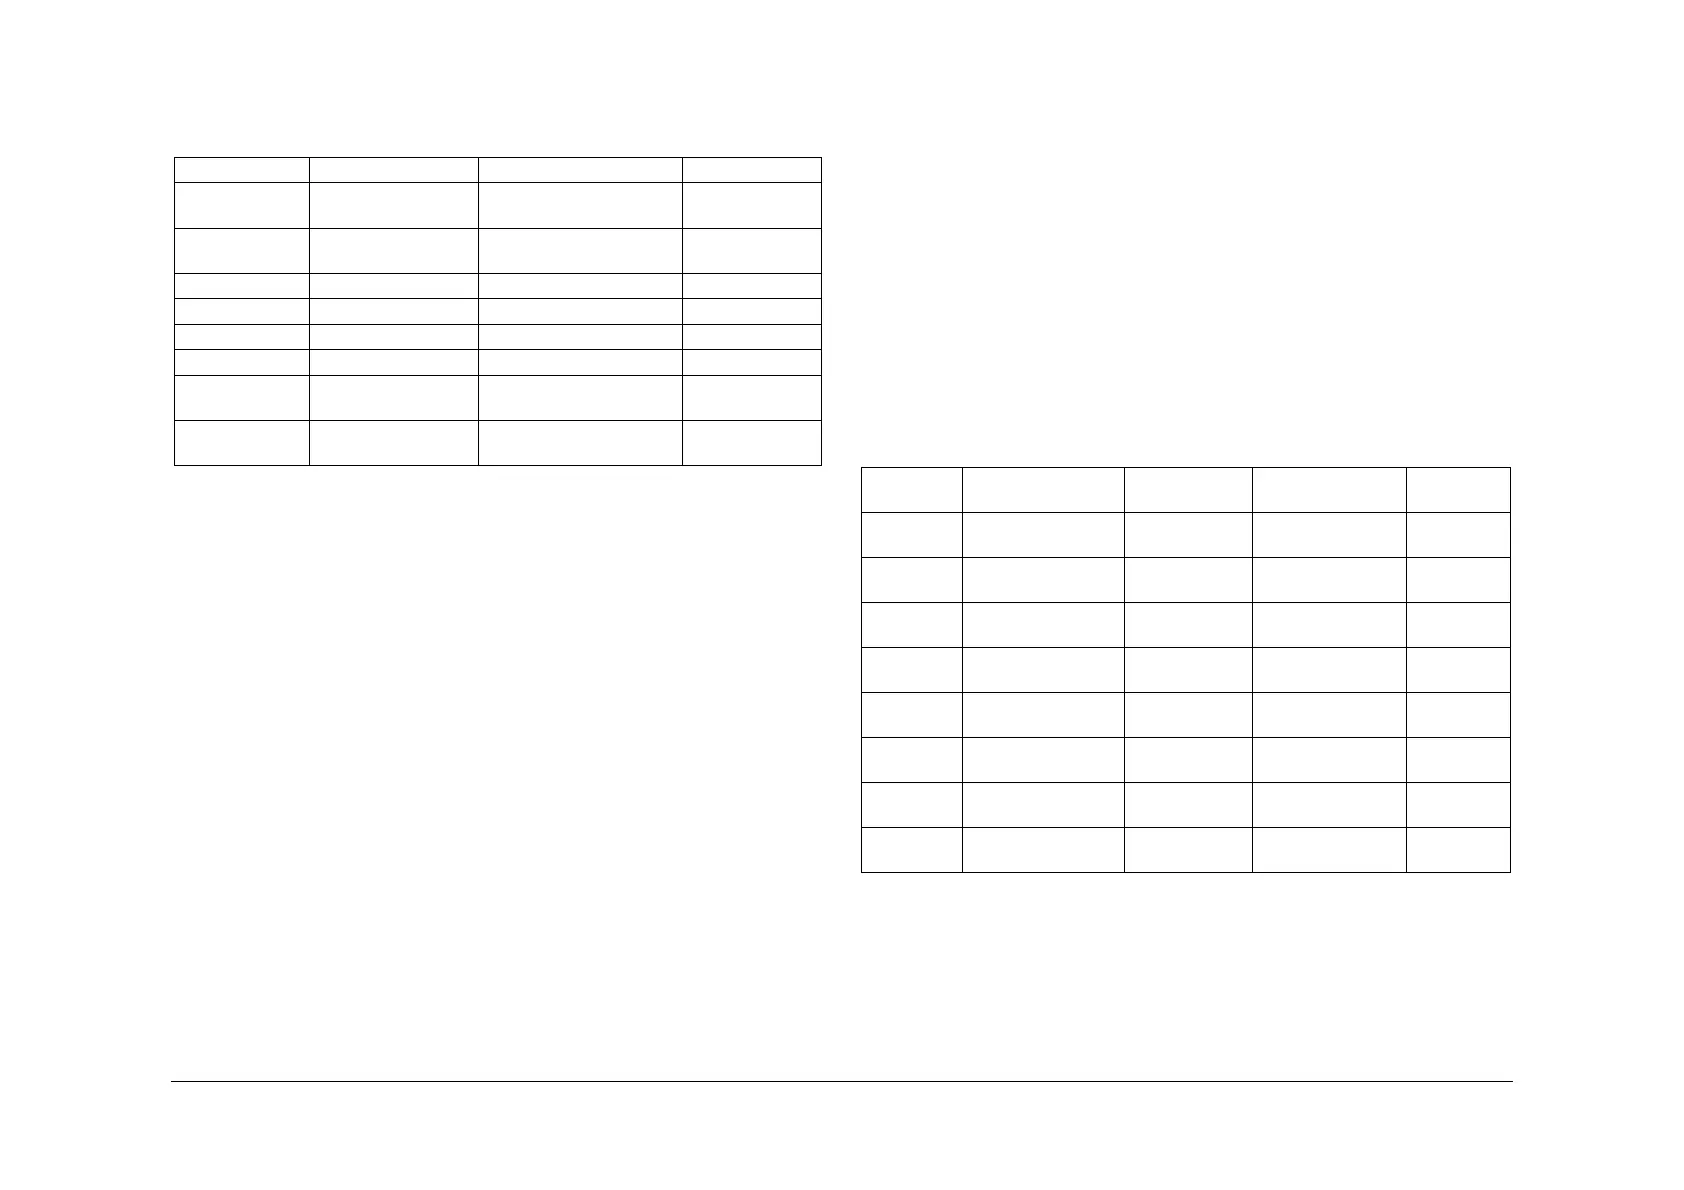
4. Measure the distance between the image and the defect. Refer to Table 1 to determine
the possible cause of the defect. If the cause of the defect is identified, install new compo-
nents as necessary.
5. Clean the charge roller and if necessary, install a new ELA Unit - OPC drum set, PL 9.10
Item 1.
6. Check the condition of the ELA HOU - fuser assembly and if necessary, install a new ELA
HOU - fuser assembly, PL 10.15 Item 1.
7. Install new components as necessary:
• PBA main (M20F), PL 1.10 Item 4.
• PBA main (4118), PL 1.15 Item 9.
• PBA main (2218), PL 1.20 Item 9.
IQ17 Periodic Printing Defects Check RAP
Use this RAP when the printed image shows regular patterns in black or white, across the pro-
cess direction.
Procedure
WARNING
Switch off the electricity to the machine. Disconnect the power cord from the customer
supply while performing tasks that do not need electricity. Electricity can cause death or
injury. Moving parts can cause injury.
NOTE: If necessary, refer to GP 20 for the acronym list and cross reference lists of more com-
monly recognised part names.
1. Go to GP 3, Service Mode Entry. Scroll to System Admin Tools/Maintenance. Perform the
Clean Drum routine. If necessary, install a new ELA Unit - OPC drum set, PL 9.10 Item 1.
2. Measure the distance between the repeated black or white abnormality. Refer to Table 1
identify the possible cause. If the cause of the defect is identified, install new components
as necessary.
3. If the defect appears to be fuser related, ensure that the paper tray settings match the
paper or media size in the trays. Also, ensure the media is within specification, refer to GP
22 Paper and Media Specifications.
Table 1 Defect distance
Defect distance Roller Component Parts List Ref.
94.3mm ELA - OPC unit drum P/O ELA Unit - OPC drum
set
PL 9.10 Item 1
38.3mm Charge roller P/O ELA Unit - OPC drum
set
PL 9.10 Item 1
43.8mm Supply roller P/O ELA toner unit set PL 9.10 Item 2
54.3mm Developer roller P/O ELA toner unit set PL 9.10 Item 2
51.9mm Cleaning roller P/O ELA toner unit set PL 9.10 Item 2
56.6mm Transfer roller Transfer roller PL 8.13 Item 10
82.6mm Heat roller P/O ELA HOU - fuser
assembly
PL 10.15 Item 1
91.1mm Pressure roller P/O ELA HOU - fuser
assembly
PL 10.15 Item 1
Table 1 Abnormal image distance
Defect dis-
tance
Kind of abnormal
image Roller Component
Parts List
Ref.
94.3mm White spot. Black
spot
ELA - OPC
unit drum
P/O ELA Unit -
OPC drum set
PL 9.10
Item 1
38.3mm White spot. Black
spot
Charge roller P/O ELA Unit -
OPC drum set
PL 9.10
Item 1
43.8mm Horizontal dark
band
Supply roller P/O ELA toner unit
set
PL 9.10
Item 2
54.3mm Horizontal dark
band
Developer
roller
P/O ELA toner unit
set
PL 9.10
Item 2
51.9mm Black side contami-
nation/transfer fault
Cleaning roller P/O ELA toner unit
set
PL 9.10
Item 2
56.6mm Black spot, White
spot
Transfer roller Transfer roller PL 8.13
Item 10
82.6mm Black side contami-
nation
Heat roller P/O ELA HOU -
fuser assembly
PL 10.15
Item 1
91.1mm Black side contami-
nation
Pressure roller P/O ELA HOU -
fuser assembly
PL 10.15
Item 1