INSTALLATION
Page 17
I) Feed through a little slack cable, and tighten the cable grip on the
eight-conductor cable.
J) Tie wrap the Station cable to the Processor frame.
5.3.2 Power Cable
A) Run the length of two-conductor power cable between the DC Power
Supply and the Processor.
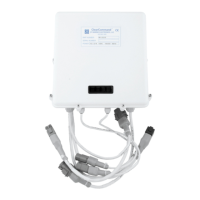
B) Install the power cable grip in the Processor enclosure. (refer to Figure
7:)
C) Connect the two-conductor cable to the Processor. Refer to the Draw-
ing in Appendix C for power connection points.
D) Feed through a little slack cable and tighten the cable grip.
E) Tie wrap the power cable to the Processor frame.
5.3.3 Start Interlock
Run the length of two-conductor start interlock cable between the Starter
Solenoid and the Processor. (Refer to Figure 9:)
Connections at Starter Solenoid:
A) Remove the remote start switch lead from the Starter Solenoid.
B) Strip and connect one start interlock cable wire to this lead.
C) Strip and connect the second start interlock cable wire to the Starter
Solenoid
Connections at Processor:
A) Install the start interlock grip in the Processor enclosure. (refer to
Figure 7:)
NOTE: Bring the other Station's eight-conductor cables in the same way, and connect to the
appropriate station terminal strips. (Refer to Drawing in Appendix C)
CAUTION: A jumper is required between terminals 5 and 6 on all unused station terminals on
the circuit board. Refer to Drawing Notes in Appendix C.
WARNING: When connecting the DC power cable to the Processor be sure the power is OFF.
NOTE: ZF Mathers highly recommends the use of an Automatic Power Selector (APS). Refer to
Appendix A - S-214 APS Service Sheet.
NOTE: Repeat for all Processors. Ensure all connections are as indicated on the Drawing in
Appendix C.
CAUTION: The Processor is designed for a maximum of 30 amperes, maximum 50 volt, start signal
current. Greater current will damage the interlock circuit.