Do you have a question about the ZF Marine ClearCommand and is the answer not in the manual?
Describes the purpose and scope of the ClearCommand System manual.
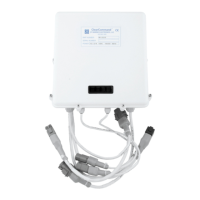
Overview of the ClearCommand Control Processor's design and capabilities.
Describes system behavior when DC power is initially turned on.
Details the interlocks preventing engine start under specific conditions.
Procedure for transferring command between different stations.
Explains the procedure for operating the system in Warm-up Mode.
Describes the dual lever synchronization feature for multi-engine systems.
Explains the meaning of different audible tones from the control heads.
Details the function and use of the Speed Boost feature.
Lists the required processor component and included items.
Lists the required control head component and included items.
Specifies types and requirements for electric cables.
Lists necessary tools for installing the ClearCommand system.
Details the type and requirements for push-pull cables.
Information on available wire harnesses for system connection.
Mandatory requirement for engine stop switches at each station.
Specifies power requirements for the control system processor.
Guidelines for selecting an appropriate location for the processor unit.
Recommendations for mounting control heads in various configurations.
Specific mounting considerations for 400 Series Control Heads.
Specific mounting considerations for MC2000 Series Control Heads.
Specific mounting considerations for 700 Series Control Heads.
Guidance on selecting and connecting the DC power source.
Procedure for installing the eight-conductor cable.
Steps for securing and preparing the processor unit for connection.
Details on making electrical connections to the processor unit.
Specific instructions for connecting station cables to the processor.
Procedure for connecting the power cable to the processor.
Instructions for connecting the start interlock circuit.
Information on installing and connecting control heads.
Steps for mounting various models of control heads.
Procedure for connecting cables to the control head.
Specific wiring for control heads facing aft.
Installation details specific to the 700 Series Control Head.
Information on installer-supplied engine stop switches.
Interconnecting processors for multi-engine synchronization.
Procedure for connecting push-pull cables to the processor.
Detailed steps for connecting push-pull cables to the processor housing.
Setup procedures for main engine speed control.
Connecting the throttle wire harness to the processor and engine interface.
Procedure for setting the jumper on the auxiliary circuit board.
Procedure for selecting the engine signal type.
General steps to follow before starting set-up procedures.
Instructions for configuring dip switches on the main circuit board.
Recommended order for performing set-up adjustments.
Guidance on how to select dip switches for configuration.
Procedure to place the system in Run State for normal operation.
Steps to enable the set-up mode for configuration.
Procedure for saving the configured set-up values.
Setting the number of screws for system configuration.
Procedure for selecting a unique System ID for multi-processor applications.
Configuration of clutch pressure time settings.
Setting the clutch delay parameters for system operation.
Adjusting the throttle pause settings for smoother operation.
Selecting the appropriate engine signal type for the system.
Configuring the delay timer for in-gear or neutral states.
Testing control head functionality with engines stopped.
Verifying start interlock operation with engines stopped.
Adjusting clutch cable travel with engines stopped.
Procedure for adjusting clutch cable to neutral position.
Procedure for adjusting clutch cable to ahead position.
Verifying correct clutch cable travel in all positions.
Testing engine stop switches while engines are running.
Testing warm-up mode functionality with engines running.
Adjusting and verifying electric throttle signals.
Procedure to adjust the minimum throttle signal output.
Procedure to adjust the maximum throttle signal output.
Procedure for warming up engines and checking operational RPM.
Guidelines for adjusting speed boost parameters.
Setting the percentage of maximum throttle for speed boost.
Configuring the duration for which speed boost is applied.
Setting the time delay before speed boost begins.
Details the single alarm connection for system failures.
Explains the interlock to prevent high RPM when clutch is not engaged.
Procedures for setting up and testing engine synchronization.
Connecting processors using a serial communication wire harness.
Connecting the violet lead to the starboard terminal on control heads.
Connecting violet lead to the starboard processor auxiliary board terminals.
Testing control head synchronization with engines running.
Performing operational checks for engine synchronization.
Lists annual checks required for the control processor unit.
Annual checks for control head terminals and contacts.
Operator cannot take command at one station when DC power is on.
One station fails to take command when DC power is first turned on.
Engine RPM varies without movement of the control head lever.
Engine RPM drops to idle, indicator light off, and tone emitted after lever reposition.
No audible tone at control head on system startup, but otherwise functional.
Steady tone from all stations, preventing command acquisition.
Control head red indicator light fails, but other functions are normal.
No tones or lights on control head or processor circuit board.
Engine starts then stops during starting, with a slow repetitive tone.
Troubleshooting steps when the engine fails to start.
Indicates a clutch feedback error.
Indicates control head malfunction due to loose connections.
System cannot achieve speed above idle.
System cannot achieve speed above idle.
System in Set-up Mode, preventing control commands.
Processor in Set-up Mode with an adjustment setting selected.
Indicates an invalid switch combination was selected.
Indicates set-up or adjustment steps were not followed correctly.
| Brand | ZF Marine |
|---|---|
| Model | ClearCommand |
| Category | Controller |
| Language | English |