10
a
OPTIONAL 3M™ ATTEST™ CONNECT AUTOREADER APPLICATION
Use of 3M™ Attest™ Connect provides additional functionality as described in the
Features section of this manual.
Personal Computer (PC) Requirements
3M™ Attest™ Connect is designed to be used with PCs with internet access running
either the Windows 7 or Windows 10 operating systems. The 3M™ Attest™ Connect
application will run in the first supported language specified in the PC’s language
settings. For best results, a minimum PC display resolution of 1440 X 900 is
recommended.
Getting Started
Open a web browser on the PC and navigate to Go.3M.com/490M. Click on the
REGISTER PRODUCT button to begin the registration process. When prompted,
click on the Download Attest Connect for Windows button.
Double click on the Setup3MAttestConnect.exe file and follow the prompts on the
screen to review and accept the End User License Agreement (EULA) and install
3M™ Attest™ Connect. 3M™ Attest™ Connect will automatically start.
Next, connect a 3M™ Attest™ Mini Auto-reader 490M to the PC using the
supplied USB cable. The first time an Auto-reader is connected, you will be
presented with a “Sign In” form. Sign in using the same email address that was
entered in the registration process. The sign in process links the installation of
3M™ Attest™ Connect on your PC with the registration information created in the
registration website.
Once the sign in form completes, the Home page will appear on the PC screen.
3M™ Attest™ Connect has four main pages: Home, History, Settings, and BI Details.
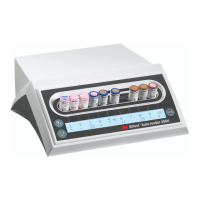
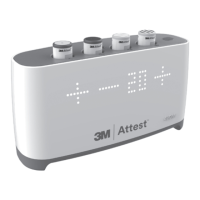
HOME PAGE
As depicted below, when the 3M™ Attest™ Auto-reader 490M is connected to the PC, the Home page provides a real-time, virtual image of the Auto-reader along with other
information and functionality.
1. Incubating BIs. BIs are depicted as type ‘unknown’ until the BI Type and Control
status are specified by the user on the BI Details page. Navigate to the BI Details
page for a specific BI by clicking on the BI image when either the remaining
minutes of incubation or result is displayed.
2. Click the virtual button to stop Display flashing and silence the audible alarm (if
enabled). A diagonal line through the speaker image indicates the audible alarm
has been disabled.
3. Click to minimize the application.
4. Click to close the application.
5. Click to navigate to the History page.
6. Click to navigate to the Settings page.
7. Auto-reader model #
8. Auto-reader firmware version
9. Auto-reader serial number
10. Any BI results, remaining incubation time, or caution/
error codes appearing on the Auto-reader Display are
shown in this row. Click on caution/error codes for an
explanation of the problem and solution.
 Loading...