5-2 Section 5: Maintenance & Service
Installing New String
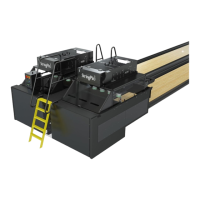
When installing new string it is important to make sure the strings are routed through the machine
properly. Pay particular attention to how the strings are routed around the String Limiting Bar. The
strings for pins 4-6, and 7-10 go over the limiting bar. The strings for pins 1-3 route under the limiting
bar. Refer to Figure5-2.
Warning! Pinsetter power is to remain o while performing any manual
function.
WARNING! To avoid burning your hands wear gloves and use a rag to taper the
melted string end.
7
4/5/6
7/8/9/10
7
4
4
2
2
8
8
5
5
1
1
1
9
9
3
3
6
6
10
10
1
(1)
STRING LIMITING
BAR
2/3
(2)
STRING
SPOOLS
(3)
STRING
WAGON
(3)
STRING
WAGON
(1)
STRING LIMITING
BAR
(1)
STRING LIMITING
BAR
Figure5-2.StringPaths
(1) STRING LIMITING BAR (2) STRING SPOOLS (2) STRING WAGON
1. Cycle the pinsetter to rst ball with ten pins on the pin deck.
2. Cut the string o any pin being replaced, just above its head. Refer to Figure5-3.