Do you have a question about the HIKVISION DS-K1TA70MI-T and is the answer not in the manual?
Provides an overview of the manual's contents and purpose.
Lists the trademarks and logos belonging to Hikvision and other owners.
Outlines the terms and conditions regarding product use and liability.
Indicates a hazardous situation that could lead to death or serious injury if not avoided.
Highlights a potentially hazardous situation that could result in equipment damage or data loss.
Provides additional information to emphasize or supplement important points in the text.
Details compliance with FCC regulations for digital devices and radio frequency energy.
Confirms product compliance with harmonized European standards for EMC and Radio Equipment Directives.
Highlights critical warnings that could cause serious injury or death if neglected.
Lists precautions to prevent potential injury or material damage.
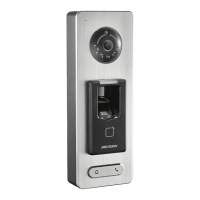
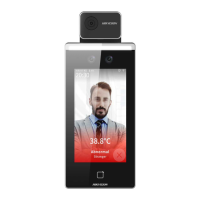
Introduces the face recognition terminal and its application areas.
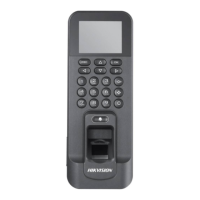
Details the key functionalities and specifications of the face recognition terminal.
Provides guidance on selecting an optimal environment for device installation and temperature measurement.
Describes the step-by-step process for flush mounting the device.
Details the procedure for surface mounting the face recognition terminal.
Explains the functions and connections of each terminal on the device.
Illustrates how to wire the terminal with normal peripherals.
Shows how to connect the terminal with a secure door control unit.
Provides wiring diagrams for fire module configurations.
Guides users through activating the device directly through its interface.
Explains how to activate the device using the SADP tool.
Details the process of activating the device through the client software.
Describes how to select an application mode for optimal device performance.
Covers the login procedures for the device.
Covers configuration of network, RS-485, and Wiegand parameters.
Describes how to add an administrator with backend configuration privileges.
Details the process of capturing and adding a user's face picture for authentication.
Explains how to add a card number for user authentication.
Guides on setting a password for user authentication.
Covers setting the device's authentication modes (Device or Custom).
Describes how to search for and modify existing user information.
Details settings for temperature detection, alarm thresholds, and compensation.
Explains how to configure black body parameters for accurate temperature measurement.
Guides on exporting events, user data, and pictures to a USB flash drive.
Explains how to import user data and pictures from a USB flash drive.
Describes 1:N matching for comparing a face with all stored face pictures.
Explains 1:1 matching for comparing a face with a specific user's linked face picture.
Details authentication using multiple credentials like card, face, and password.
Covers authentication using a single credential such as face or card.
Covers setting community, building, unit numbers, voice prompts, and brightness.
Details settings for security levels, recognition interval, and mask detection.
Explains how to set the device's time and DST parameters.
Guides on upgrading the device firmware using a USB flash drive.
Covers deleting user data, restoring factory, or default settings.
Explains how to search and view authentication logs.
Describes how to disable attendance status display on the initial page.
Details setting attendance mode to auto with configurable schedules.
Explains setting attendance mode to manual for manual status selection.
Covers configuring attendance mode as manual and auto with automatic status changes.
Allows viewing device capacity for users, faces, cards, and events.
Provides details about the device, such as type, serial number, and version.
Displays information about the open-source software licenses used in the product.
Explains how to initiate a call from the device to the client software.
Guides on making calls from the device to the master station.
Details how to call the device from the client software.
Explains how to initiate a call from the device to an indoor station.
Presents a flow diagram for configuring the client software.
Covers managing access control and video intercom devices within the client.
Explains adding multiple online devices sharing credentials in a batch.
Guides on adding devices by specifying their IP address or domain name.
Covers adding devices within a specific IP segment in a batch.
Explains adding devices using the ISUP protocol and account details.
Describes importing device parameters from a CSV file.
Guides on resetting the password for detected online devices via the client.
Details how to create groups for organizing added devices and resources.
Explains importing device resources like access points into created groups.
Covers editing parameters for resources within a group, such as access point names.
Guides on removing devices or resources from a group.
Details creating organizational structures for managing persons.
Covers editing the name of an organization.
Explains how to delete an organization.
Describes viewing persons within sub-organizations.
Guides on adding and configuring basic person details like name and gender.
Explains issuing cards using a local card enrollment station.
Details uploading face photos from a PC for person profiles.
Covers taking a photo directly via the client software for person profiles.
Explains collecting face data using an access control device linked to the client.
Guides on enabling face anti-spoofing detection for authentic user verification.
Covers setting access control details like PIN codes, visitor status, and access groups.
Explains adding persons to a blacklist for access restriction.
Guides on setting a person's status as a visitor with valid visit times.
Covers assigning the device operator role to a person.
Details adding custom properties to person information.
Explains configuring resident information and linking indoor stations for intercom.
Covers adding extra details like ID type and job title for persons.
Guides on batch import/export of person information and pictures.
Details importing person data from a CSV/Excel template.
Explains importing multiple person pictures in a batch.
Guides on exporting person information to a local PC in CSV/Excel format.
Explains exporting person face picture files to a local PC.
Details retrieving person information from devices and importing it to the client.
Guides on moving persons between different organizations.
Explains issuing cards to multiple persons simultaneously.
Covers reporting lost cards to deactivate their access authorization.
Details setting parameters for reading card numbers via enrollment stations or readers.
Explains issuing cards locally using a connected card enrollment station.
Guides on selecting the model of the connected card enrollment station.
Explains selecting the card type (EM or Mifare) for specific models.
Details adding regular and irregular holidays to the system.
Guides on adding holidays that occur on specific, non-recurring dates.
Details customizing major and minor leave types for employees.
Explains enabling data synchronization to external databases like SQLServer or MySQL.
Covers adding and configuring break times, including start/end times and duration.
Explains the 'Must Check' calculation method for break duration.
Guides on setting display contents for attendance reports.
Setting the company name for display in reports.
Defining marks and colors for attendance statuses in reports.
Defining marks and colors for weekend displays in reports.
Details creating general timetables for employees with start/end work times.
Defines calculation method based on first check-in and last check-out.
Defines calculation method based on each check-in/out period.
Setting the standard start and end times for work.
Defining the time window for valid check-in and check-out.
Setting how work duration is calculated.
Defining grace periods for late arrivals or early departures.
Setting parameters for employees checking in late.
Setting parameters for employees checking out early.
Defining status for employees who do not check in.
Defining status for employees who do not check out.
Editing existing timetable configurations.
Deleting timetable configurations.
Guides on creating shifts with specified periods and timetables.
Setting schedules where check-in is not mandatory.
Setting schedules where check-out is not mandatory.
Configuring schedules that remain effective on holidays.
Enabling overtime recording for specific schedules.
Assigning shift schedules to individual persons.
Creating temporary schedules for persons.
Setting how temporary schedule attendance is calculated.
Selecting a timetable for temporary schedules.
Using multiple timetables for a single shift.
Setting rules like check-in/out not required for schedules.
Checking shift schedules in calendar or list mode.
Viewing shift schedules in a calendar format.
Viewing shift schedules in a list format.
Viewing attendance handling information in calendar or list mode.
Editing attendance record details.
Deleting selected attendance record items.
Exporting attendance handling details to a local PC.
Viewing applied leave or business trip information.
Editing details of applied leave or business trips.
Deleting leave or business trip applications.
Exporting leave and business trip details.
Setting up automatic daily calculation of attendance data.
Performing manual calculation of attendance data for a specified range.
Adding check-in/out corrections to attendance records.
Choosing which items to display in attendance reports.
Generating attendance reports.
Exporting attendance data reports.
Searching and viewing employee attendance records and status.
Generating attendance reports manually for immediate viewing.
Defining and generating custom attendance reports with specific content.
Specifying a name for a custom report.
Selecting the type of report to be generated.
Defining the time period for report generation.
Selecting specific persons for whom attendance reports are generated.
Guidance on optimal positioning and distance for face picture capture.
Tips for maintaining a natural expression during face picture collection.
Advice on maintaining correct posture for accurate face picture capture.
Ensuring the face is centered within the collecting window.
Provides reference values for light source illumination levels.
Specifies recommended clearance distances from lights, windows, and doors.
Advises against installing the device in environments with strong or direct lighting.
| Model | DS-K1TA70MI-T |
|---|---|
| Category | IP Access Controllers |
| Display | 7-inch LCD touch screen |
| Audio Input | Built-in microphone |
| Audio Volume | Adjustable |
| Event Capacity | 100, 000 |
| Fever Detection | Yes |
| Mask Wearing Alert | Yes |
| Forced Mask Wearing Alert | Yes |
| Audio Prompt | Yes |
| Working Temperature | -10 °C to 50 °C (14 °F to 122 °F) |
| Application Environment | Indoor |
| Operating System | Linux |
| Resolution | 1024 x 600 |
| Camera | 2MP wide-angle camera |
| Audio Compression | G.711 |
| Audio Output | Built-in loudspeaker |
| Wired Network | 10/100M Ethernet |
| Wireless Network | Wi-Fi |
| Network Interface | 1 RJ45 port |
| RS-485 | 1 RS-485 (Half duplex) |
| Wiegand | 1 Wiegand output |
| Output Relay | 1 relay output |
| Input Interface | 1 door contact input, 1 door exit button |
| Face Recognition Distance | 0.3 m to 1.5 m |
| Face Recognition Duration | <1 s |
| Face Recognition Accuracy Rate | > 99% |
| Temperature Measurement Range | 30 °C to 45 °C (86 °F to 113 °F) |
| Temperature Measurement Distance | 0.3 m to 1 m |
| Temperature Measurement Accuracy | ± 0.5 °C |
| Time Synchronization | NTP |
| Power Supply | 12 VDC/2 A |
| Working Humidity | 10% to 90% (No Condensing) |
| Installation | Wall-mounted |
| Language | Multi-language support |