183
Performance Tests
Performance Test Instructions
5 Ensure, the attenuation of the laser source is set to 0.00 dB.
6 Move to the power sensor channel, move to [P], press
[POWER UNIT], and select <dBm> from the menu that appears.
7 Press the key beside the laser output on the module front panel
to switch on the laser source.
8 Note the power reading of the power sensor in the test record.
The Module Interaction Test ends here if you use the HP 8163A.
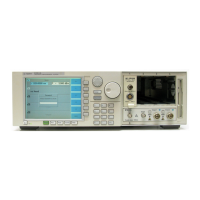
NOTE If you use the HP 8164A, perform steps 9 to 12.
9 Switch your mainframe off, by pressing the Power Key.
10 Move the laser source module from slot 1 to slot 3, and the power
sensor module from slot 2 to slot 4.
11 Connect the output of the laser source in slot 3 to the input of the
power sensor in slot 4.
12 Repeat step items 2 to 8.
Test of the Tunable Laser Module Channel (Slot 0)
If you need to test a back-loadable Tunable Laser module slot,
perform the remaining list items.
13 Connect the power output of the Tunable Laser module to the
input of the power sensor.
14 Switch on the HP 8164A and wait until is has booted.
15 Press PRESET, the green hardkey, to set all parameters to their
default values.
16 Move to [λ], the wavelengthof your Tunable Laser module, type
1550.00.
17 Move to [λ], the wavelength of your power sensor, type 1550.00.
18 Set the [P], the output power, and [ATT], the attenuation, to the
value given in Table D-1.
19 Note the power reading of the power sensor in the test record.