• A pair of front and rear mounng rails that aach to the rack posts—provided with the rack mount
kit.
To mount the device on a four-post rack:
1. Review the General Safety Guidelines and Warnings.
2. Wrap and fasten one end of the electrostac discharge (ESD) cable grounding strap around your bare
wrist, and connect the other end to a site ESD point.
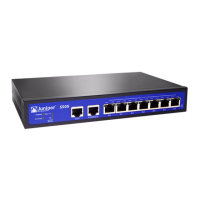
3. To aach the side mounng brackets to the chassis, align the keyholes on the mounng brackets
over the shoulder screws on the chassis. Slide the mounng brackets toward the rear of the chassis.
Figure 16: Aach the Side Mounng Brackets
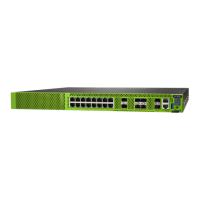
4. Assemble the mounng rails by sliding the rear oang rails into the front rails.
Figure 17: Assemble the Mounng Rails
5. Install the mounng rails on the rack:
a. Align the guide blocks of the rear mounng rails with the rear-post holes. Pull the rear mounng
rails toward the front of the rack to lock the rails in place. You will hear a disnct click sound when
the latch locks into the corresponding rack holes.
47