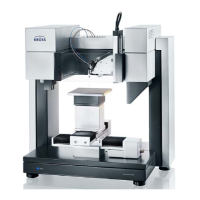
page 50 Mounting axes
6. Align the sample table with the help of the graduations as described below so
that the centre of the scale is in the centre of the image.
Horizontal alignment
1. Loosen the screws tightened in Chapter 7.7.3, Step 4.
2. Slide the tilting table into the required position.
3. Retighten the screws
Vertical alignment
Move the tilting table to the required position with the help of the z-axis height
adjuster
After this, do not change the position of the z-axis again.
The surface height is adjusted with the help of the tilting table sample stage.
7.7.6 Levelling the tilting table
Setting the tilting table to the starting position
Select the Axes tab in the CPanel. Select the Tilting Table option from the left-
hand drop-down menu.
Select Reset Zero Position from the right-hand drop-down menu.