4. Operation MX-FR Series Modular Matrix Frames – User's Manual 32
Switching
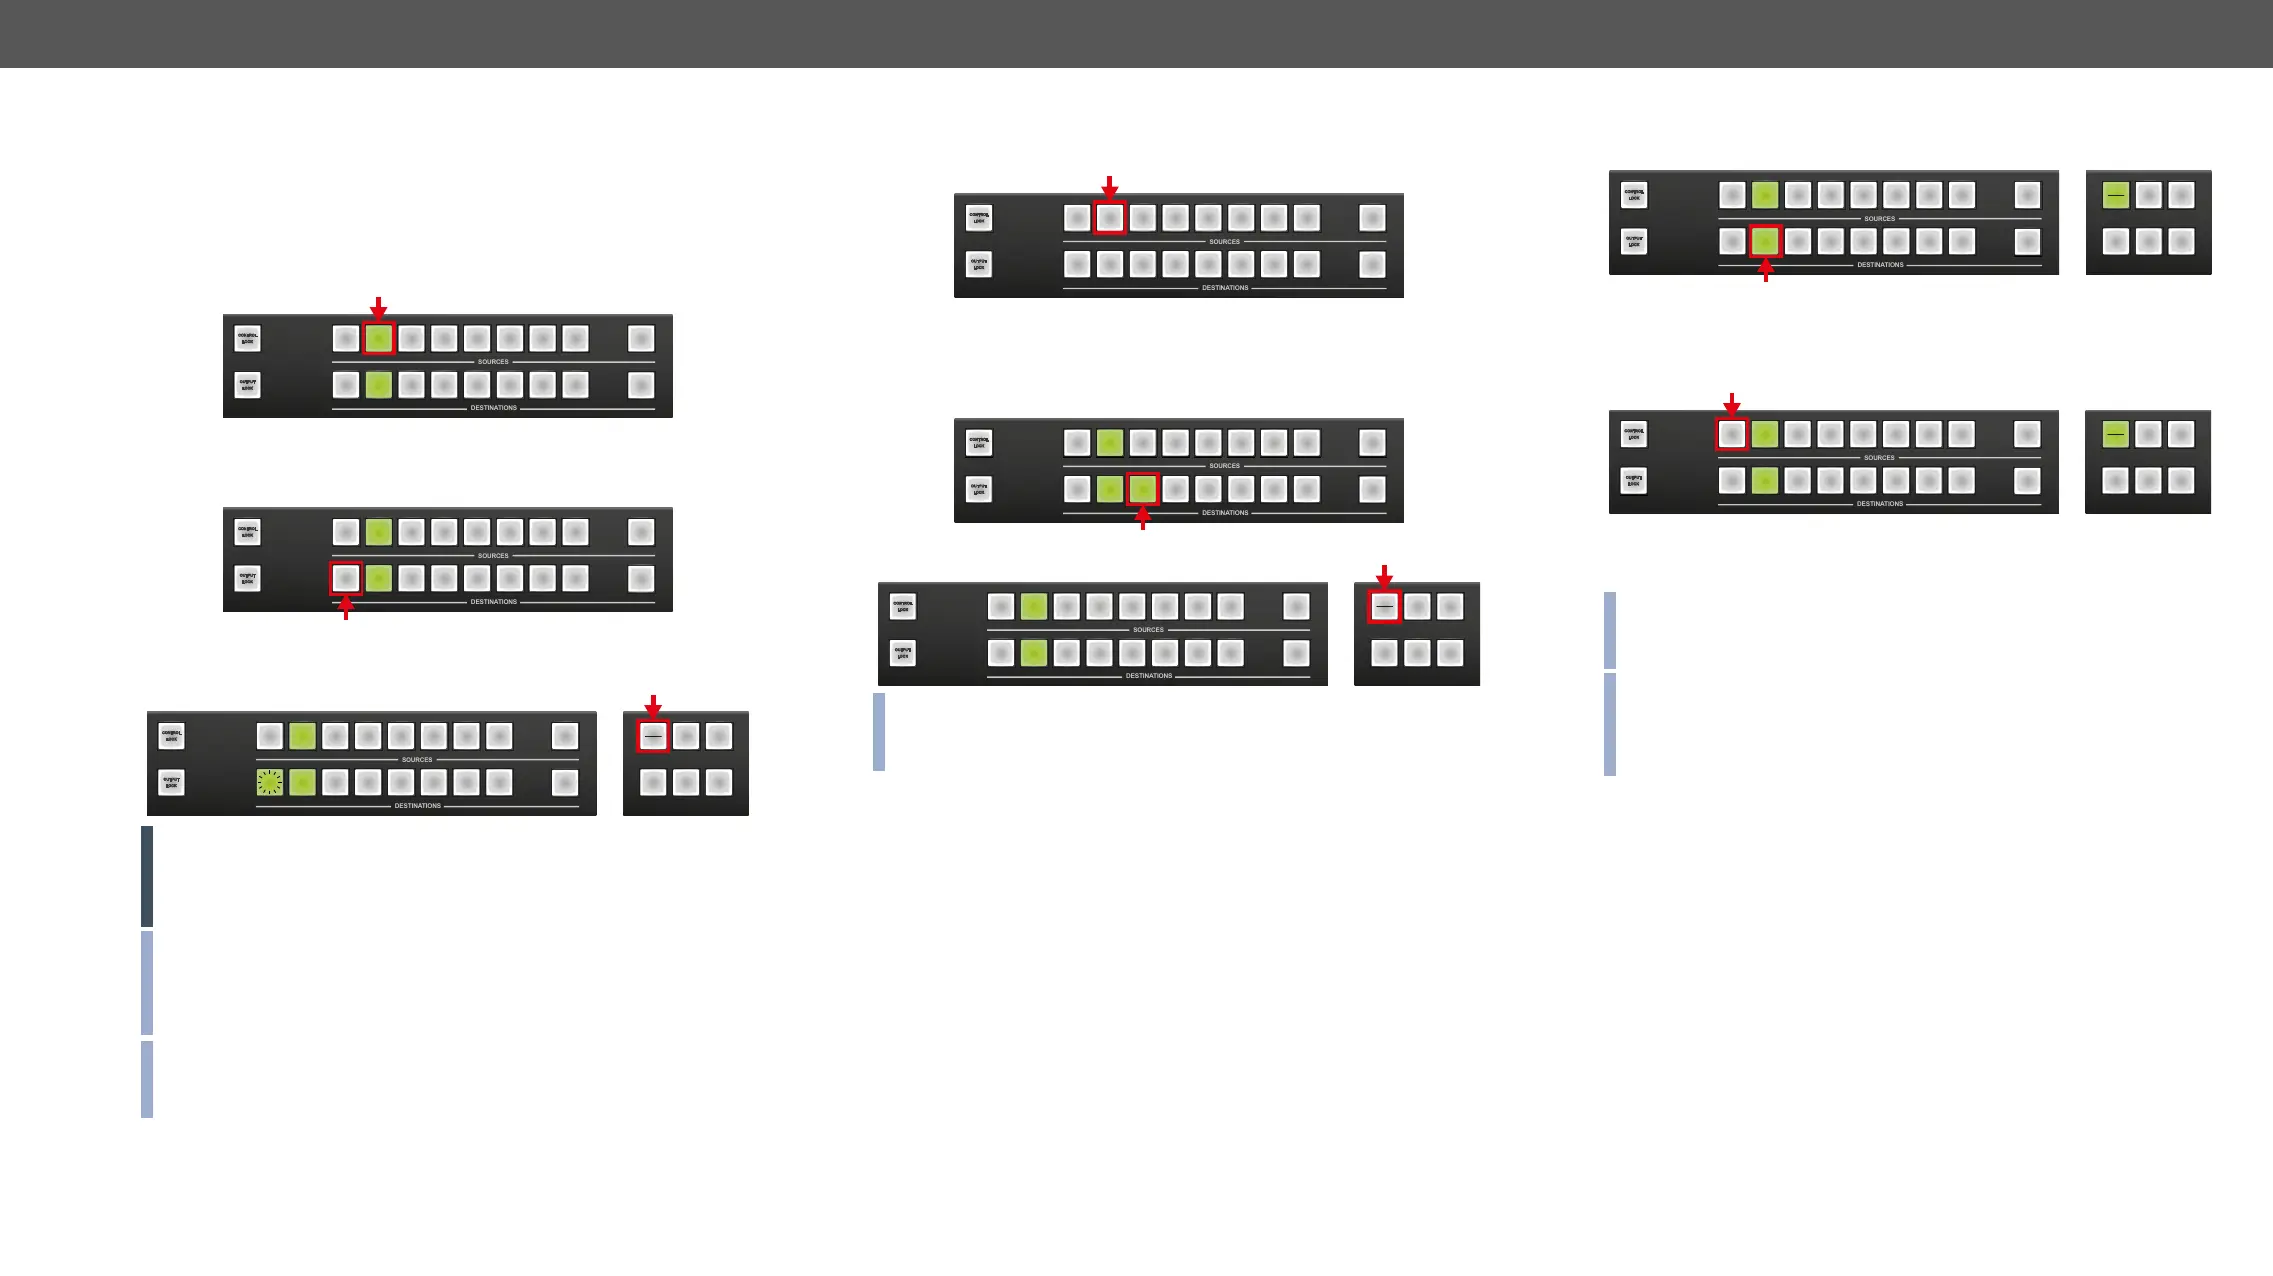
Changing Connections in TAKE Mode
Step 1. Press and release the desired source button. The pressed
source button and all destination buttons which are currently
connected to this source will light up. This is an informative
display about the current status of the selected input (view
only).
Step 2. Press and release the desired destination button(s) which has to
be connected to the selected source. The preselected
destination button(s) start(s) blinking.
Step 3. Press and release the Take button to execute switching. Now
the selected input is switched to the selected output or to the
multiple outputs.
ATTENTION! A source button can be pressed twice to preselect all
outputs. Outputs which are connected to the pressed input light up
and all other outputs start to blink. Some outputs can be unselected
if needed, and then pressing Take executes the switching.
INFO: Test input and Preview output ports can be accessed with up
and down buttons when the LCD shows their status. An asterisk
on the LCD indicates if the port is selected just like the back light
INFO: If the pressed destination is locked then it could not be
Output lock when a
locked destination is pressed.
3 4 5 6 7 8
1 4 6 7 8
9
9
CCOONNTTRROOLL
LLOOCCKK
LLOOCCKK
OOUUTTPPUUTT
1
2 3 5
2
3 4 5 6 7 8
4 6 7 8
9
9
CCOONNTTRROOLL
LLOOCCKK
LLOOCCKK
OOUUTTPPUUTT
1
2 3 5
2
1
3 4 5 6 7 8
4 6 7 8
9
9
CCOONNTTRROOLL
LLOOCCKK
LLOOCCKK
OOUUTTPPUUTT
1
3 5
2
1
EDID
SIGNAL
PRESENT
SAVE
PRESET
LOAD
PRESET
TAKE
AUTO
2
Disconnecting or Muting in Take Mode
Step 1. Press and release the selected source button.
The pressed source button and all destination buttons which
are currently connected to this source will light up.
Step 2. Press and release the desired green lighting destination button.
The pressed destination or multiple destinations will turn dark.
Step 3. Press and release Take button to execute disconnection.
INFO: Deselected destinations are disconnected from any source,
thus output devices will display black image or no signal message,
or automatically will turn off.
3 4 5 6 7 8
1 4 6 7 8
9
9
CCOONNTTRROOLL
LLOOCCKK
LLOOCCKK
OOUUTTPPUUTT
1
2 3 5
2
3 4 5 6 7 8
4 6 7 8
9
9
CCOONNTTRROOLL
LLOOCCKK
LLOOCCKK
OOUUTTPPUUTT
1
2 5
2
1 3
3 4 5 6 7 8
4 6 7 8
9
9
CCOONNTTRROOLL
LLOOCCKK
LLOOCCKK
OOUUTTPPUUTT
1
3 5
2
1
EDID
SIGNAL
PRESENT
SAVE
PRESET
LOAD
PRESET
TAKE
AUTO
2
Creating a Connection in Autotake Mode
Step 1. Press and release the desired destination button.
The pressed destination button and the actually connected
source button light up green. If no source is connected (the
output is muted) no source button will light up.
Step 2. Press and release the desired source button.
Switching is executed immediately. Switching between
sources to the selected destination can be done directly.
INFO:
entering Autotake mode to give quick access to the Test input and
Preview output ports.
INFO: Test input and Preview output ports can be accessed with up
and down buttons when the LCD shows their status. An asterisk
on the LCD indicates if the port is selected just like the back light
Disconnecting or Muting in AUTOTAKE Mode
To prevent accidental muting this action is inhibited (disabled) in
Autotake mode. Pressing a source button twice would cause accidental
disconnecting.
3 4 5 6 7 8
4 6 7 8
9
9
CCOONNTTRROOLL
LLOOCCKK
LLOOCCKK
OOUUTTPPUUTT
1
3 5
2
1
EDID
SIGNAL
PRESENT
SAVE
PRESET
LOAD
PRESET
2
TAKE
AUTO
3 4 5 6 7 8
4 6 7 8
9
9
CCOONNTTRROOLL
LLOOCCKK
LLOOCCKK
OOUUTTPPUUTT
1
3 5
2
1
EDID
SIGNAL
PRESENT
SAVE
PRESET
LOAD
PRESET
2
TAKE
AUTO