4. Operation MX-FR Series Modular Matrix Frames – User's Manual 33
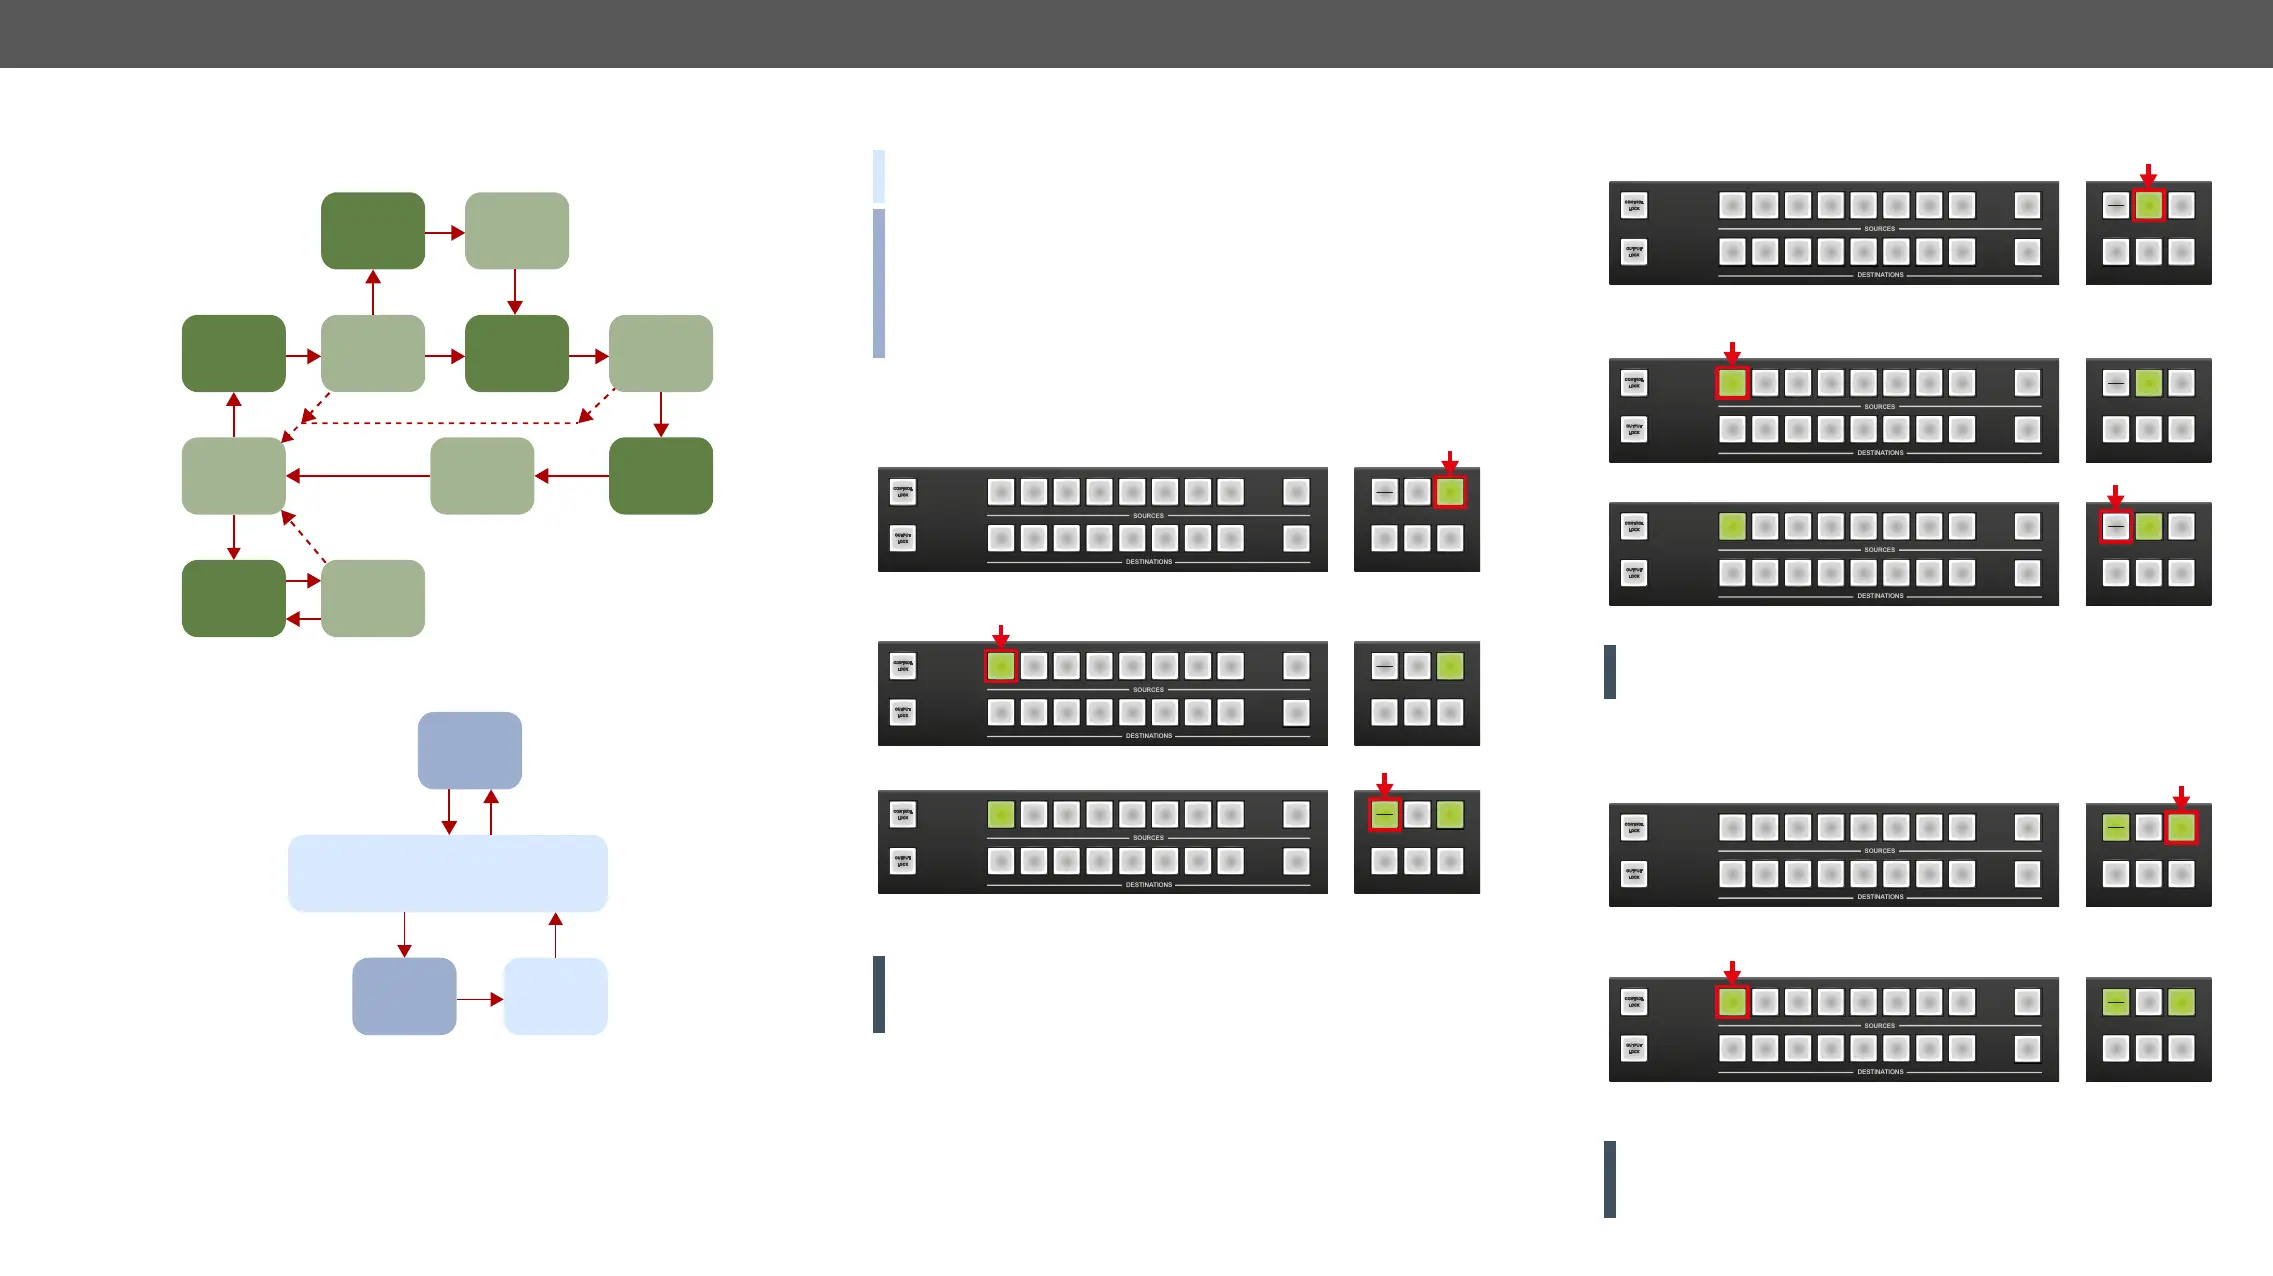
Switching Operations Flowchart
Take Mode
Autotake Mode
source
button
pressed
destination
button
pressed
idle
TAKE
mode
viewing
source
connections
viewing
destination
connection
select or
deselect
destinations
connections
realized
previewing
connections
TAKE
button
pressed
same
button
pressed
all outputs
preselected
nothing pressed for 3 sec
nothing pressed for 3 sec
destination
button
pressed
idle
AUTOTAKE
mode
viewing last destination’s
connection
select or
deselect
destinations
connection
realized
Preset Operations
DEFINITION: A preset
connections and mute state for all outputs.
INFO: All Lightware matrix routers have 32 user programmable
presets. All presets are stored in a non-volatile memory; the router
keeps presets even in the case of a power down. Memory numbers
are assigned to source buttons 1 to 32. If the frame has fewer
buttons, the higher numbered presets are accessible only through
software control.
Saving a Preset in Take Mode
Step 1. Create the desired connections which have to be saved.
Step 2. Press and release the Save preset button.
Step 3. Press and release a source button according to the desired
memory address (source 1 to 32).
Step 4. Press and release the Take button.
memory.
ATTENTION! Preset save action always stores the current
state.
3 4 5 6 7 8
4 6 7 8
9
9
CCOONNTTRROOLL
LLOOCCKK
1
3 5
EDID
SIGNAL
PRESENT
LOAD
PRESET
21
TAKE
AUTO
2
LLOOCCKK
OOUUTTPPUUTT
SAVE
PRESET
3 4 5 6 7 8
4 6 7 8
9
9
CCOONNTTRROOLL
LLOOCCKK
3 5
EDID
SIGNAL
PRESENT
LOAD
PRESET
21
TAKE
AUTO
2
LLOOCCKK
OOUUTTPPUUTT
SAVE
PRESET
1
3 4 5 6 7 8
4 6 7 8
9
9
CCOONNTTRROOLL
LLOOCCKK
3 5
EDID
SIGNAL
PRESENT
LOAD
PRESET
21
TAKE
AUTO
2
LLOOCCKK
OOUUTTPPUUTT
SAVE
PRESET
1
Loading a Preset in Take Mode
Step 1. Press and release the Load Preset button.
Step 2. Press and release a source button according to the desired
memory address (source 1 to 32).
Step 3. Press and release the Take button.
Now the selected preset is loaded.
ATTENTION!
not currently locked.
Saving a Preset in Autotake Mode
Step 1. Create the desired connections which have to be saved.
Step 2. Press and release Save Preset button.
Step 3. Press and release a source button according to the desired
memory address (source 1 to 32).
memory.
ATTENTION! Preset save action always stores the current
ignored.
3 4 5 6 7 8
4 6 7 8
9
9
CCOONNTTRROOLL
LLOOCCKK
3 5
EDID
SIGNAL
PRESENT
21
TAKE
AUTO
2
LLOOCCKK
OOUUTTPPUUTT
SAVE
PRESET
1
LOAD
PRESET
3 4 5 6 7 8
4 6 7 8
9
9
CCOONNTTRROOLL
LLOOCCKK
3 5
EDID
SIGNAL
PRESENT
21
TAKE
AUTO
2
LLOOCCKK
OOUUTTPPUUTT
SAVE
PRESET
1
LOAD
PRESET
3 4 5 6 7 8
4 6 7 8
9
9
CCOONNTTRROOLL
LLOOCCKK
3 5
EDID
SIGNAL
PRESENT
21
TAKE
AUTO
2
LLOOCCKK
OOUUTTPPUUTT
SAVE
PRESET
1
LOAD
PRESET
3 4 5 6 7 8
4 6 7 8
9
9
CCOONNTTRROOLL
LLOOCCKK
3 5
EDID
SIGNAL
PRESENT
21
TAKE
AUTO
2
LLOOCCKK
OOUUTTPPUUTT
SAVE
PRESET
1
LOAD
PRESET
3 4 5 6 7 8
4 6 7 8
9
9
CCOONNTTRROOLL
LLOOCCKK
3 5
EDID
SIGNAL
PRESENT
21
TAKE
AUTO
2
LLOOCCKK
OOUUTTPPUUTT
SAVE
PRESET
1
LOAD
PRESET