Installation
3827_en_B PHOENIX CONTACT 63/138
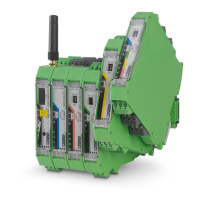
Figure 4-10 Connecting the antenna
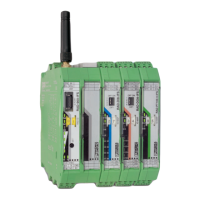
4.2 Wall-mounted devices (RAD-900-DAIO6)
4.2.1 Mounting
The RAD-900-DAIO6 includes mounting feet for installing the device on a vertical surface.
1. Loosen the four screws securing the cover and remove the cover.
2. Attach the mounting feet to the RAD-900-DAIO6 in the desired orientation using the
included screws, flat washers and lockwashers.
Figure 4-11 Mounting feet
+
2
4
V
0
V
R
S
S
I+
R
S
S
I-
A
B
+
2
4
V
RSSI+
RS
SI-
A
N
T
C
O
M
1
N
O
1
N
C
1
R
X
TX G
N
D
D
(
A
)
D
(
B
)
Reset
RAD-ID
RAD-2400-IFS
S.PORT
8
8
PW
R
D
AT
ER
R
RX TX
0
V
4-3-2-1
 Loading...