5
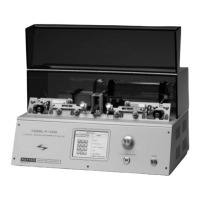
Filament Block
Assembly
(Figure 1-3)
The filament block assembly is made up of several pieces of hard
black nylon. Wires supplying current to the filament are attached
to threaded ‘posts’. This current is carried to the filament via the
upper and lower Brass Jaws. Note that these jaws may be moved up
and down by loosening the screws (D) that secure them to the front
of the filament block assembly. When changing the filament type
from trough to box (or vice versa), the jaws must be moved up or
down so that the filament is positioned at the correct level relative
to the glass. If the jaws are repositioned and/or the filament type
has been changed, make sure that the securing screws of the jaws
and filament clamp are again tightened. Failure to tighten these
screws can result in, poor current flow for scorching and
insufficient heat to melt the glass. Please refer to the “Installing a
Filament” You Tube video at
https://www.youtube.com/watch?v=cCsJsIZlzLw.
See “Filament Replacement” in the Maintenance chapter and
Pages 9-18 in the
Sutter Pipette Cookbook
for additional
instructions.
Eccentrics and
Angle Plate
(Figure 1-3)
The Angle Plate secures the Filament Block Assembly to the Cover
Plate; it contains two eccentric adjustments. The two chrome-
plated screws A and B are the eccentrics, and A’ and B’ are the
corresponding locking screws. By turning the eccentrics with a
screwdriver the Filament Block Assembly can be moved up and
down (A) or forward and back (B) to adjust the position of the
filament. Loosen the locking screw associated with each ‘eccentric
screw’ before turning, and tighten after completing the adjustment.
Note: Changing the eccentrics should be made only for fine/small
adjustments.
Cover Plate
(Figure 1-3)
The cover plate conceals the entry of the Pulling Cables into the
Base of the instrument. It is attached to the top by two screws, in
slots, at points labeled C. Loosening these screws allows the
Filament Block/Angle Plate assembly to move forward and back
over large distances.
NOTE: The movements of the Cover Plate and the Jaws constitute the ‘coarse adjustments’
of filament position, while the eccentric screws allow ‘fine adjustments’.
1.5.4 Upper Pulley Assembly
This assembly guides the Pulling Cables (T in Figure 1-5) from the Puller Bars (G in Figure
1-5) to the centrally located (and concealed) Lower Cable Pulley Assembly. Note that the
Upper Cable Pulley Assembly is attached to its panel by two screws, in slots (J’ in Figure
1-5), and contains a large eccentric adjustment screw (J in Figure 1-5). This eccentric screw
is used to adjust cable ‘tension’. Its use is covered in the Maintenance Section, and changes
P-1000 FLAMING/BROWN MICROPIPETTE PULLER SYSTEM OPERATION MANUAL – REV. 3.02 (20161118)
 Loading...