Do you have a question about the Weber 4300 and is the answer not in the manual?
Defines manual's purpose, scope, and user tasks.
Explains symbols, formatting, and terminology used throughout the document.
Provides a chapter-by-chapter overview of the manual's content.
Information on contacting technical support representatives for assistance.
Details machine dimensions, weight, electrical, air, and environmental requirements.
Criteria for optimal machine placement and positioning for operation.
Covers machine reliability, directives, guarding, and stop functions for safe operation.
Addresses procedures and responsibilities for pneumatic power loss.
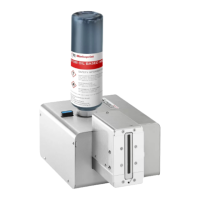
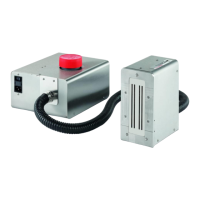
Illustrations and identification of the applicator's main parts and layout.
Procedures for unpacking and mounting the applicator unit.
Steps for safely moving and transporting the applicator.
Instructions for loading printer ribbon and label stock into the machine.
Guidance on adjusting label width settings for the print engine.
Procedures for setting up the tamp pad, including hole punching.
Instructions for installing and connecting the air filter assembly.
Steps to safely connect the applicator to the AC power source.
Connect and adjust compressed air supply, including air assist.
Procedure for setting the tamp pad's home position for label reception.
Steps for aligning the tamp pad precisely with the label for proper application.
How to adjust vacuum and air assist regulators for optimal label pickup.
Checking and adjusting tamp function, speed, and cushion settings.
Guidance on adjusting air blast duration and pressure for label transfer.
Procedure to test applicator setup by applying multiple labels to a single product.
Checks and verifies the operational status of the low label sensor.
Calibrating the low label sensor's sensitivity for accurate detection.
Setting the point at which the low label sensor activates an alarm.
Illustrations showing different orientations and positions of the applicator.
Instructions on how to rotate the controller display for better viewing.
Ensuring correct applicator placement for accurate label application.
Adjusting the product detector's sensitivity for reliable product detection.
Steps to position the product detector for accurate label placement.
Performing a final test run to verify label application accuracy.
Visual guide to navigating the controller's menu structure and options.
Explanation of the applicator controller's buttons and their functions.
Accessing and configuring core applicator settings like options, timers, and run modes.
Monitoring inputs, outputs, running test cycles, and viewing system status.
Routine checks and cleaning tasks performed each day.
Tasks to be performed weekly for optimal machine performance.
Periodic maintenance actions required every six months.
Annual checks and replacements for long-term reliability.
Procedure for adjusting the sensor that detects the tamp's home position.
Aligning the rewind sensor flag for proper waste liner management.
Troubleshooting steps for issues with label liner breakage.
Resolving problems with labels not adhering correctly to the tamp pad.
Addressing issues causing inconsistent label placement on products.
Diagnosing and fixing problems with the air assist system.
Troubleshooting common causes for the applicator failing to cycle.
Resolving issues where label application speed lags behind product rate.
Investigating and correcting unexpected or random machine operations.
Diagnosing and resolving problems preventing labels from feeding.
Troubleshooting compressed label print issues.
Addressing factors that lead to low-quality printing on labels.
Resolving labels printing without being applied to the product.
Troubleshooting the absence of the air blast during label application.
Resolving issues where labels do not transfer from the tamp pad.
Diagnosing and fixing problems with the rewind motor stalling.
Configuration settings for the product detector using JMP2 jumpers.
Description and color codes for the optional stack light indicator.
Wiring and implementation of an external switch to disable the tamp.
Overview of the I/O interface for external system coordination.
Illustrations of common input signal connection configurations.
Details on applicator output signals, voltage, and current ratings.
Example wiring diagram for a typical applicator output signal.
Diagram and explanation of the applicator's AC power wiring.
Diagram illustrating the DC wiring connections for sensors and components.
Configuration for a master-slave setup for continuous operation.
Diagram illustrating the pneumatic system layout and components.
Visual representations of the applicator's center of gravity.
Manufacturer's declaration regarding conformity with CE directives.
Manufacturer's statement of compliance with CE electromagnetic directives.
Details the warranty coverage, period, and limitations for the applicator.
Defines Weber's responsibilities and liabilities concerning product defects.