Applicator Setup
Weber Packaging Solutions, Inc. 4-5
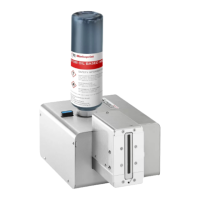
3. The tamp home position is adjusted by loosening the jam nut that locks the cylinder rod
to the floating coupling. Thread the cylinder rod into the coupling to raise the pad. Back
the rod out to lower the pad (see Figure 4-3).
4. Readjust and secure the Tamp Home sensor. See the Tamp Home Sensor Adjustment
Procedure in Chapter 7, Maintenance.
5. Slowly open the tamp-regulator back up to 30 psig (2 bar).
6. Set the main [POWER ON/OFF] switch to ON.
7. Use the [JOG] button to cycle the machine. Check the pad height setting and tamp home
sensor. Re-adjust as needed.
Tamp Pad/Label Alignment
There are two adjustments that can be made to align the tamp pad with the label:
The inboard edge of the tamp pad must be aligned with the inboard edge of the label.
The upstream edge of the tamp pad must be close enough to the printer peeler bar in
order to properly receive the label.
Figure 4-4: Inboard Edge of the Tamp Pad Aligned with Inboard Edge of Label