The
frequency of preventive
maintenance
is listed in D
100.
Components:
Internal calibrated leak . . . . . . . . . . . . . . . . . . . . . . . P/N
F
500
Purpose
of the
calibrated internal leak
AUTO CAL
It
enables
the auto-calibration
of the detector.
The
calibration is triggered at
start-up
or when the AUTOCAL
button is
pressed
on the
control panel (
C
300
).
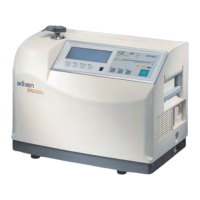
Heat
sensor
Label
Frequency
of
the internal leak
«recalibration»
In order to
ensure
the reliability of the helium
test,
the manufacturer
recommends
to «recalibrating» the internal calibrated leak at least
every 2 years (from the calibration date marked on the leak label and
its calibration certificate).
How to recalibrate the
internal leak
Recalibration
is generally performed using a comparative method
with a
reference
standard.
This
work can only be performed in our
approved
service
centers.
For this,
therefore
it is
necessary
to
remove
the internal calibrated leak
from the detector, et de
nous
le retourner.
Removal
of
the
internal
calibrated
leak
-
Switch off the
detector
and
disconnect
it from the main power
.
-
Reach
the internal calibrated leak (
E
110
).
-
Disconnect
the heat
sensor connector
(3-pin connector).
-
Disconnect
the flange and
remove
the calibrated leak.
Do not
separate
the heat
sensor
from the calibrated leak.
1/2