Do you have a question about the AGFA DR 800 and is the answer not in the manual?
Details the scope and content covered in this user manual for the DR 800 system.
Explains the meaning and use of various safety notice symbols (DANGER, WARNING, CAUTION, etc.).
States Agfa's liability limitations regarding document accuracy and product changes.
Defines the DR 800 system's purpose for general radiography and dynamic imaging applications.
Lists the specific anatomical areas and procedures for which the DR 800 system is indicated.
Specifies that the manual is for trained users and outlines user responsibilities for safe operation.
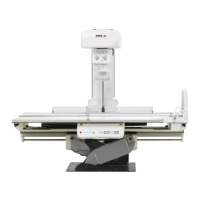
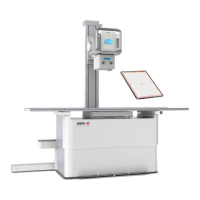
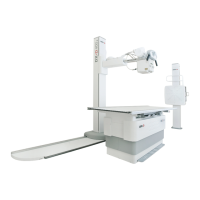
Provides a comprehensive overview of the DR 800 system components and configuration options.
Explains how system messages are displayed and what information they provide to the user.
Details the meaning of various symbols and labels found on the equipment.
Outlines requirements and considerations for the installation and configuration of the system.
Details essential safety measures and precautions related to X-ray radiation.
Describes the importance of regular maintenance for system safety and reliability.
Describes the function, features, and variants of the radiographic table.
Details the operation and function of the position controls on the console and table.
Explains how to view and manage scheduled and performed patient examinations.
Describes the software console's role in X-ray exposure and position parameter control.
Details the function of the exposure button and fluoroscopy/radiography pedals.
Explains how to view and manage details of a specific patient examination.
Describes how to manage image acquisition for radiography and fluoroscopy examinations.
Explains the process of preparing images for printing.
Describes how to manage aspects of the NX Workflow outside the daily routine.
Explains the use of an optional monitor for displaying reference images during examinations.
Details the DR detector switch functionality and status indication.
Describes the collimator controls, camera, and rotation features.
Provides information on detector orientation aids and contact with patients.
Explains the remote-controlled compressor's function and parking position.
Describes the FLFS overlay components and its function in image stitching.
Details the function and operation of the emergency stop buttons.
Explains the use of the emergency shutdown power switch for critical situations.
Identifies the electronic cabinets and the main system power switch.
Describes the radiographic wall stand, its variants, and bucky details.
Details the components and positioning controls of the ceiling suspension system.
Explains how system messages are displayed and what information they provide to the user.
Details the meaning of various symbols and labels found on the equipment.
Provides information on type labels and warning symbols on the radiographic table.
Details the type and warning labels found on the positioning console.
Describes the warning labels present on the wireless console.
Identifies the location of the type label on the DR 800 sync cabinet.
Indicates the location of the type label on the positioner cabinet.
Specifies the location of type and maintenance labels on the wall stand.
Details the type label and laser information for the collimator.
Describes the location of type and warning labels for the ceiling suspension.
Explains the labels and meaning for the FLFS overlay.
Indicates labels that confirm earthquake resistance testing for components.
Outlines requirements and considerations for the installation and configuration of the system.
Details essential safety measures and precautions related to X-ray radiation.
Describes the importance of regular maintenance for system safety and reliability.
Describes the built-in camera for visualizing anatomical regions remotely.
Explains the functionality of rotating the collimator around the X-ray beam axis.
Details how to position the X-ray tube using the control panel.
Describes the controls and features of the collimator for the ceiling suspension.
Provides information on type labels and warning symbols on the radiographic table.
Details the type and warning labels found on the positioning console.
Describes the warning labels present on the wireless console.
Identifies the location of the type label on the DR 800 sync cabinet.
Indicates the location of the type label on the positioner cabinet.
Specifies the location of type and maintenance labels on the wall stand.
Details the type label and laser information for the collimator.
Describes the location of type and warning labels for the ceiling suspension.
Explains the labels and meaning for the FLFS overlay.
Indicates labels that confirm earthquake resistance testing for components.
Details electrical connection requirements and national regulations.
States the system's intended use in X-ray rooms with appropriate shielding.
Explains fluoroscopy technique and potential risks of exposure.
Describes the process of monitoring personnel exposure to X-ray radiation.
Defines protected areas and zones for controlling patient and operator exposure.
Details periodic maintenance tasks for suspension and wall stand components.
Explains how to perform offset calibration for the DR detector.
Provides steps to check the automatic collimation functionality.
Provides instructions for safely cleaning the exterior of the equipment.
Recommends using covers to protect the system from patient contact.
Outlines procedures and approved methods for disinfecting the device.
Provides crucial safety guidelines for disinfection procedures.
Directs users to the Agfa website for compatible disinfectant specifications.
Details cleaning and disinfection procedures for the FLFS overlay.
Identifies dangerous areas around the system during movement to prevent collisions.
Ensures operators maintain visual contact with the patient and machine.
Provides safety warnings and guidelines for using the wireless console.
Details safe procedures for patients when getting on or off the examination table.
Provides guidelines to avoid damaging the system's components and surfaces.
Warns about hazards related to overhead devices and ceiling suspension.
Safety warnings related to the use and handling of the FLFS overlay.
Warns about potential effects of metal structures on tomosynthesis image quality.
Safety warnings for operating the ceiling suspension and wall stand.
Step-by-step guide for powering on and starting the DR 800 system.
Procedure for warming up the X-ray tube to extend its lifetime.
Describes the automated workflow for warming up the X-ray tube via software console.
Explains how to use fluoroscopy for patient positioning before planned exposures.
Details the workflow for acquiring a set of fluo, rapid, and static images for diagnosis.
Describes the workflow for acquiring acquisition and reconstruction sequences for tomosynthesis.
Explains the workflow for acquiring DSA sequences and related imaging types.
Details the workflow for performing roadmapping examinations as part of DSA.
Provides the correct procedure for shutting down the NX workstation and the system.
Demonstrates patient positioning techniques for various patient conditions.
Explains how to adjust focal distance, tilting angle, and tube incidence.
Describes procedures for examining the esophagus and stomach.
Details how to perform projections for the duodenal and small intestine.
Explains how to perform skeletal examinations of skull, spine, and limbs.
Details radiography techniques for the cervical spine, including for tall patients.
Describes examinations of the abdominal and lumbar regions, including oblique projections.
Explains examinations for upper and lower limbs, including for patients with restricted movement.
Provides information on executing thorax radiography with specific focus-detector distances.
Discusses patient positioning and accessory use for urography and pyelography.
Details procedures for examining the uterine cavity and fallopian tubes.
Provides guidelines for reducing dose and maintaining image quality in pediatric applications.
Lists typical kV, AEC, mAs, and FPS settings for various examinations.
Outlines the steps for defining patient information for an exam.
Details how to select the correct thumbnail for FLFS examination.
Describes how to position the X-ray system and mount the FLFS overlay.
Explains how to position the patient and specify the region of interest for the exam.
Guides on verifying and editing exposure settings for partial images.
Details the procedure for executing the examination exposures.
Explains how to perform quality control and adjust stitching parameters.
Outlines steps for letting the patient step down and removing the FLFS overlay.
Provides instructions on how to safely store the FLFS overlay.
Covers manual adjustments like rotating, stitching, and aligning partial images.
Explains how to reject images not suitable for diagnosis.
Details how to perform calibrated distance measurements on images in NX.
Displays key parameters and navigation to detailed controls.
Details the status indicators for ready for exposure, modality position, and detector.
Explains the meaning of color codes (Green, Red, Blue) for exposure readiness.
Describes how modality position is selected and modified.
Details the DR detector switch for activating and showing detector status.
Explains battery, connection, and status icons for DR detectors.
Guides on manually triggering offset calibration to prevent image artifacts.
Explains the meaning of the unknown status icon and how to resolve it.
Details automatic and manual filter settings and their status.
Explains status indications for removable and automatic grids.
Describes the display of X-ray tube thermal capacity and limitations.
Details radiation status icons and their meanings during system operation.
Explains the DAP value as a measure of radiation dose from the last exposure.
Displays total fluoroscopy time and provides alarm and duration settings.
Explains how to reset the fluo timer to continue fluoroscopy.
Details controls for imaging modes, patient age group, and radiographic parameters.
Describes controls for fluoroscopy, patient age, sensor area, and ABS.
Details controls for selecting modality position, DR detector, filter, and grid.
Explains automatic position, actual/target parameters, and collimation controls.
Details parameters for acquisition, positioning, and reconstruction in tomosynthesis.
Explains message colors indicating importance and feedback requirements.
Explains how imaging mode selection affects exposure button function.
Describes configuration of pediatric age group for lower dose values.
Details radiographic working modes based on parameter control and automation.
Explains selecting active area size for image resolution or frame rate.
Details parameters like kV, mAs, mA, ms, Max ms, and Max mAs.
Shows how to change focal spot and its effect on kV and mAs.
Explains AEC's function in producing consistent detector dose.
Details how to select or deselect AEC fields based on physical location.
Allows adjustment of AEC cut-off dose (low, middle, high).
Explains how to adjust AEC cut-off dose and patient entrance dose.
Classifies patient size and its effect on kV and mAs variation.
Describes the safety device that terminates exposure when radiation is not detected.
Explains how imaging mode determines fluoroscopy pedal function.
Describes configuration of pediatric age group for lower dose values.
Explains selecting active area size for image resolution or frame rate.
Details radiographic parameters like kV and mA for fluoroscopy.
Explains ABS function in adjusting exposure parameters for optimal image quality.
Describes the built-in camera for visualizing anatomical regions remotely.
Explains selecting target automatic positions and previewing system positions.
Corresponds target position parameters to the selected automatic position.
Details single, double, and manual collimation features.
Provides information on the battery status and charging indicators of the wireless console.
Details parameters like kV, mAs, and FPS for tomosynthesis acquisition.
Explains SID and X-ray tube sweep angle parameters for tomosynthesis.
Details parameters for start height, end height, slice thickness, and sharpness.
Provides instructions for mounting the patient footrest on the tabletop.
Details how to mount hand grips for patient safety and stability.
Explains how to mount shoulder rests for patient safety during examinations.
Describes how to mount the compression belt for abdominal examinations.
Instructions for mounting lower limbs, ankle, and head contention devices.
Details mounting and positioning the lateral arm rest on the table.
Explains how to mount and position the lateral arm rest on the wall stand.
Provides instructions for mounting the cassette/detector holder on the table.
Details how to assemble and connect the control joystick console.
Explains how to attach the cushion for extra patient comfort.
Describes mounting the paediatric cradle using hand grips and contention structure.
Details single/double pedals, wireless pedal status, and battery requirements.
Troubleshooting steps for when the compressor cannot be released.
Explains the message indicating DR detector recalibration is needed.
Troubleshooting steps for when the DR 800 sync cabinet is not functioning.
Addresses issues where anatomical information alignment in stitching is suboptimal.
Troubleshooting steps when partial images cannot be stitched due to missing grid markers.
Explains how to adjust cropping or re-collimate manually when information is invisible.
Describes how to continue or recover from an interrupted FLFS examination.
Troubleshooting steps for restoring wireless console connection.
Troubleshooting for issues with lateral SID indications on the ceiling suspension.
Lists common error messages for the ceiling suspension and their solutions.
Specifies requirements for combining the system with other Agfa-recognized equipment.
Lists relevant standards and directives for system compliance.
Details the classification of the device regarding electric shock protection and operation.
Ensures user compliance with patient data legal requirements and security.
Specifies minimum requirements for information security and privacy (ISP).
Instructions for healthcare professionals on how to report product complaints.
Provides notices regarding WEEE and battery disposal and recycling.
Informs where to find system documentation and the latest manual version.
Emphasizes the need for adequate training on system use and safety.
Discusses performance aspects of stitched images and incidental findings.
Provides technical specifications for various system components and accessories.
Details electromagnetic emissions and immunity guidelines for the radiographic table.
Details electromagnetic emissions and immunity guidelines for the wall stand.
Details HF emission and immunity guidelines for the wall stand bucky with moving grid.
Provides manufacturer, type, electrical connection, and weight specifications.
Details type, dimensions, movement range, SID, and grid specifications.
Specifies manufacturer, model, warming-up time, and pixel matrix of the detector.
Details type, manufacturer, electrical connection, and battery life.
Provides manufacturer, type, radiation leakage, filtration, and dimensions.
Details model, manufacturer, dimensions, movement, weight, and grid specifications.
Provides model, manufacturer, dimensions, movement, and power input requirements.
Lists minimum hardware requirements for the workstation PC.
Details dimensions, weight, X-ray absorption, and environmental requirements.
Lists equivalent filtration values at 75 kV for various components.
Provides system configuration and dosimetric information obtained via test procedures.
Details rated voltage, frequency, current absorption, and protection for the radiographic table.
Provides weight, maximum load, and dimensions for various system options and accessories.
Details electromagnetic emissions and immunity guidelines for the radiographic table.
Details electromagnetic emissions and immunity guidelines for the wall stand.
Details HF emission and immunity guidelines for the wall stand bucky with moving grid.
| Type | Digital Radiography System |
|---|---|
| Image Size | 3072 x 3072 pixels |
| Vertical Movement | Yes |
| Dynamic Range | 16-bit |
| Spatial Resolution | 3.6 lp/mm |
| Detector Size | 43 cm x 43 cm |
| Pixel Size | 139 μm |
| Applications | Radiography, Fluoroscopy |
| X-ray Tube | Rotating Anode |
| Table | Height Adjustable |
| Image Acquisition Time | < 3 seconds |
| Power Requirements | 400 VAC, 50/60 Hz |
| Dimensions | Varies depending on configuration |
| Compatibility | DICOM 3.0 |