EasyManua.ls Logo

Brother S-7300A - Service Manual

Brother S-7300A
196 pages
Print Icon
To Next Page IconTo Next Page
Loading...
S-7300A
Please read this manual before making any adjustments.
SINGLE NEEDLE DIRECT DRIVE LOCK STITCHER WITH
ELECTRONIC FEEDING SYSTEM AND THREAD TRIMMER
SERVICE MANUAL

Table of Contents

Other manuals for Brother S-7300A

Questions and Answers

  • J
    Joel WilliamsSep 6, 2025
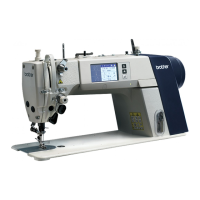
    What to do if thread trailing length on underside of material is too short when T/T short is on with Brother S-7300A?
    • M
      migueldoyleSep 6, 2025
      If the thread trailing length on the underside of the material is too short when T/T short is activated, use the T/T short parameters to increase the pitch during thread trimming.
  • J
    James AdamsSep 7, 2025
    How do I prevent fraying at the sewing end with my Brother S-7300A Sewing Machine?
    • K
      Kayla WilsonSep 7, 2025
      To prevent fraying at the sewing end, turn on the T/T short function, and then use the T/T short parameters to set the feed direction for sewing end processing to '?'.
  • R
    richardsonamySep 7, 2025
    What should I do if my Brother Sewing Machine's needle breaks?
    • G
      Gabrielle JosephSep 8, 2025
      A needle can break for several reasons: * If the material is being pushed or pulled with excessive force during sewing. * If the needle is not properly installed, install the needle correctly. * If the needle tip is bent, broken, or the needle hole is blocked, replace the needle. * If the needle and rotary hook timing is incorrect, adjust the height of the needle bar and the clearance between the needle and the tip of the rotary hook. * Try pressing the special locus key and selecting No. 2 or No. 3.
  • M
    Mark SchroederSep 8, 2025
    What to do if my Brother Sewing Machine has incorrect thread trimming (Upper thread is not being trimmed.) (Lower thread is not being trimmed.)?
    • W
      William JamesSep 8, 2025
      If the upper or lower thread is not being trimmed, check the following: * Ensure the needle is correctly installed; if not, install it correctly. * The fixed knife or movable knife may be blunt; replace them if necessary. * Ensure there is enough meshing between the upper and lower knives; the tip of the upper knife should reach the lower knife index position for proper meshing.
  • C
    Charles WhiteSep 8, 2025
    How to fix incorrect thread trimming on my Brother S-7300A Sewing Machine?
    • D
      Diane MayoSep 9, 2025
      If the thread is not being trimmed correctly, it could be due to: * A damaged or worn fixed knife or movable knife; replace them. * Insufficient meshing between the upper and lower knives; adjust the tip of the upper knife to the lower knife index position to ensure proper meshing.

Summary

SAFETY INSTRUCTIONS

Indications and Warnings

Explains hazard levels (DANGER, WARNING, CAUTION) and safety symbols for user protection.

Warning Labels

Details the meaning and importance of various warning labels found on the sewing machine.

General Safety Precautions

Outlines essential safety measures for machine setup, environment, and handling.

NOTES ON HANDLING

Machine Setup and Location

Advises on optimal placement to avoid electronic interference and ensure proper operation.

Safe Machine Handling and Tilting

Provides instructions for safely carrying the sewing machine and tilting its head.

FUNCTION SETTINGS

Special Functions and Memory Settings

Covers accessing special functions via power-on key combinations and advanced memory switch configuration.

Operational Checks and Data Management

Details methods for checking inputs/outputs, managing protect settings, error history, and software versions.

Energy Saving and Protect Settings

Explains how to enable energy saving mode and configure protection for machine functions.

MECHANICAL DESCRIPTIONS

Key Mechanism Overviews

Describes the upper, lower, feed, and lubrication mechanisms of the sewing machine.

Thread Trimming and Tension;Wiper Mechanisms

Details the operation and components of the thread trimming, tension release, and thread wiper systems.

DISASSEMBLY

Basic Component Disassembly

Covers the disassembly of knee lifter, cable ties, connectors, covers, and panel assemblies.

Wire, Oil, and Sensor Component Disassembly

Details the removal of tension wires, solenoids, oil systems, sensors, and hand switches.

Mechanism Component Disassembly

Explains the disassembly of tension, feed, motor, pulley, shaft, and trimming mechanisms.

ASSEMBLY

Shaft, Gear, Pulley, and Motor Assembly

Guides on assembling shaft, gear, pulley, motor, belt, and related components.

Core Sewing Mechanism Assembly

Details the assembly of tension, feed, presser foot, trimming, oil, and cover components.

ADJUSTMENTS

Thread Tension and Spring Adjustments

Covers adjusting thread tension springs, arm thread guides, and presser foot height.

Feed Mechanism Adjustments

Provides detailed procedures for adjusting feed motor home position, pitch, stitch length, and dog height/angle.

Timing and Release Wire Adjustments

Guides on adjusting needle/hook timing, thread take-up, presser foot floating, tension release, and X-over sensor.

Touch Key Calibration

Explains the process for calibrating the touch panel's key reading coordinates.

REPLACING PARTS

Thread Trimming and Motor Replacement

Provides steps for replacing thread trimming parts and motors, including adjustments.

Panel and Tension Assembly Replacement

Guides on replacing the control panel and adjusting the tension stud bracket assembly.

APPLYING GREASE

ELECTRIC MECHANISM

Electrical Safety and Connector Checks

Emphasizes electrical safety precautions and the importance of checking connector integrity before adjustments.

Component Electrical Checks

Details procedures for checking fuses, motors, power supply, and solenoids for proper function.

TROUBLESHOOTING

General Troubleshooting Guide

Lists common sewing problems, their potential causes, and suggested remedies with page references.

Error Code and Specific Issue Resolution

Provides a list of error codes and detailed steps for resolving specific operational issues.

Brother S-7300A Specifications

General IconGeneral
BrandBrother
ModelS-7300A
CategorySewing Machine
LanguageEnglish

Related product manuals