7.7.2 Main pipe
Removal
• Remove hose clamps in the ends of the respective back
valve
• Each back valve has eight nuts.
• Remove the seal.
Assembly
• Replace the seal and install the back valve.
• Attach the hoses and tighten the hose clamps.
• Then tighten the nuts that hold the back valve.
• When replacing the upper back valve the pressure switch has
to be attached before the nuts are tightened on the two upper
screws.
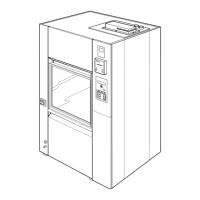
Figure 23. Rear of machine
7.7.3
Valves
Removal
• Remove the hose(s) that are connected to the valve.
• Then unscrew the two screws that keep the valve in place in
the valve bridge.
Assembly
• Screw the valve into the valve bridge.
7.7.4
Electric terminals
• The respective electric terminal has two screws in the lower
plate on the back side.
7.8
Maintenance from bottom
The machine must be turned on its side in order to perform
maintenance from the underside of the machine.
7 REPAIRS AND ADJUSTMENT
TECHNICAL MANUAL GETINGE WD15 CLARO 89 (128)
<Doc_TEC><Doc_6001396902><Rev.I><Lang_en>