1 689 989 087 2018-07-24| Robert Bosch GmbH
78 | CRI/CRIN 848H | Preparing for testingen
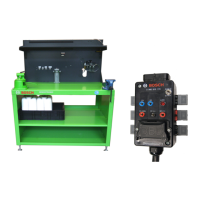
2. Connect multiple connector (Fig. 53, item2) of
adapter cable with X5 connection to control elec-
tronics.
3. Join ground lead (Fig. 53, item1) to ground plug
socket on control electronics.
458806-24
2
1
Fig. 53: Adapter cable connection
i The assignment must be observed when connecting
the plug connector to the injectors. Each plug con-
nector is identified by means of a nameplate.
4. Connect adapter cable to injectors (Fig. 54).
A
B
C
D
E
F
A
B
C
D
F
E
A
B
C
D
E
F
Fig. 54: Electrical connector
5.3 Commercial vehicle injectors with
external connections
ATTENTION - Risk of burns from hot sur-
faces!
Hand burns may result from contact with
the hot surfaces of the test pressure line,
distributor rail or injection chamber.
¶ Allow the test pressure lines, distributor
rail and injection chamber to cool down.
¶ Wear protective gloves.
! Never clamp injectors for testing if damaged or
severely corroded.
i Injectors must always be cleaned before clamping
for testing (refer to Section 5.1).
i No more than four commercial vehicle injectors can
be clamped for each test. The maximum possible
number of injectors can be found in the system soft-
ware EPS 945 in the "Component selection" window
under "General values".
5.3.1 Preparing the injection chamber
1. Check the injector nozzle retaining nut shape:
458847-54_Pal
Fig. 55: Nozzle retaining nut shape
A) Flat
B) Conical
 Loading...