1 689 989 087 2018-07-24| Robert Bosch GmbH
Preparing for testing | CRI/CRIN 848H | 81
en
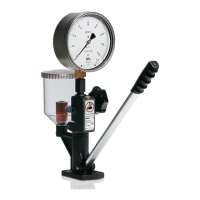
5.3.3 Connecting high pressure hose
Replace the high-pressure hose imme-
diately if the union, the sealing cone or
the sheath of the high-pressure hose is
damaged.
1. Check that the thrust ring (Fig. 62, item 1) is secure-
ly tightened (left-hand thread).
2. Screw a suitable adapter nut (Fig. 62, item 2) for the
injector connection to the high-pressure hose, and
tighten slightly.
i The adapter nut (Fig. 62, item 2) is included in the
high-pressure hose scope of delivery.
458847-49_Pal
1 687 712 ...
M=25 - 30 Nm
3
FD: 2010-09FD: 2010-09
Fig. 62: High-pressure hose
3. Remove the union nut (Fig. 64, item 2) and sealing
cone (Fig.64, item 1) from the high-pressure outlets
of the distributor rail.
! The high-pressure hose must not lie against the pro-
tective hood of the EPS 708 when it is closed. Make
sure that the bending radius of the high-pressure
hose is no less than 200 mm.
4. Connect the high-pressure hose to the high-pressure
outlet of the distributor rail (refer to Fig. 63). Tight-
ening torque: 25 – 30 Nm.
5. Connect the other end of the high-pressure hose to
the high-pressure connection of the injector (refer to
Fig. 63). Tightening torque: 25 – 30 Nm.
458847-24_Pal
Fig. 63: High pressure connection
6. Seal unused high-pressure outlets with sealing cone
(Fig. 64, item1) and union nuts (Fig. 64, item 2).
Tightening torque: 25 – 30 Nm
458847-25_Pa
1
2
Fig. 64: Plug for high-pressure outlet
 Loading...