Do you have a question about the HIKVISION DS-2SE4C425MWG-E/26(F0) and is the answer not in the manual?
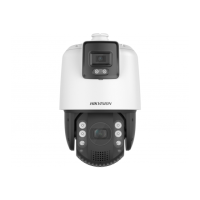
Provides an introduction to the Smart-Linkage PTZ Camera and its capabilities.
Details the main functions of the PTZ camera, including audio alarm and face capture.
Outlines the necessary computer specifications for operating the product.
Explains the process of activating the device by setting a strong password.
Guides on activating the device using a web browser and its required steps.
Details the activation process using the SADP tool for detecting and activating devices.
Instructions for accessing the device through a web browser, including login.
Information on installing necessary plug-ins for web browser compatibility.
Procedure for recovering the admin password if it is forgotten.
Configuration for the illegal login lock feature to enhance security.
Options for enabling VCA functions and allocating resources for desired functions.
General parameters related to smart applications and their configurations.
Customizing specific information for the device for identification purposes.
Details on how the device detects, captures, and processes faces.
Configuration for automatically capturing faces based on defined rules.
Instructions for manually capturing target faces from the live view.
Configuring capture parameters and information display on streams and pictures.
Settings for optimizing the algorithm library used for face capture.
Function to display real-time pictures from smart functions and analyze targets.
Using PTZ control buttons for panning, tilting, and zooming the camera.
Defining and calling preset image positions for quick camera positioning.
Utilizing presets with special demands to enable specific functions.
Configuring automatic movement among multiple presets for patrol scanning.
Automatically adding presets to a patrol path and starting patrol scan.
Enabling the device to move according to a recorded pattern.
Defining movement range limits for the device's operation.
Setting a reference point as the device's home or base position.
Configuring an action (preset or patrol) to perform after a period of inactivity.
Function to initiate park action instantly.
Scheduling the device to perform specific tasks during defined periods.
Resuming the previous PTZ status of the device after a power restart.
Setting the priority for different PTZ control signals.
Configuring privacy masks to cover specific areas in the live image.
Reducing focusing time by using rapid focus function after calibration.
Linking panoramic and PTZ channels through calibration for target tracking.
Performing automatic calibration for panorama linkage.
Performing manual calibration for panorama linkage.
Mapping geographical locations to camera scenes for target information.
Setting calibration points for GPS calibration.
Verifying the accuracy of GPS calibration settings.
Setting the device's geographical location and orientation.
Manually determining and setting the North direction for the device.
Configuration of parameters for the live view display.
Instructions for starting and stopping the live view feed.
Setting the display ratio for the live view image.
Selecting the type of stream for the live view.
Choosing third-party plug-ins for browser compatibility in live view.
Enabling digital zoom to view detailed information in specific image regions.
Enabling focus on specific areas within the live view.
Optimizing image exposure for selected regions in the live view.
Displaying height and width pixel information for selected regions.
Turning the illuminator on or off.
Controlling the camera's wiper through the web browser.
Resetting the camera lens to its initial state.
Manually selecting and tracking a target in the live view.
Relocating a selected area to the center of the image.
Adjusting transmission parameters to resolve live view display issues.
Configuring video parameters such as stream type, encoding, and resolution.
Specifying parameters for different stream types like Main and Sub Stream.
Selecting the content type (video only or video & audio) for the stream.
Choosing video resolution based on bandwidth and storage needs.
Setting constant or variable bitrate for video compression.
Configuring video quality when using variable bitrate.
Setting the frequency at which video streams are updated.
Selecting the compression standard for video encoding.
Determining image quality and network bandwidth requirements based on profile.
Defining the number of frames between I-frames for video decoding.
Configuring Scalable Video Coding for backward compatibility.
Adjusting stream smoothness for fluency or quality.
Configuring audio parameters including encoding and noise filtering.
Setting up external audio input devices and their parameters.
Adjusting the volume for the device's built-in speaker.
Enabling or disabling a filter to reduce environmental noise.
Enabling and using two-way audio communication.
Setting Region of Interest for prioritizing encoding resources.
Defining specific regions for interest encoding.
Cropping images to save transmission bandwidth and storage.
Setting rules to display object information on the video stream.
Adjusting various image features and parameters.
Selecting predefined image parameter sets for different environments.
Automatically switching image parameters based on time periods.
Adjusting the live view image to display normally (mirroring).
Selecting the video signal standard (NTSC or PAL).
Customizing On-screen Display information on the video stream.
Configuration of common storage paths and memory card management.
Viewing and managing memory card capacity, status, and encryption.
Configuring FTP server settings for saving captured images.
Configuring Network Attached Storage for storing records and images.
Automatically stopping eMMC use when its health status is poor.
Uploading captured pictures and data to the cloud.
Operations for manual and scheduled video recording.
Configuring automatic video recording based on time periods and events.
Initiating and stopping video recording manually.
Searching, playing back, clipping, and downloading recorded videos.
Manually or automatically capturing pictures and snapshots.
Setting up automatic picture capture based on schedule or events.
Capturing snapshots manually from the live view or playback window.
Searching, viewing, and downloading captured pictures.
Configuration of basic event types like motion detection.
Detecting moving objects and triggering linkage actions.
Triggering an alarm when the video feed is tampered with.
Configuring actions triggered by external alarm input devices.
Setting alarms for exceptional conditions like network disconnection.
Detecting abnormal sound conditions in the scene.
Configuration of advanced smart event detections.
Detecting object movement within predefined areas.
Detecting objects crossing a predefined line.
Detecting objects entering a predefined area.
Detecting objects exiting a predefined area.
Configuring parameters for target tracking, including zoom and duration.
Adjusting motion parameters for better target tracking performance.
Setting the valid time periods for device tasks and alarms.
Enabling and configuring linkage functions when events or alarms occur.
Configuring automatic or manual alarm outputs.
Sending alarm information to FTP, NAS, or memory card.
Configuring email notifications for alarm events.
Uploading alarm information to a surveillance center.
Enabling smart tracking of targets when an alarm event is detected.
Initiating video recording upon detection of an alarm event.
Setting up audible warnings for alarm events.
Configuring an alarm server to receive alarm information.
Configuring TCP/IP settings for IPv4 and IPv6 network access.
Setting up port mapping to access devices through specified ports.
Configuring automatic port mapping using UPnP™.
Configuring manual port mapping for device access.
Configuring port mapping settings on the router.
Configuring SNMP for network management and alarm event retrieval.
Accessing the device using a domain name via DDNS.
Configuring PPPoE parameters for ADSL dial-up connection.
Accessing the device remotely using the Hik-Connect mobile app.
Enabling the Hik-Connect service on the camera.
Installing and setting up the Hik-Connect application.
Adding the camera to the Hik-Connect service.
Configuring HTTP and HTTPS protocols for secure remote access.
Configuring multicast settings for group data transmission.
Enabling multicast discovery for automatic network camera detection.
Configuring Real Time Streaming Protocol for media streaming.
Setting Secure Real-time Transport Protocol for encrypted streaming.
Enabling Bonjour for zero-configuration networking and service discovery.
Enabling WebSocket or WebSockets for browser preview.
Improving network latency and reducing packet loss.
Shaping and smoothing video data packets for better quality.
Registering the device on the ISUP platform for management.
Configuring user settings for Open Network Video Interface protocol.
Enabling SDK Service for adding the device to client software.
Viewing device information such as model, serial number, and firmware version.
Restarting the device via the web browser.
Upgrading the device firmware using the correct package.
Restoring device parameters to default or factory settings.
Searching and managing device logs for troubleshooting.
Exporting and importing device configuration files for batch setup.
Exporting diagnose information including logs, system, and hardware details.
Searching and exporting data statistics like restarts and alarms.
Viewing the open source software license information.
Controlling the maximum number of concurrent live view connections.
Configuring device time zone, synchronization, and daylight saving.
Manually synchronizing the device time.
Synchronizing device time using satellite signals.
Configuring an NTP server for accurate time synchronization.
Setting Daylight Saving Time (DST) parameters.
Configuring RS-485 parameters for external device communication.
Enhancing system security through various security parameter settings.
Configuring IP address filters for access control.
Configuring MAC address filters for access control.
Searching and analyzing security audit logs.
Configuring Quality of Service to improve network delay and congestion.
Authenticating user permissions using IEEE 802.1X.
Configuring Secure Shell (SSH) for secure network services.
Setting timeout periods for automatic logout after inactivity.
Managing server/client certificates and CA certificates.
Configuring Transport Layer Security (TLS) protocols.
Managing user accounts and their permissions.
| Camera Type | PTZ |
|---|---|
| Image Sensor | 1/2.8" Progressive Scan CMOS |
| Max. Resolution | 2560 × 1440 |
| Focal Length | 4.8 mm to 120 mm |
| Optical Zoom | 25× |
| Digital Zoom | 16× |
| IR Range | Up to 100 m |
| Tilt Range | -15° to 90° (auto flip) |
| Operating Temperature | -40°C to 70°C (-40°F to 158°F) |
| Noise Reduction | 3D DNR |
| Ingress Protection | IP66 |
| Operating Conditions | Humidity 95% or less (non-condensing) |
| Effective Pixels | 4 MP |
| Lens | Motorized varifocal lens |
| Min. Illumination | 0 Lux with IR |
| WDR | 120 dB |
| Pan Range | 360° |
| Smart Features | Intrusion detection, line crossing detection, region entrance detection, region exiting detection, unattended baggage detection, object removal detection |
| Audio Compression | G.711ulaw/G.711alaw/G.722.1/G.726/MP2L2/PCM |
| Network Interface | 1 RJ45 10M/100M Ethernet port |
| Protocol | IPv4/IPv6, HTTP, HTTPS, FTP, SMTP, UPnP, SNMP, DNS, DDNS, NTP, RTSP, RTCP, RTP, TCP/IP, UDP, IGMP, ICMP, DHCP, PPPoE, Bonjour |
| Alarm I/O | 1 input, 1 output |
| Power Supply | 24 VAC |
| Day/Night | IR cut filter |
| Bit Rate | 32 Kbps to 16 Mbps |
| Video Compression | H.265 / H.264 / MJPEG |