Installation and User Manual
25
6.
INSTALLATION PROCEDURE
To install the unit, proceed as follows:
1. Secure the P3UP to the machine tool (see para.6.1)
2. Connect the measurement heads to the connectors on the rear of the unit. (see para. 6.2)
3. Connect the I/O connector to the machine logic (see para.6.3).
4. Connect the analogue output if present (see para.6.4)
5. Connect the unit to earth using the earth stud (see para.6.5)
6. Use the cable provided to connect the power supply to the connector on the rear of the unit (see
para.6.5).
7. Switch the unit on (see para.6.6).
8. Perform the measurement head(s) mechanical zeroing procedure (see para. 6.7).
9. Perform the zero correction on the master part (see para. 7.2.4).
The plastic covers that protect the unit connectors should only be removed when connecting the
corresponding external connectors. Always replace the plastic covers when it is necessary to
disconnect one or more connector. Take care not to touch the connector pins either directly or
via the leads connected to the various external connectors when removing or fitting the plastic
covers, whether the unit is switched on or not.
WARNING
Do not remove the plugs from the holes on the rear panel.
[
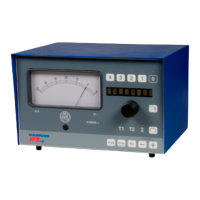
The ideal position for reading the instrument display is with the unit positioned horizontally ad
not tilted.
The unit is designed to be operated horizontally.