Using the BayStack 350 Series 10/100 Autosense Switch
1-20
893-00992-E
Although switch SW4 is shown with all ports configured in VLAN V1+V2, any of
the ports can be assigned to additional VLANs as long as they are all in the same
VLAN membership as the connecting port (port 1).
VLAN Configuration Screen Examples
Figures 1-11
to 1-14 show examples of the VLAN Configuration screen settings
for switches SW1, SW2, SW3, and SW4.
The screen examples shown in this section show how the VLAN Configuration
screens appear when MultiLink trunking is not active (no trunks configured).
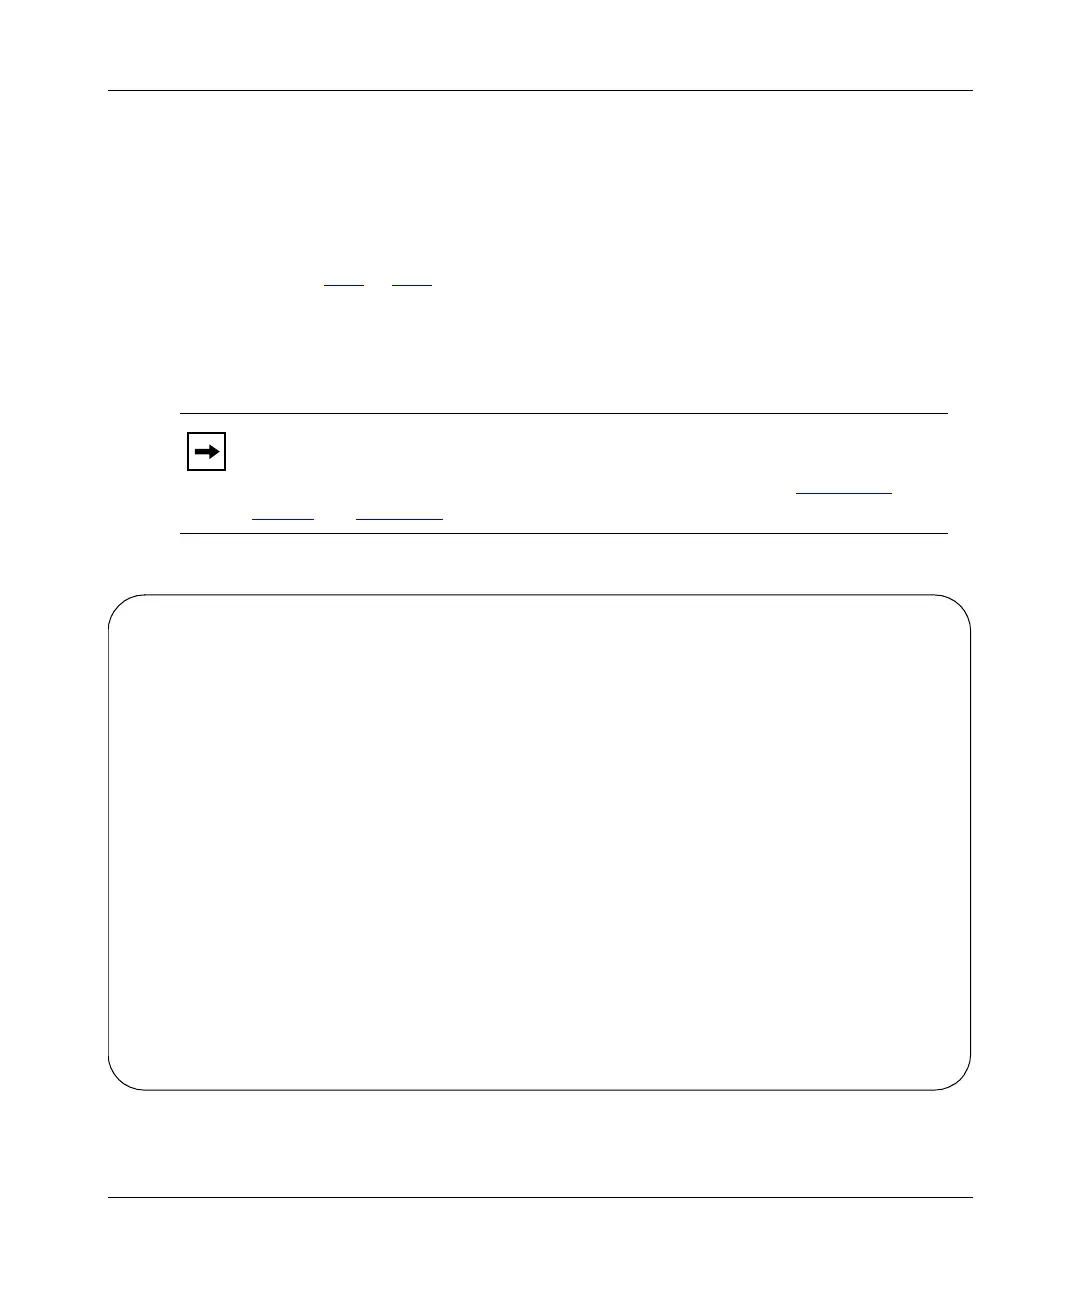
Figure 1-11. VLAN Configuration screen for switch SW1
Note:
When MultiLink trunking is active, only five VLANs can be configured
and the VLAN Configuration screen shows only five VLAN columns. For
more information about the MultiLink Trunking feature, see “MultiLink
Trunks” on page 1-24.
VLAN Configuration
Port Trunk V1 V2 V3 V4 V5 V6 V7 V8
---- ----- ----- ----- ----- ----- ----- ----- ----- -----
1 [ X ] [ X ] [ ] [ ] [ ] [ ] [ ] [ ]
2 [ ] [ X ] [ ] [ ] [ ] [ ] [ ] [ ]
3 [ ] [ ] [ ] [ ] [ ] [ ] [ ] [ ]
4 [ ] [ X ] [ ] [ ] [ ] [ ] [ ] [ ]
5 [ ] [ ] [ ] [ ] [ ] [ ] [ ] [ ]
6 [ ] [ ] [ ] [ ] [ ] [ ] [ ] [ ]
7 [ X ] [ ] [ ] [ ] [ ] [ ] [ ] [ ]
8 [ ] [ ] [ ] [ ] [ ] [ ] [ ] [ ]
9 [ ] [ ] [ ] [ ] [ ] [ ] [ ] [ ]
10 [ ] [ X ] [ ] [ ] [ ] [ ] [ ] [ ]
11 [ X ] [ X ] [ ] [ ] [ ] [ ] [ ] [ ]
12 [ X ] [ X ] [ ] [ ] [ ] [ ] [ ] [ ]
13 [ ] [ ] [ ] [ ] [ ] [ ] [ ] [ ]
14 [ ] [ X ] [ ] [ ] [ ] [ ] [ ] [ ]
15 [ X ] [ ] [ ] [ ] [ ] [ ] [ ] [ ]
16 [ X ] [ ] [ ] [ ] [ ] [ ] [ ] [ ]
Use space bar to display choices, press <Return> or <Enter> to select choice.
Press Ctrl-R to return to previous menu. Press Ctrl-C to return to Main Menu.