EasyManua.ls Logo

Oracle Database Appliance X10 User Manual

Oracle Database Appliance X10
171 pages
To Next Page IconTo Next Page
To Previous Page IconTo Previous Page
Page #85 background image
6. Place the PCIe card on an antistatic mat.
Caution:
If you are not immediately inserting a replacement PCIe card into the
empty slot, insert a PCIe filler panel in the slot to reduce the possibility of
radiated electromagnetic interference (EMI).
Install a Half Height PCIe Card
1. Unpack the replacement PCIe card, and place it on an antistatic mat.
Before replacing or installing a PCIe card, refer to the card documentation for
specific installation and cabling instructions.
2. Locate the proper PCIe slot for the card you are replacing.
PCIe slots 1 through 4 are nonfunctional in single-processor systems.
3. If necessary, remove the PCIe filler panel from the slot.
Save this filler panel in case you need to remove the PCIe card from the system.
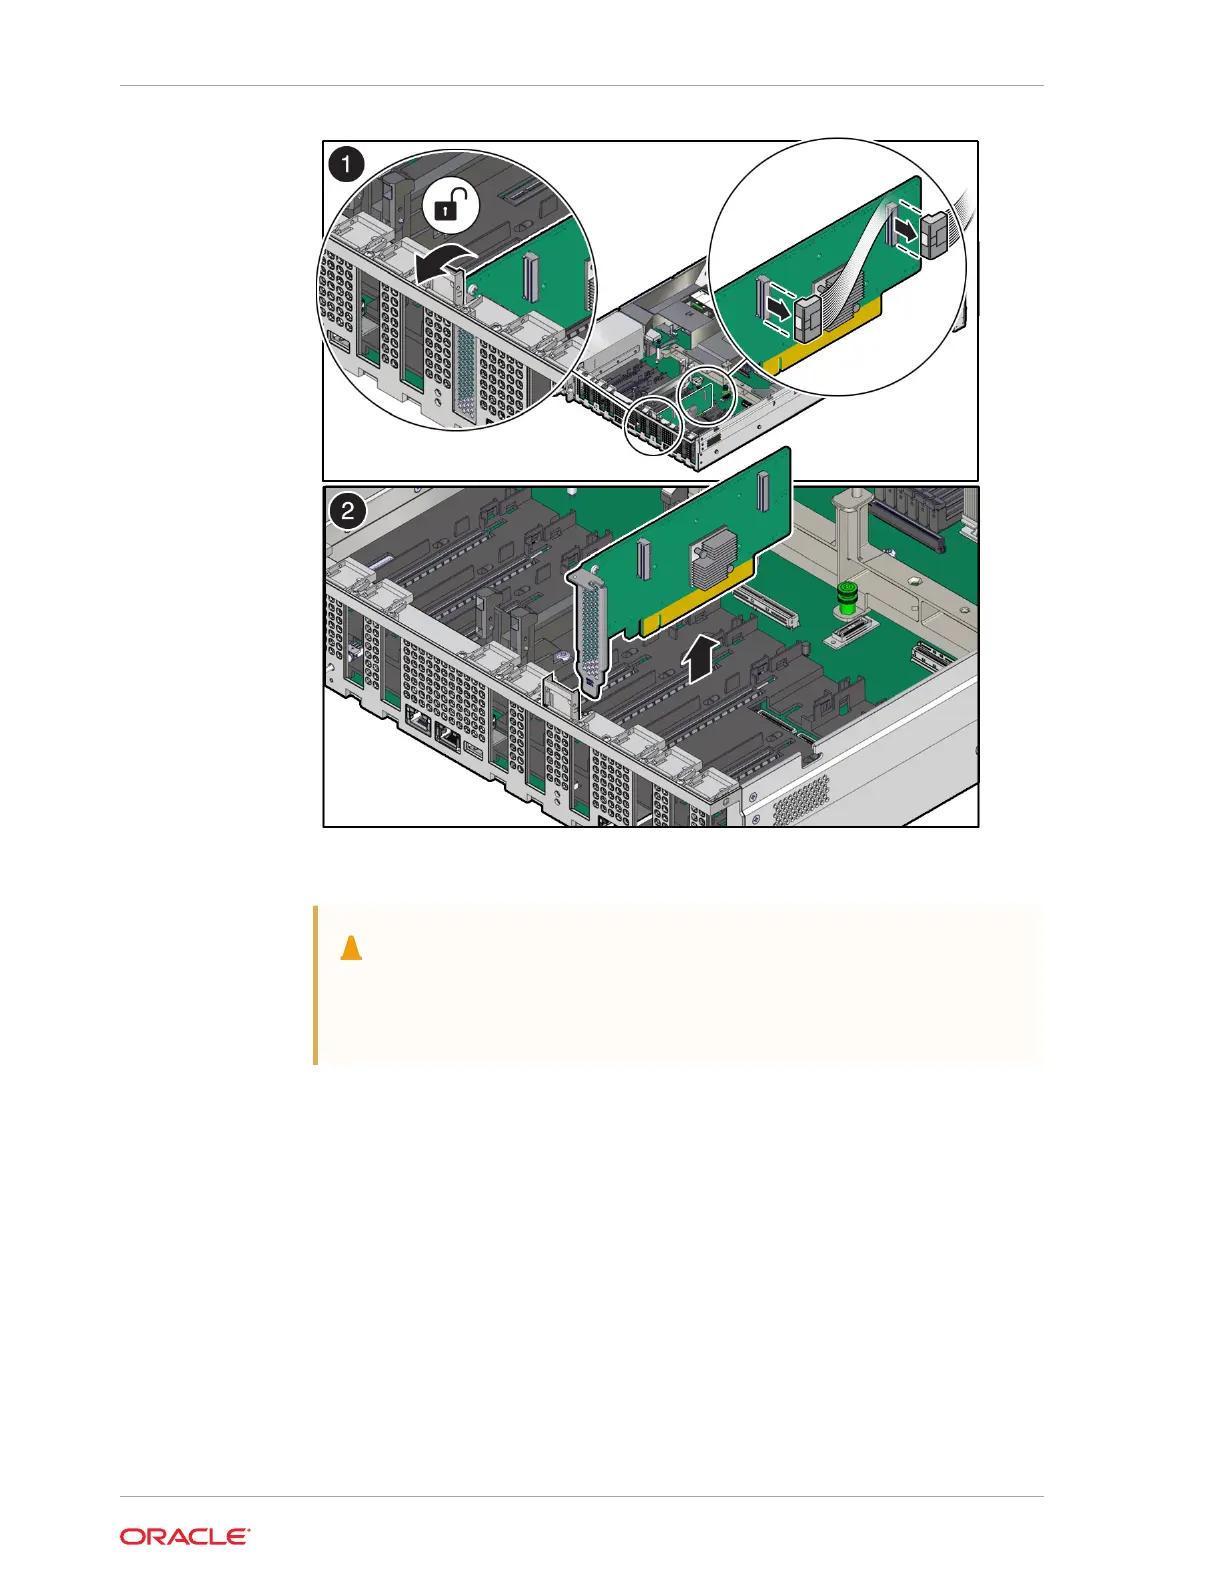
4. Insert the PCIe card into the correct slot [1], and rotate the PCIe locking
mechanism downward to secure the PCIe card in place [2].
Chapter 4
Servicing PCIe Cards (CRU)
4-20

Table of Contents

Question and Answer IconNeed help?

Do you have a question about the Oracle Database Appliance X10 and is the answer not in the manual?

Oracle Database Appliance X10 Specifications

General IconGeneral
BrandOracle
ModelDatabase Appliance X10
CategoryStorage
LanguageEnglish

Summary

Preface

Audience

Identifies the intended audience for this document, including technicians and administrators.

Documentation Accessibility

Provides information on Oracle's commitment to accessibility and how to access resources.

Related Documents

Lists other relevant Oracle Database Appliance documentation available in the online library.

Conventions

Explains text and typographical conventions used throughout the document.

1 Overview of System Status Indicators and LEDs

Oracle Database Appliance X10-S/X10-L Status Indicators

Details status indicators for X10-S/X10-L servers, including front and back panel views.

Server Back Panel Status Indicators

Lists and explains status indicators found on the back panel of the X10-S/X10-L server.

Oracle Database Appliance X10-HA Status Indicators

Details status indicators for X10-HA models, covering server nodes and storage shelves.

Server Node Front Panel Status Indicators

Describes status indicators on the front panel of X10-HA server nodes.

Storage Shelf Front Panel Status Indicators

Explains indicators on the front panel of Oracle Database Appliance X10-HA storage shelves.

2 Preparing Oracle Database Appliance for Service

Servicing System Components

Describes serviceable components of the server, including parts breakdown and CRU information.

Safety Precautions and ESD Handling

Outlines essential safety measures and electrostatic discharge prevention for component servicing.

FRU Key Identity Properties (KIP) Automated Update

Explains the automated update feature for Field-Replaceable Unit key identity properties.

Required Service Tools

Lists the necessary tools for servicing the Oracle Database Appliance.

Preparing the Server for Component Replacement

Details the initial steps required before replacing server components, including powering down.

Powering Down the Server

Provides methods for gracefully or immediately shutting down the server for service.

3 Servicing CRUs That Do Not Require System Power Off

Oracle Database Appliance X10 Server Hot-Pluggable Components

Instructions for servicing hot-pluggable components on the Oracle Database Appliance server.

Servicing NVMe Storage Drives (CRU)

Procedures for servicing front-mounted NVMe drives in X10-S/X10-L systems.

Servicing Fan Modules (CRU)

Guidance on servicing the server's fan modules and fan tray.

Servicing Power Supply Modules (CRU)

Steps for servicing the system's AC-powered redundant power supplies.

Oracle Database Appliance X10-HA Storage Shelf Hot Pluggable Components

Procedures for servicing hot-pluggable components in X10-HA storage shelves.

Replace a Storage Shelf HDD or SSD (CRU)

Steps for replacing HDDs or SSDs within the storage shelf.

Replace a Storage Shelf Power Supply (CRU)

Instructions for replacing a power supply unit in the storage shelf.

Replace a Storage Shelf I/O Module (CRU)

Procedures for replacing the I/O module in the storage shelf.

4 Servicing CRUs That Require System Power Off

Servicing Internal M.2 Flash SSDs (CRU)

Procedures for servicing internal M.2 flash SSDs, requiring server power off.

Servicing DIMMs (CRU)

Instructions for servicing dual in-line memory modules (DIMMs), requiring server power off.

Servicing PCIe Cards (CRU)

Procedures for servicing PCIe cards in the system, requiring server power off.

Servicing the Battery (CRU)

Steps for servicing the system battery, requiring server power off.

5 Servicing FRUs

Servicing Processors (FRU)

Detailed procedures for servicing server processors, requiring system power off.

Servicing the Fan Tray (FRU)

Instructions for removing and installing the fan tray, requiring server power off.

Servicing the Disk Backplane (FRU)

Procedures for servicing the disk backplane, requiring server power off.

Servicing the Front LED Indicator Module (FRU)

Steps for servicing the front LED indicator module, requiring server power off.

Servicing the PCIe Slot Flyover Cable (FRU)

Procedures for servicing the PCIe slot flyover cable, requiring server power off.

Servicing the Motherboard Assembly (FRU)

Instructions for servicing the motherboard assembly, requiring server power off.

Component Fault Management

Guidance on managing component faults within Oracle ILOM.

6 Returning Oracle Database Appliance to Operation

Install the Air Baffle

Steps to install the air baffle after servicing components.

Install the Server Top Cover

Instructions for reattaching the server's top cover.

Reinstall the Server Into the Rack

Procedure for physically reinstalling the server chassis into the rack.

Return the Server to the Normal Rack Position

Steps to return the server from maintenance position to its normal rack position.

Install the Cable Management Arm (Optional)

Instructions for installing the cable management arm for cable routing.

Powering On Oracle Database Appliance

Steps to power on the server and storage shelves after service.

7 Server Node Diagnostic Tools and Resetting the Service Processor

Server Node Diagnostic Tools

Overview of diagnostic tools available for server nodes and where to find more information.

Manually Resetting a Server's Service Processor

Procedure for resetting the Service Processor (SP) using a pinhole button.

8 Server Basic Input/Output System (BIOS)

Accessing the BIOS Setup Utility

How to access and navigate the BIOS Setup Utility screens.

BIOS Key Mappings

Table mapping function keys to control key sequences for BIOS navigation.

Navigate BIOS Setup Utility Menus

Instructions on how to navigate through BIOS setup utility menus and modify settings.

Using UEFI BIOS

Information about the Unified Extensible Firmware Interface (UEFI) compatible BIOS.

Related product manuals