range Pi User Manual Copyright reserved by Shenzhen Xunlong Software Co., Ltd
58
2) Then insert the NVMe SSD into the M.2 PCIe interface of the development board and
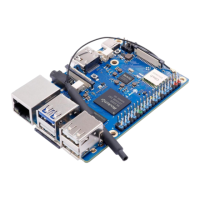
fix it
3) The position of the SPI Flash on the development board is shown in the figure below,
no other settings are required before starting the programming
4) Burning the Linux image to SPIFlash+NVMe SSD requires a TF card, so first you
need to burn the Linux image to the TF card, and then use the TF card to start the
development board to enter the Linux system. For the method of burning the Linux image
to the TF card, please refer to the instructions in the two sections of the method of
burning the Linux image to the TF card based on the Windows PC and the method
of burning the Linux image to the TF card based on the Ubuntu PC.
5) After booting into the Linux system in the TF card, please confirm that the NVMe
SSD has been properly recognized by the Linux of the development board. If the NVMe
SSD is recognized normally, use the sudo fdisk -l command to see nvme related
information
orangepi@orangepi:~/Desktop$ sudo fdisk -l | grep "nvme0n1"
Disk /dev/nvme0n1: 1.86 TiB, 2048408248320 bytes, 4000797360 sectors
Use the lspci command to see an NVMe-related PCI device
orangepi@orangepi:~/Desktop$ lspci
00:00.0 PCI bridge: Fuzhou Rockchip Electronics Co., Ltd Device 3566 (rev 01)
01:00.0 Non-Volatile memory controller: Realtek Semiconductor Co., Ltd. Device 5765