| 3 - System planning
Single-room setup with SL Multi-Channel Receiver DW only
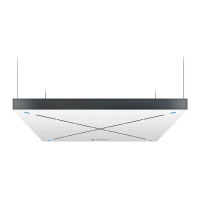
▷ Install the SL Multi-Channel Receiver DW on a wall or the ceiling with the front side of
the receiver facing into the room (see Mounting the receiver).
▷ Connect a LAN cable supplying PoE to the Dante I / PoE / Ctrl RJ-45 socket of the
first SL Multi-Channel Receiver DW (see Connecting the receiver).
➥ This receiver will become the Master.
▷ Wait until the LEDs of the receiver light up red.
▷ Connect a LAN cable supplying PoE to the respective Dante I / PoE / Ctrl RJ-45
sockets of all other SL Multi-Channel Receiver DW units (see Connecting the
receiver).
➥ They will synchronize with the Master.
When you are using multiple SL Multi-Channel Receiver DW units, it is possible
to daisy-chain the network and audio signals by using the “Single-Cable
Mode” (factory default setting, see Connecting the receiver).
PoE will not be daisy-chained, so a PoE injector is required for any additional SL
Multi-Channel Receiver DW.
Related information
Single-room setup with both SL Rack Receiver DW and SL Multi-Channel Receiver DW
Multi-Room Mode setup with SL Rack Receiver DW only
Multi-Room Mode setup with SL Multi-Channel Receiver DW only
Multi-Room Mode setup with both SL Rack Receiver DW and SL Multi-Channel
Receiver DW
63