Do you have a question about the Thermo King SB-210+ and is the answer not in the manual?
Basic safety precautions for working with Thermo King units and describes safety stickers.
Information on high voltage power supply, electric standby, and potential electrical hazards.
Warning about the unit starting automatically without warning and precautions to take.
Precautions for working with refrigerants, including dangers of toxic gases and asphyxiation.
Provides first aid instructions for contact with refrigerant, refrigerant oil, and general first aid.
Precautions when working with or around refrigerant oil, including protective measures.
Outlines the responsibilities of Thermo King Corporation and the owner regarding the warranty.
Details the owner's responsibilities during the emission warranty period.
Specifies limitations of Thermo King's responsibility regarding emission-related parts and components.
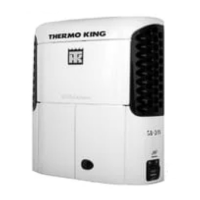
Provides a general overview of the Thermo King SB-210+/310+ unit.
Lists key design features and options of the SB-210+/310+ models.
Describes the Thermo King TK486 family of 4-cylinder diesel engines used in the unit.
Explains the Extended Life Coolant (ELC) as standard equipment and its maintenance interval.
Describes the EMI 3000 package as an extended maintenance interval package.
Details the Thermo King X430L reciprocating compressor used in the unit.
Explains the Electronic Throttling Valve (ETV) and its role in controlling the refrigeration system.
Describes the SR-2 controller as a microprocessor control system for transport refrigeration.
Explains the CYCLE-SENTRY operation modes, including cooling and heating.
Details the Continuous Run Operation modes, including cooling and heating.
Explains the CYCLE-SENTRY Start-Stop fuel saving system and its operation.
Describes the two separate data loggers (ServiceWatch and CargoWatch) for recording unit data.
Introduces OptiSet Plus as programmable functions for unit operation based on setpoints or named products.
Explains FreshSet as a demand-based temperature control for fresh products.
Explains how frost builds up on evaporator coils and the methods of defrost initiation.
Details the automatic initiation of timed or demand defrost cycles by the controller.
Describes how the operator manually initiates a defrost cycle.
Instructions on how to pull the door latch handle to open the door and access the engine compartment.
Instructions on opening the secondary door latch mechanism.
Instructions on how to properly close the unit's front doors.
Identifies maintenance items in the engine compartment that can be checked visually.
Describes the sight glass that indicates the refrigerant level in the receiver tank.
Explains various protection devices like fuse links and cutout switches that protect the unit.
Explains the overload relay protecting the standby electric motor and how to reset it.
Mentions Smart FETs in the controller interface board protecting circuits from overcurrent.
Lists fuses located on the interface board that protect various circuits and components.
Shows the control box with the service door open, containing the microprocessor and other components.
Displays images and labels for the interface board within the control box.
Describes the white status LEDs illuminating the "T" portion of the TK logo for normal operation.
Explains amber status LEDs illuminating the "K" portion for a check alarm condition.
Describes white and amber LEDs for shutdown alarms indicating risk to load integrity.
Details displays showing fuel level and how LEDs indicate the fuel level.
Describes displays showing fuel level and box temperature, noting "dF" during defrost.
Ensures adequate diesel fuel supply for engine operation to the next check point.
Checks the engine oil level and warns against overfilling.
Checks engine coolant level and antifreeze protection, and warns about adding coolant when hot.
Ensures battery terminals are tight and free of corrosion.
Checks belts for condition and proper tension.
Checks electrical connections for security, corrosion, cracks, and moisture.
Visually inspects the unit for leaks, loose or broken parts, and other damage.
Checks if the damper in evaporator air outlets moves freely without sticking or binding.
Ensures condenser and evaporator coils are clean and free of debris.
Checks the interior and exterior of the cargo box for damage.
Verifies cargo doors and weather seals are in good condition and latch securely.
Checks defrost drain hoses and fittings to ensure they are open.
Explains the SR-2 controller's role in controlling temperature and unit function.
Explains how the display provides unit information to the operator.
Describes the HMI control panel with its display and touch-sensitive keys.
Details the functions of the dedicated and soft keys on the control panel.
Provides step-by-step instructions for turning the unit on.
Provides step-by-step instructions for turning the unit off.
Describes the default Standard Display showing box temperature and setpoint.
Explains variations of the Standard Display, including named products and temperature units.
Describes the Temperature Watch Display which shows temperature and setpoint in larger fonts after a period of inactivity.
Explains how the Alarm Icon appears on the Standard Display during alarm conditions.
Details the automatic preheating and starting of the diesel engine in Continuous and CYCLE-SENTRY modes.
Provides steps to take if the engine does not start and an Alarm Icon appears.
Lists items to check after the unit is running to confirm proper operation.
Explains the Electric Standby feature allowing operation on electric power and the required voltage.
Provides steps for starting the unit on electric standby operation.
Outlines steps to take if the electric motor does not start and an Alarm Icon appears.
Explains how the unit automatically switches to Electric Mode or prompts for the switch.
Describes automatic switching to Diesel Mode or prompts when standby power is unavailable.
Provides steps to change the setpoint, including notes on OptiSet Plus profiles.
Provides guidelines for selecting operating modes (CYCLE-SENTRY vs. Continuous Run) based on commodity.
Explains how to switch between CYCLE-SENTRY and Continuous Run modes.
Provides steps to initiate a manual defrost cycle when conditions allow.
Explains how a defrost cycle terminates automatically or can be manually stopped.
Details steps to view various gauge readings like coolant temp, oil pressure, and RPM.
Outlines steps to view sensor readings such as return air, discharge air, and coil temperatures.
Explains how to access and navigate through the main menu areas.
Lists the available choices within the Main Menu, such as Language, Alarms, and Datalogger.
Explains how to select an alternate language for the HMI control panel displays.
Details how to view and clear alarms using the Alarm Menu.
Provides important notes regarding alarm clearing, potential existing alarms, and specific alarm codes.
Explains the Datalogger Menu's purpose for initiating start of trip or printing reports.
Details the procedure to place a marker in the datalogger memory to indicate the start of a trip.
Describes how to print the current CargoWatch datalogger record to a handheld printer.
Explains how hourmeters can be viewed and programmed to be visible or hidden.
Introduces various operating modes that can be selected via the menu.
Explains how to turn the CYCLE-SENTRY mode on or off.
Describes how to lock the keypad to prevent unauthorized use and how to deactivate it.
Explains Sleep Mode for keeping the engine warm and battery charged when the unit is not in use.
Provides the easiest way to switch between CYCLE-SENTRY and Continuous Run modes.
Details the steps to select the Keypad Lockout feature.
Provides steps for selecting and programming Sleep Mode.
Explains the Pretrip Test function for verifying unit operation.
Describes the Full Pretrip test performed before engine or motor starts.
Describes the Running Pretrip test performed when the unit is already running.
Discusses issues to consider when performing a Pretrip Test for accurate results.
Provides steps to initiate a Pretrip Test, including clearing alarms.
Explains how to manually select or automatically switch between Electric Standby and Diesel modes.
Details how to adjust the brightness of the HMI Control Panel display backlight.
Explains how to view the time and date held by the HMI Control Panel's real-time clock.
Describes OptiSet Plus temperature profiles for selecting named products and setpoints.
Provides steps to select or change a named product using the HMI display.
Guides on selecting a setpoint for a named product when a range is programmed.
Explains how to change the setpoint for a named product if a range is available.
Details the steps to select or change a numeric setpoint for the unit.
Lists functions available via the Rear Remote Control Panel based on configuration settings.
Describes the unit's operation when the Rear Remote Control Action is set to RUN.
Explains the unit's behavior when the Rear Remote Control Action is set to STAND BY.
Details how to change the setpoint using the remote standard display.
Explains the nine touch-sensitive keys on the rear remote control panel and their functions.
Defines the icons and display segments on the rear remote control panel's display.
Explains how to interpret the temperature and setpoint on the remote standard display.
Describes when the remote control panel may be locked out and what the display shows.
Instructions for turning the unit ON/OFF when configured for STAND BY operation via the remote panel.
Instructions for turning the unit ON/OFF when configured for RUN operation via the remote panel.
Explains how to change between Cycle Sentry and Continuous Mode using the Select Key on the remote panel.
Describes how to show the discharge air temperature using the Select Key on the remote panel.
Explains how to display and clear alarm codes using the Select and Enter keys on the remote panel.
Details how to initiate a manual defrost cycle using the Defrost Key on the remote panel.
Explains how to send a Start of Trip marker to data loggers using the TK Logo Key.
Guides on starting a Pretrip Test using the Pretrip Key on the remote panel.
Explains that alarm codes are generated by the microprocessor sensing abnormal conditions.
Describes the four types of alarms: Log, Check, Prevent, and Shutdown alarms.
Explains Log Alarms as notices for corrective action before a problem becomes severe.
Describes Check Alarms indicated by the Alarm Icon, requiring corrective action.
Explains Prevent Alarms that may cause the unit to stop or restart with reduced performance.
Details Shutdown Alarms indicated by flashing displays and forcing unit shutdown until cleared.
Explains how alarm codes are displayed during a Pretrip Test.
Provides guidance on operator-repairable faults and those requiring a Thermo King dealer.
Details pre-cooling, door seal inspection, trailer inspection, and setpoint verification.
Lists factors for proper loading, including height, doors, air circulation, temperature, and insulation.
Ensures cargo is loaded properly, checks evaporator outlets, and performs final load temperature check.
Describes performing enroute inspections every four hours to minimize temperature problems.
Outlines verifying setpoint, checking return air temperature, and initiating manual defrost.
Provides steps for troubleshooting temperature readings not within the desired range.
Advises on battery dangers, safety equipment, and handling jumper cables.
Step-by-step guide for connecting jumper cables to jump start the unit.
Provides specifications for the engine, including model, fuel type, oil capacity, and viscosity.
Lists tension numbers for various belts on Model 30 and Model 50 units.
Provides specifications for the electrical control system, including voltage, battery, fuses, and alternator.
Details specifications for the electric motor, overload relay, and heater strips for Model 50.
Lists specifications for the optional electric fuel heater, including resistance and current draw.
Provides specifications for the compressor, oil, refrigerant, and defrost methods.
Details engine inspect/service items for different intervals (pre-trip, hours, annual).
Lists electrical inspect/service items for damper, battery, harness, and motor.
Details maintenance for the microprocessor, including running a pretrip test.
Lists structural inspection items like fluid leaks, damaged parts, and bearing wear.
Outlines refrigeration system checks, including refrigerant level, compressor oil, and efficiency.
A device to collect liquid refrigerant and meter it safely back to the compressor as gas.
Temperature of the air surrounding an object.
Refrigeration component that compresses refrigerant vapor.
Removal of accumulated ice from evaporator coils, necessary for proper operation.
Device used with a microprocessor to precisely control the refrigeration system.
Part of the refrigeration system that absorbs heat during cooling.
System failure due to moisture/ice, affecting expansion valve operation or airflow.
Refrigerated/transported product or heat removed by the system.
Optional system reducing product dehydration and avoiding top freeze.
Cooling down an empty box or cargo to the desired load temperature.
Heating diesel engine glow plugs or intake manifold heater before start-up.
Checking the refrigeration system's operation before loading.
Desired box temperature selected on a thermostat or controller.
Refrigeration unit cycling between heat and cool modes more often than normal.
Component allowing visual inspection of oil or refrigerant level.
Specifies location of unit nameplates above the compressor and on the evaporator roadside.
Directs to the engine identification plate on the engine valve cover.
Indicates compressor serial number is stamped between cylinders above the oil pump.
Provides the Toll Free Emergency Cold Line number and explains the factory answering service assistance.
States Thermo King's adherence to policies promoting refrigerant recovery and awareness of Federal regulations.
| Brand | Thermo King |
|---|---|
| Model | SB-210+ |
| Category | Temperature Controller |
| Language | English |