Installation and Maintenance Manual - Aastra 5000 AMT/PTD/PBX/0058/4/6/EN
Maintenance 01/2011 Page 417
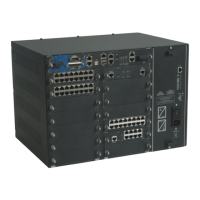
SHEET E-4REPLACING AN AXS12/AXS6 POWER SUPPLY MODULE
AVAILABILITY
• No mission capable
• 1 operator on site
DURATION
• 20 minutes
• 1 standard tool case
• 1Facom AZXR 15*75 Torx screwdriver for M4 screw (cover)
INGRÉDIENT(S)/CONSOMMABLE(S)
•N/A.
See Figure 3.16 for a view of the AXS iPBX.
Table 6:
OPERATION DETAILS OF THE OPERATION / COMMENTS
• Alert the operator. • In the case of remote operation, contact the remote operator
before starting any operation.
• Power off the power
supply module to be
removed.
• Refer to Section 6.4, Stopping the system (AXD, AXL, AXS,
AXS12 and AXS6)Error! No bookmark name given.
• Disconnect the external
cables.
• Disconnect the mains cable, and if required the backup battery
connected on the rear panel of the cabinet.
• Remove the cabinet
cover.
• Unscrew the two securing screws at the back of the cabinet,
• Slide the iPBX cover to the back.
• Remove the expansion
cards.
• Use the 1/4 turn locks to remove the card from its slot
(see Figure 4.1 ).
• Remove the guide rails.
• Remove the backplane • Disconnect the backplane from the main card.
• Disconnect the power
supply cable from the
CPU card.
• Unscrew the two securing
screws on the mains unit.
• Disconnect the fan cable
from the power supply.
• Pull out the power supply
module.
• Unscrew the power supply module and pull it out slowly.