Installation and Maintenance Manual - Aastra 5000 AMT/PTD/PBX/0058/4/6/EN
Maintenance 01/2011 Page 445
• Check the configuration of
the UCV card.
• As the UCV card may be fitted with a daughter card, check that
the new card is fitted exactly like the previous one, unless its
configuration has been modified due to a change in its capacity
(in this case, see Sections 4.6 or the product “Data sheet”).
• Remove and recover the
i-button
identification number.
• Remove and recover, at the back of the cabinet, the label with
the i-Button's identifier number (the i-Button's identifier label
only, not the product identification label).
• Stick the i-Button's identification label on the back of the new
cabinet.
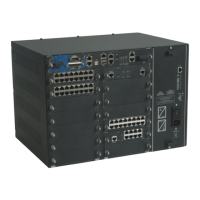
• Install the expansion
cards in the new cabinet.
• Slide the cards along the guides until they click into place and
lock the cards in place using the 1/4 turn locks (see Figure 4.1 ).
• Close the new cabinet. • Secure the cover,
- Fit the cover slightly to the rear of the cabinet and push it
forward.
- Tighten the two securing screws at the back of the cabinet.
• Fit the new cabinet.
• Install the cables exactly
like in the old cabinet.
• On the front panel of the UCV card
• at the back of the cabinet (mains cable).
Attention : The iPBX must be powered off when installing
the mains cable.
• Power on the iPBX. • Before powering on the cabinet, check that all the following tasks
have been performed:
- all line connections are installed,
- all equipment has been connected to a grounded power point.
• Power on the iPBX:
- Set the “I/O” switch on the cabinet power supply module to
position “I”.
• Check the status of the indicators (see Section 4.9).
• Check the UCV card's
system and application
software releases using
the AMP.
• Refer to the document [1].
• Restore the data of the
old configuration.
• Refer to the document [1].
Table 21:
OPERATION DETAILS OF THE OPERATION / COMMENTS