AMT/PTD/PBX/0058/4/6/EN Installation and Maintenance Manual - Aastra 5000
Page 444 01/2011 Maintenance
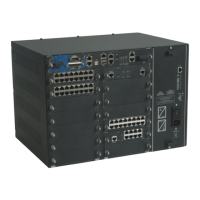
SHEET E-14STANDARD REPLACEMENT OF AN AXS12 MAIN CABINET
AVAILABILITY
• No mission capable
• 1 operator on site
DURATION
• 15 minutes
• 1 Facom AZXR 15*75 Torx screwdriver for M4 screw (cover).
INGRÉDIENT(S)/CONSOMMABLE(S)
•N/A
Table 21:
OPERATION DETAILS OF THE OPERATION / COMMENTS
• Back up the customer
configuration.
• Precautionary operation to be carried out if there is no existing
copy (which is the case when previous installation operations
have been carried out and the procedures followed).
• Refer to [1]
• In the case of remote operation, contact the remote operator
before starting any operation.
• Power off the iPBX. • Refer to Section 6.4, Stopping the system (AXD, AXL, AXS,
AXS12 and AXS6)Error! No bookmark name given.
Nota : It is advisable to stop the IPS card before powering off the
iPBX.
• Disconnect the cables. • Disconnect the mains cable.
• Disconnect the external cables from the front panel of the UCV
card, and mark the cables for refitting.
• Remove the cover from
the old cabinet.
• Unscrew the two securing screws of the upper cover, at the back
of the cabinet.
• Remove the upper cover by sliding it backwards.
• Remove the old cabinet.
• Remove the expansion
cards.
• Unlock the cards (see Figure 4.1 ) and pull them out from the
backplane.
• Recover the i-button
module.
• Recover, on the UCV card, the i-button module containing the
system's identifier.
• Remove the cover from
the new cabinet.
• Unscrew the two securing screws at the back of the cabinet,
• Slide the iPBX cover to the back.
• Install the i-Button
module.
• Install the i-button module from the old UCV card on the new
card.
 Loading...