Do you have a question about the Automationdirect.com prosense PPC5 Series and is the answer not in the manual?
| Brand | Automationdirect.com |
|---|---|
| Model | prosense PPC5 Series |
| Category | Controller |
| Language | English |
Describes the installation, configuration, and methods of operation of the PPC5 series Prosense Advanced Process Controller.
Provides important information for those who will install, maintain, and/or operate PPC5 series advanced process controllers.
Details safety standards and EMC standards compliance, and use in Pollution Degree 2 environments.
Provides guidance on cleaning, avoiding static discharge, and precautions for plastic components and chemicals.
Instructions for unpacking and verifying all product contents are present and undamaged.
Lists and describes the different PPC5 series advanced process controller models.
Explains symbols used in the manual to indicate safety precautions and references.
Outlines the flowchart for setting up the PPC5 controller.
Specifies conditions for installing the instrument in indoor locations and instrument panels.
Details the procedure for mounting the controller onto an instrumented panel.
Provides detailed dimensions for the controller and panel cutout for mounting.
Covers important information, procedures, and diagrams for wiring the controller's terminals.
Explains the method for attaching and detaching the terminal cover of the controller unit.
Defines main symbols and terms used in the manual and controller.
Explains the PV input, control output, and remote auxiliary analog input functions.
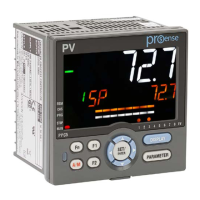
Describes the active color PV display, guide display, multilingual guide, and parameter display levels.
Details the RS-485 and Ethernet communication capabilities of the PPC5 series.
Identifies and explains the functions of various display parts on the controller.
Identifies and explains the functions of the control keys on the controller panel.
Provides a list of symbols used in the PV display, symbol display, and group display.
Illustrates the transitions between Operation Display, Operation Parameter Setting Display, and Setup Parameter Setting Display.
Provides an example operating procedure for setting alarm setpoints and other parameters.
Explains the Quick Setting function for easily setting basic controller functions like control type, input, and output.
Describes methods to restart the Quick Setting function if it does not start automatically.
Details the transitions between different operation displays based on control modes.
Explains how to set the target setpoint (SP) in the Operation Display and Parameter Setting Display.
Describes how to perform and cancel the auto-tuning function for PID parameter optimization.
Explains how to manually adjust PID parameters such as Proportional band (P), Integral time (I), and Derivative time (D).
Details how to set alarm setpoints for different alarm types like PV, SP, deviation, and output.
Explains how to select the target setpoint number (SPNO) for zone PID selection.
Describes how to switch between operation modes like AUTO, MAN, CAS, STOP, RUN, REM, and LCL.
Explains how to control the output value using direct key or SET/ENTER key methods in manual mode.
Describes how to release the alarm latch function using user function keys, communication, or contact input.
Covers setting input type, unit, range, scale, and decimal point position for PV and remote analog inputs.
Explains how to set the input sampling period, also known as the control period.
Describes how to use PV auto-selector to select or calculate larger, smaller, average, or difference of two PV inputs.
Explains the two methods for remote input: analog input and communication.
Details how to adjust PV range for control when measurement ranges of two input signals differ.
Explains how to set PV switching methods for Loop control with PV switching.
Details the different control modes available, such as Single-loop, Cascade, and Loop controls.
Describes various control types including PID, ON/OFF, PD, Sample PI, and Batch PID.
Explains the selection between standard PID and fixed-point PID control modes.
Covers methods for switching PID parameters based on target setpoint number, PV, SP, deviation, or contact input.
Explains the Super function for monitoring overshoot danger and temporarily adjusting the setpoint.
Describes the Super2 function for suppressing controller hunting without re-tuning PID parameters.
Explains the anti-reset wind-up function for preventing extreme integral output by stopping PID computations.
Details how to perform non-linear PID control by adding proportional gain based on deviation.
Describes the adjustment of auto-tuning operation, including auto-tuning type and output limiter settings.
Explains how to set SP high and low limits to restrict the SP range, applicable to all SP groups and loops.
Describes the SP ramp-rate setting function to force SP change at a fixed rate, preventing abrupt changes.
Explains the PV tracking function to align SP with PV and then change to original SP at the SP ramp rate.
Describes the SP tracking function to force local SP to track remote SP when switching from REM to LCL mode.
Explains how to select the output type as relay output, voltage pulse output, or current output.
Details setting the cycle time for relay or voltage pulse output for faster cycling and finer control.
Explains how to set control output high and low limits to restrict the output to a specific range.
Describes how to release the output limiter when the operation mode is changed from MAN to AUTO.
Explains the output velocity limiter to prevent sudden changes in control output signal.
Describes the tight shut function to fully close the control valve beyond its positioner dead band.
Explains how to set hysteresis for ON/OFF control to prevent frequent relay output cycling (chattering).
Describes how manual reset can be used to cancel the offset when integral action is disabled.
Details setting preset output values for STOP mode and manual preset output.
Explains the function for correcting control output by adding bias values to 11 points or using approximation.
Describes how to select the analog output type from 4-20 mA, 0-20 mA, 20-4 mA, or 20-0 mA.
Explains the V-mode and Parallel-mode characteristics of split computations for current output.
Describes the function to supply DC power (14.5 to 18.0 V DC) to a 2-wire transmitter.
Covers alarm parameters including type, stand-by action, energized/de-energized, latch function, and setpoints.
Explains how to set the number of alarm groups, with options to hide unused parameters.
Describes how to prevent frequent alarm switching by increasing the alarm hysteresis.
Explains the on-delay and off-delay timers for delaying alarm output when an alarm condition occurs or is removed.
Details how to use the control relay terminal for alarm output when it is not used for control output.
Explains how to set the alarm mode to disable alarm action in STOP or MAN modes.
Describes how the contact input function works by setting internal relay numbers for functions like AUTO/MAN and REMOTE/LOCAL.
Explains how the contact output function works by setting a status such as an alarm to the contact output.
Covers functions related to display settings like active color PV, masking values, SELECT displays, and bar-graphs.
Explains how to assign various functions to the user function keys and A/M key on the front panel.
Details setting password protection, parameter display levels, locking menus, and key locks.
Describes how to confirm key status, I/O conditions, and software versions.
Explains how to initialize all parameter settings back to their factory default values.
Covers registering user settings as default values and initializing the controller to user default values.
Details the controller's status and remedies after power failures of different durations.
Explains how to set the time delay between powering on the controller and starting control computation.
Describes how to set the power frequency by automatic detection or manually to match the installation location.
Provides a flowchart and details for troubleshooting common issues like display, key, I/O, and communication failures.
Covers maintenance procedures including cleaning the instrument and proper disposal.
Provides a brief description of the parameter map, group display, loop-2 display, and parameter display levels.
Lists parameters by menu symbol, name, display level, setting range, and initial value.
Describes the main functional overview of the Parameter Setting Software, including parameter setting and monitoring functions.
Explains how to connect the controller to a PC using IR Adapter or Maintenance Port Communication.
Provides a flowchart for setting parameters on the controller using the software.
Details the procedure for starting up and exiting the Parameter Setting Software, including the Startup Guide window.
Explains the names and functions of the Basic window, File window, Register window, and Parameter Setting window.
Guides through creating a new parameter file using the Wizard function, including system data and parameter settings.
Explains how to set the parameter view level in the software (Easy, Standard, Professional).
Describes how to set system data such as model, control mode, and input/output settings.
Details the procedure for setting parameters, including entering set values and registering register symbols.
Explains how to create user file information for data sheets submitted to customers.
Provides the procedure for downloading parameter data to the controller, including communication conditions.
Details the procedure for uploading data such as user file name, system data, and parameter data from the controller.
Explains how to compare file data with controller data to identify any mismatches.
Describes how to monitor and change tuning data, including trend display and data read cycle settings.
Covers file management operations such as creating, opening, saving, comparing, and managing environmental settings.
Explains how to perform window operations like cascading, tiling, arranging icons, and making toolbars visible/invisible.
Details the procedure for printing data, including selecting the print range and previewing the image.
Explains how to initialize the controller to factory default values or user default values.
Describes how to check the software version information of the Parameter Setting Tool.
Explains how to view the list of .dll and .xml files contained in the Table folder.
Provides an overview of the PPC5 controller's communication capabilities, including RS-485 and Ethernet.
Details the RS-485 communication protocols, specifications, and connection methods.
Explains Ethernet communication capabilities for PPC5-1x02 models, including Modbus/TCP protocol.
Describes the coordinated operation function where PPC5 controllers act as master and slave.
Covers setting parameters for RS-485, Ethernet, and Coordinated Operation.
Explains how to permit or prohibit writing to registers via communication protocols.
Provides an overview of Modbus communication, including parameter placement, configuration, and message structures.
Introduces Modbus/TCP communication protocol for PPC5-1x02 models via Ethernet or other networks.
Explains the Modbus/TCP transaction procedure on the TCP/IP socket interface.
Details the configuration of Modbus/TCP frames, including MBAP Header and PDU.
Lists Modbus function codes and explains requests, responses, and error codes for host communication.
Describes the Ethernet-serial gateway function allowing access to RS-485 devices via Ethernet.
Explains the function to read process data from PPC5 and serial devices at high speed.
Details the IP access control function to permit access from registered IP addresses and reject others.
Introduces coordinated operation with a master controller and multiple slave PPC5 controllers.
Lists items that controllers operate in coordination with, such as Super function start-up and operation mode switching.
Provides steps for starting coordinated operation after wiring and communication setup.
Describes the functions and applications of D registers used in Modbus and Ethernet communications.
Explains conventions used in D register map tables, including register numbers, symbols, and read/write attributes.
Outlines how D registers are classified by their numbers in the D register map tables.
Details D registers for process monitoring, loop operation parameters, setup parameters, and terminal status.
Explains how to write data to registers via communication, including setting target setpoints and control output values.