SMP 300 Series • Front Panel Operations 41
Aspect Ratio
The Aspect Ratio adjustment allows the user to select
between input rates to fill the entire window for that channel
(FILL), scale up to fit the channel window and keep the
original aspect ratio (FIT), or to allow each input rate to
display in its native aspect ratio with respect to the channel
window (FOLLOW).
MENU
NEXT
INPUT
CONFIG
Rotate either to
select the input format.
Rotate [ to select the horizontal
start pixel.
Rotate { to adjust the vertical
start pixel.
Rotate [ to adjust Horizontal Active pixel
width.
Rotate { to adjust Vertical Active pixel height.
Rotate [ to set an
EDID value for the
active input.
Rotate either to
select input.
Rotate either to
select an aspect ratio for the
selected input.
Rotate either to
select an audio input source
for the selected input.
Rotate either to set the
audio input level from -18
to +24 dB.
NOTE: The Input Configuration submenus are input
specific. Depending on the input type, not all
submenus (shown in gray on subsequent pages)
are available.
Rotate [ to adjust TTL pixel width.
Rotate { to adjust phase.
INPUT SELECT
<3>
INPUT #[3]
<YUVp/HDTV>
(3) TTLPIX PHASE
<XXX> <16>
EDID INPUT #[1]
<720p_60_2ch>
(3) H START V
<128> <128>
(3) H ACTIVE V
<1024> <0768>
ASPECT RATIO IN[1]
<FILL>
IN[1] AUDIO SELECT
<LPCM 2CH>
IN[1] AUDIO LEVEL
<0 dB>
The aspect ratio can be changed per input. The selected input is displayed in the first line.
Rotate either ADJUST knob to select FOLLOW, FILL (default), and FIT for the selected input.
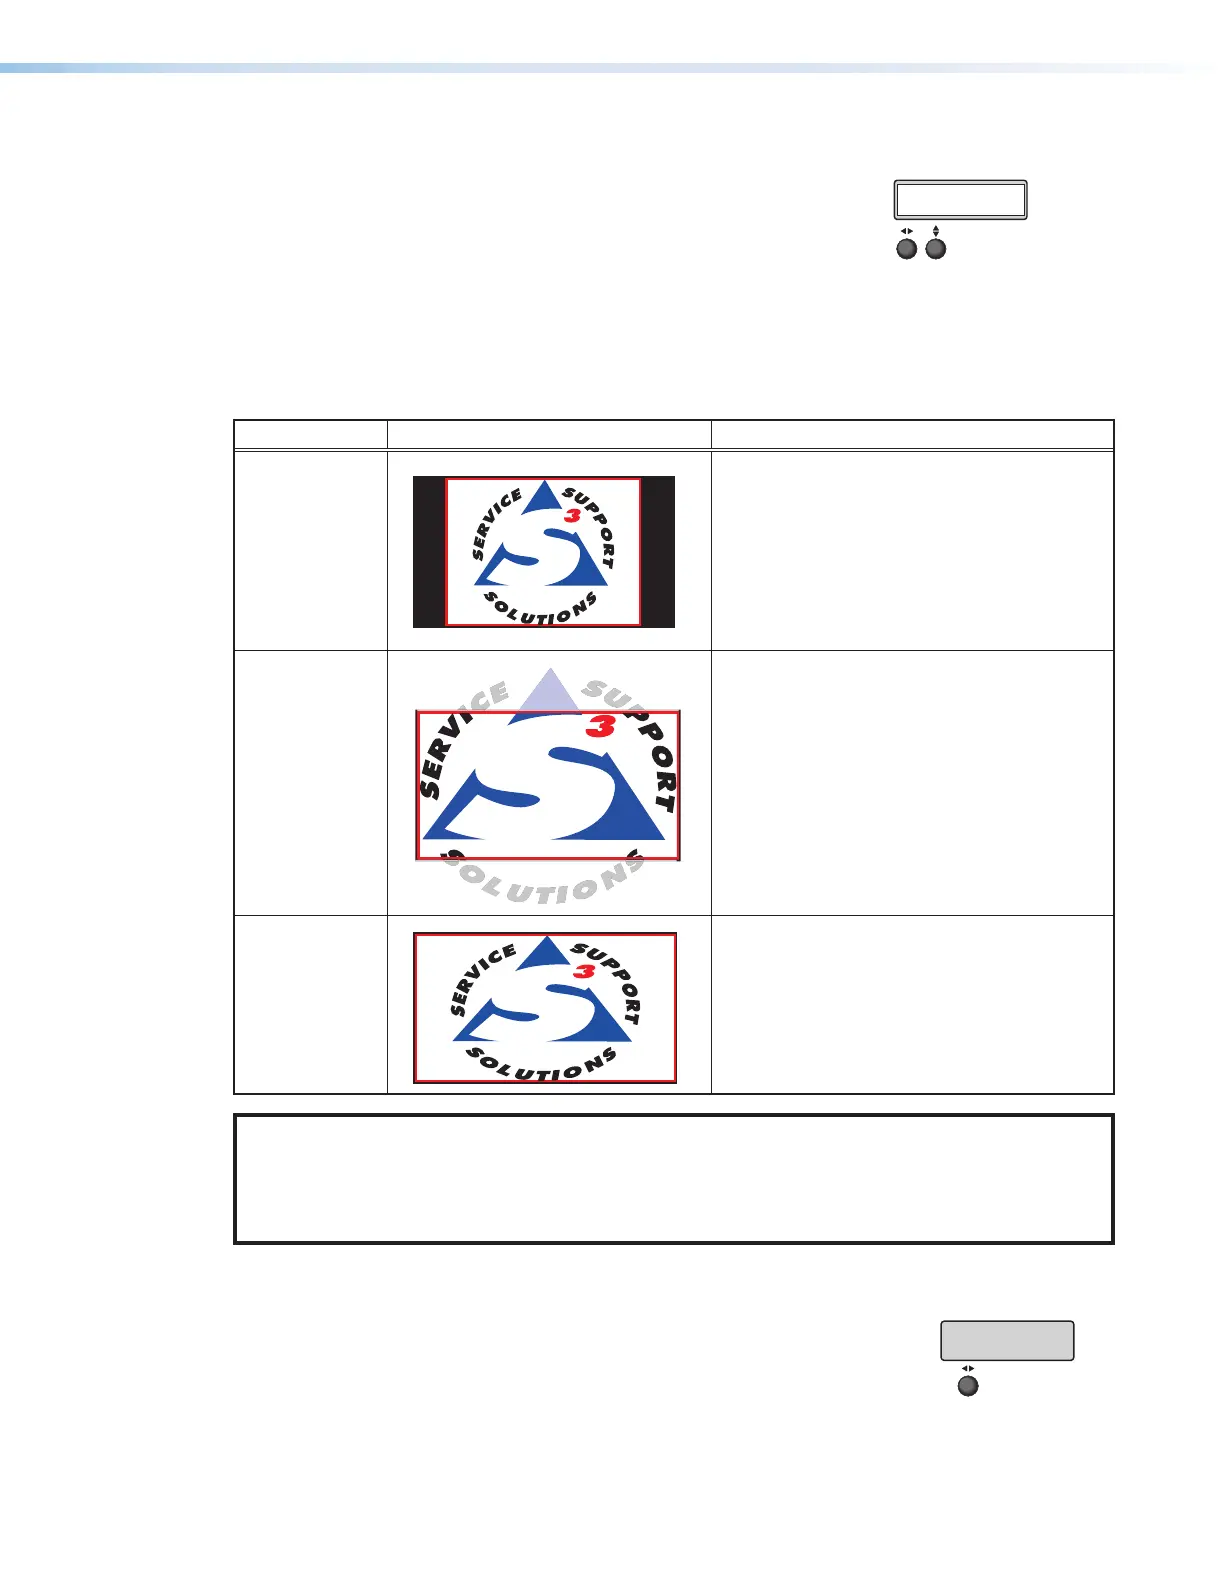
Aspect Ratio
Screen Appearance Description
FOLLOW
The input format passes unchanged. A 4x3
format (represented by the red block on the
left) remains at its original aspect ratio. The
vertical dimension fills, but not the horizontal
dimension of the output or recording. Letter
box or pillar bars can be applied based on
the horizontal and vertical size settings (see
Picture Control Menu on page30).
FIT
The input format is zoomed to fill the
output with top and bottom or left and right
information cropped out in order to fit the
screen without letterboxing or adding pillars.
Some loss of image occurs represented by
the dimmed image outside the red block.
FILL
The input format is non‑uniformly scaled
to fill the 16x9 output. A 4x3 input fills the
horizontal and vertical screen of the output
or recording with some distortion of the input
(default)
NOTE: The selected input aspect ratio setting is applied to both the archive and confidence
outputs. If the confidence resolution is different, the applied aspect ratio cannot be maintained.
For example, if the archive resolution is 1080p with an aspect ratio of 16:9, and the confidence
display is 1024x768 with an aspect ratio of 4:3, the input aspect ratio selection cannot be
maintained for both.
EDID on HDMI Connectors
EDID emulation is available on HDMI inputs 1, 2 and 4. By default,
all three custom EDIDs are set to 720p @ 60Hz, 2‑channel audio.
The selected input is displayed in the first line. Rotate either
ADJUST knob to select the desired EDID from the EDID table on
page42.
MENU
NEXT
INPUT
CONFIG
Rotate either to
select the input format.
Rotate [ to select the horizontal
start pixel.
Rotate { to adjust the vertical
start pixel.
Rotate [ to adjust Horizontal Active pixel
width.
Rotate { to adjust Vertical Active pixel height.
Rotate [ to set an
EDID value for the
active input.
Rotate either to
select input.
Rotate either to
select an aspect ratio for the
selected input.
Rotate either to
select an audio input source
for the selected input.
Rotate either to set the
audio input level from -18
to +24 dB.
NOTE: The Input Configuration submenus are input
specific. Depending on the input type, not all
submenus (shown in gray on subsequent pages)
are available.
Rotate [ to adjust TTL pixel width.
Rotate { to adjust phase.
INPUT SELECT
<3>
INPUT #[3]
<YUVp/HDTV>
(3) TTLPIX PHASE
<XXX> <16>
EDID INPUT #[1]
<720p_60_2ch>
(3) H START V
<128> <128>
(3) H ACTIVE V
<1024> <0768>
ASPECT RATIO IN[1]
<FILL>
IN[1] AUDIO SELECT
<LPCM 2CH>
IN[1] AUDIO LEVEL
<0 dB>