SMP 300 Series • Front Panel Operations 43
Audio Select
Each of the inputs has a corresponding input audio format
selection. The selected input is displayed in the first line.
For HDMI inputs 1, 2, 4, and 5 the audio format can be:
• LPCM 2CH (default) — Embedded digital audio (default).
• ANALOG AUDIO — Analog audio from the rear panel captive
screw connections.
• OFF — No audio.
For analog video input 3, the audio format can be:
• ANALOG AUDIO (default) — Analog audio from the rear
panel captive screw connections.
• OFF — No audio.
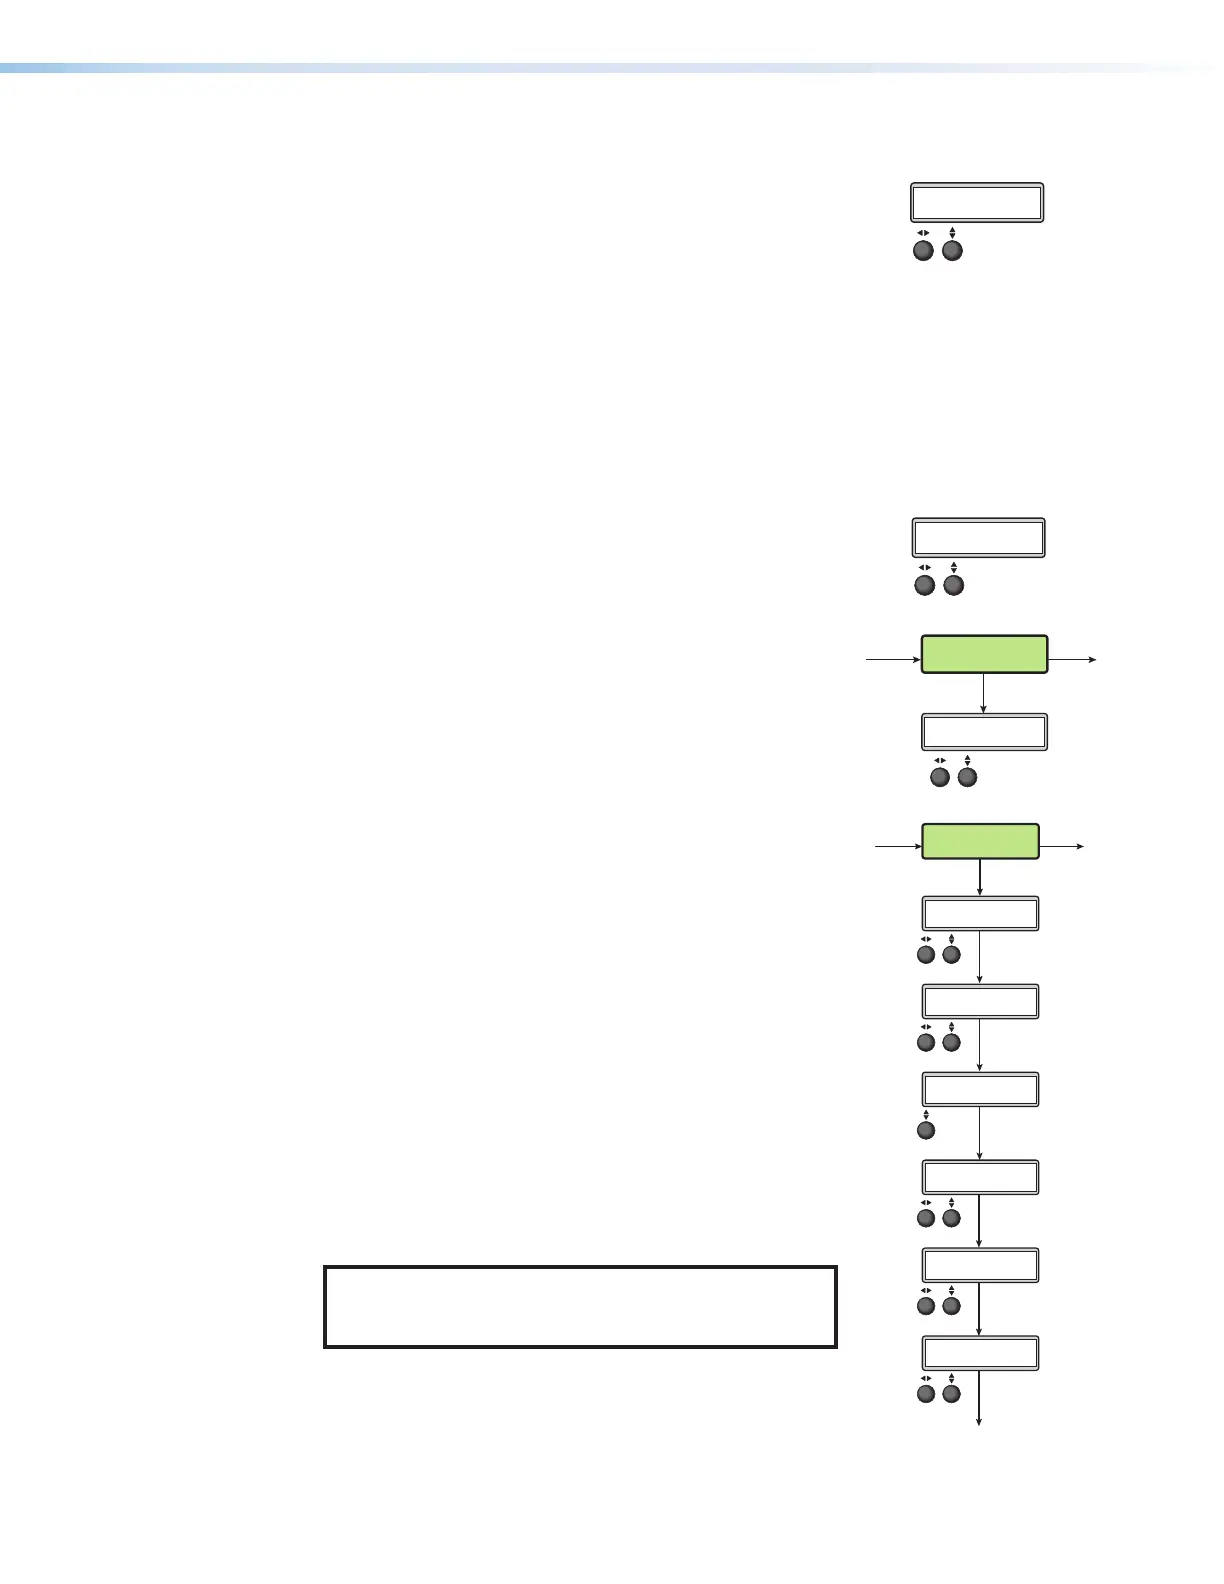
MENU
NEXT
INPUT
CONFIG
Rotate either to
select the input format.
Rotate [ to select the horizontal
start pixel.
Rotate { to adjust the vertical
start pixel.
Rotate [ to adjust Horizontal Active pixel
width.
Rotate { to adjust Vertical Active pixel height.
Rotate [ to set an
EDID value for the
active input.
Rotate either to
select input.
Rotate either to
select an aspect ratio for the
selected input.
Rotate either to
select an audio input source
for the selected input.
Rotate either to set the
audio input level from -18
to +24 dB.
NOTE: The Input Configuration submenus are input
specific. Depending on the input type, not all
submenus (shown in gray on subsequent pages)
are available.
Rotate [ to adjust TTL pixel width.
Rotate { to adjust phase.
INPUT SELECT
<3>
INPUT #[3]
<YUVp/HDTV>
(3) TTLPIX PHASE
<XXX> <16>
EDID INPUT #[1]
<720p_60_2ch>
(3) H START V
<128> <128>
(3) H ACTIVE V
<1024> <0768>
ASPECT RATIO IN[1]
<FILL>
IN[1] AUDIO SELECT
<LPCM 2CH>
Audio Level
Each audio input channel can be adjusted from -18 dB to
+24dB. The default value is 0dB. The selected input is displayed
in the first line.
MENU
NEXT
INPUT
CONFIG
Rotate either to
select the input format.
Rotate [ to select the horizontal
start pixel.
Rotate { to adjust the vertical
start pixel.
Rotate [ to adjust Horizontal Active pixel
width.
Rotate { to adjust Vertical Active pixel height.
Rotate [ to set an
EDID value for the
active input.
Rotate either to
select input.
Rotate either to
select an aspect ratio for the
selected input.
Rotate either to
select an audio input source
for the selected input.
Rotate either to set the
audio input level from -18
to +24 dB.
NOTE: The Input Configuration submenus are input
specific. Depending on the input type, not all
submenus (shown in gray on subsequent pages)
are available.
Rotate [ to adjust TTL pixel width.
Rotate { to adjust phase.
INPUT SELECT
<3>
INPUT #[3]
<YUVp/HDTV>
(3) TTLPIX PHASE
<XXX> <16>
EDID INPUT #[1]
<720p_60_2ch>
(3) H START V
<128> <128>
(3) H ACTIVE V
<1024> <0768>
ASPECT RATIO IN[1]
<FILL>
IN[1] AUDIO SELECT
<LPCM 2CH>
IN[1] AUDIO LEVEL
<0 dB>
Background Recall Menu (For composite mode only)
A background can be selected to record with the channel A
and B inputs. Background files must be in PNG format and
uploaded to the Background folder of the SMP300 Series
using the embedded web pages or an SFTP client.
Use either knob to scroll through available files. Press NEXT
to apply the background to the current layout. If the file is
smaller than the selected output resolution, the background
displays from the top left corner. If the file resolution is larger,
the background is cropped to fit the selected resolution.
MENU MENU
NEXT
BACKGROUND
RECALL
Rotate either to select.
Press NEXT to load
the background file
and exit.
RECALL
<default.png>
MENUMENU
NEXT
NEXT
NEXT
NEXT
NEXT
NEXT
NEXT
ADVANCED
CONFIG
Rotate { to toggle Auto
Memory On or Off.
Rotate either to select
reboot or to reset all
advanced configurations.
Rotate either to select a
test pattern.
Rotate [ to select input.
Rotate { to toggle on or off.
Rotate either to select
a resolution.
Rotate either to select
the drive restriction.
IN<1> AUTO IMAGE
<OFF>
TEST PATTERN
<N/A>
RESET
<NONE>
AUTO MEMORY
<ON>
PREVIEW HDMI OUT
<1280X720@60Hz>
RECORD DRIVE LIMITER
<OFF/ON>
Advanced Configuration Menu
The following flowchart provides an overview of the
ADVANCED CONFIGURATION menu. Options include
AUTO IMAGE (ON or OFF), PREVIEW HDMI OUT, AUTO MEMORY
(ON or OFF), TEST PATTERN, RECORD DRIVE LIMITER, and
RESET (defaults to factory).
Auto-Image
This mode is selectable per input and is used where a
variety of input sources are likely encountered. Auto‑Image
automatically sizes and positions incoming video signal to
fill the channel window when a new input signal is detected.
When Auto Memory is off, Auto‑Image executes whether or
not the same input frequency has been detected before.
NOTE: Enabling Auto‑Image when overscan is also
enabled recalls the default sampling settings for the
detected input rate.