Do you have a question about the GE Definium AMX 700 and is the answer not in the manual?
Provides an overview of the Definium AMX 700 X-Ray System, highlighting its digital imaging capabilities.
Directs users to essential safety considerations detailed in Chapter 2 for proper system operation.
Explains the visual symbols and conventions used throughout the manual for clarity.
Details critical safety instructions for operating X-ray equipment to prevent injury and ensure proper use.
Emphasizes the importance of authorized personnel and careful reading of the manual before operation.
Provides essential guidelines for safe and effective operation of the X-ray system.
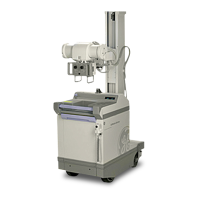
Describes the key features and benefits of the battery-operated Definium AMX 700 mobile X-ray unit.
Explains the functions of the display panel, including battery status and kVp/mAs settings.
Details the operation of the console hand switch for initiating X-ray exposures.
Lists and describes available options and accessories like the DAP Meter and External CD Drive.
Guides users through the procedure for powering on the Definium AMX 700 unit and its self-tests.
Explains how to safely and effectively maneuver the mobile X-ray unit using its drive handle.
Outlines steps for adjusting mechanical components like the column and telescoping arm for proper positioning.
Describes the step-by-step process for acquiring radiographic images using the system.
Explains how to adjust kVp and mAs settings for optimal image quality and radiation dose.
Explains the basic process of charging the Definium AMX 700 batteries via a wall outlet.
Provides guidance on when to recharge the batteries for optimal battery life.
Details the procedure for connecting the unit to a charging station or wall outlet.
Recommends regular cleaning using approved mild cleaners and lists tested cleaning agents.
Emphasizes the need for scheduled maintenance by qualified GE service representatives.
Presents a table outlining required periodic maintenance checks and their frequencies.
Explains the different types of messages displayed and basic troubleshooting steps for errors.
Outlines basic detector functions, usage, care, and specifications for the GE Portable DR Detector.
Explains basic system operations, software startup/shutdown, login, and status messages.
Details procedures for patient setup and selecting acquisition protocols from the Worklist.
Describes the process of acquiring images using the GE Portable DR Detector or free cassette.
Explains the primary functions of the detector: converting X-ray data to digital format and transferring it.
Describes the detector's construction, pixel array, and imaging window.
Lists and explains the safety symbols and information found on the back of the detector.
Covers detector alignment and the function of indicator LEDs for status indication.
Explains the on-screen virtual keyboard used for text input on touch screen systems.
Guides users on starting up and shutting down the GE Portable DR Detector software.
Covers standard login procedures, invalid password messages, and logging off the system.
Explains how to connect the unit to a facility wireless network for data transfer.
Introduces the Worklist as the starting point for patient setup and procedure selection.
Explains how to find patients and procedures using search, filter, and sort functionalities.
Details how to use filters to display specific criteria from the Worklist.
Guides users on selecting single or multiple procedures for patient exams.
Introduces the Acquisition screen where exams are set up and exposure details are adjusted.
Guides users on selecting or modifying protocols from the available list for an exam.
Details the procedure for conducting a digital X-ray exam using the DR Detector.
Explains how to perform an X-ray exam using a traditional film screen or CR cassette.
Introduces the Image Viewer screen for adjusting and viewing acquired images.
Details tools for flipping, rotating, adjusting brightness, contrast, and inverting images.
Explains the Detector Exposure Index (DEI) as a tool to assess image exposure and quality.
Details methods for printing images, including Auto Print and Manual Print options.
Introduces the Image Management screen for managing images, copying, transferring, and saving.
Details the process for accessing and copying images stored on a CD.
Covers copying exams to network hosts, CDs, or other exams.
Explains how to delete exams, series, or individual images from the local database.
Guides users on configuring network connections, adding, removing, or editing hosts.
Covers setting preferences for the Worklist, including default query and auto-refresh.
Allows enabling and configuring Copy Exam, Auto Tag, Auto Print, Auto Push, and Auto Delete functions.
Covers preferences for managing the protocol database, including backup and retrieval.
Differentiates between Detector Check and the full QAP test for assessing detector quality.
Describes the recommended schedule for quality testing and conditions requiring tests.
Provides a step-by-step guide for performing the Detector Check test.
Details the procedure for performing the Quality Assurance Program test using a flat-field phantom.
Guides on how to enable or disable the HIPAA login feature via GE Field Engineer.
Covers tasks for administering login functions, including managing groups and users.
Explains how to add, assign, change passwords, and remove users from the system.
Covers tasks affecting login functionality, like inactivity timeout and enterprise authorization.
| Brand | GE |
|---|---|
| Model | Definium AMX 700 |
| Category | Medical Equipment |
| Language | English |


 Loading...