EasyManua.ls Logo

GE AMX-II

GE AMX-II
223 pages
To Next Page IconTo Next Page
Loading...
GE
Medical
Systems
Technical
Publications
Service
Manual
SM
A0654E
Revision
3-1684
AMX-IT
X-Ray
Unit
Product
Operating
Documentation
Question and Answer IconNeed help?

Do you have a question about the GE AMX-II and is the answer not in the manual?

GE AMX-II Specifications

General IconGeneral
BrandGE
ModelAMX-II
CategoryMedical Equipment
LanguageEnglish

Summary

Technical Publications

Service Manual SM A0654 E

Service manual for AMX-II X-Ray Unit, Revision 3-1684.

DAMAGE IN TRANSPORTATION

Handling Damaged Shipments

Procedures for reporting and claiming damages during shipment.

IMPORTANT!... X-RAY PROTECTION

Radiation Safety Guidelines

Crucial safety instructions and responsibilities for X-ray equipment use.

AMX-II X-RAY UNIT

FOREWORD

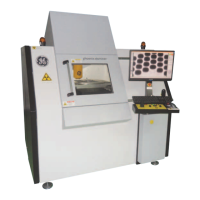
Introduction to the AMX-II X-Ray Unit and its operation.

SAFETY PRECAUTIONS

Radiation Safety Guidelines

Guidelines for protecting against radiation during operation.

Good Operating Practices

Recommendations for safe and effective operation of the AMX-II.

Electrical Shock and Battery Warnings

Battery Safety Precautions

Hazards and precautions related to the unit's battery.

FUNCTIONAL DESCRIPTION

Unit Controls and Operation Overview

Explanation of the unit's functional description and controls.

OPERATION

Driving the Mobile Unit

Step-by-step instructions for driving the mobile unit.

Positioning and Making an Exposure

Procedures for positioning the unit and preparing for an exposure.

Unit Operation and Battery Recharging

Battery Recharging Procedure

Procedure for recharging the unit's battery.

WARNING: Exposure Termination

Actions for prolonged exposure indicators or audible signals.

RATINGS AND SPECIFICATIONS

X-Ray Generator Ratings and Duty Cycle

Maximum ratings and duty cycles for the X-ray generator.

Technic Factor Deviations

MAS and KVP Accuracy

Deviation of MAS and KVP readings from selected values.

Measurement Criteria and Tube Unit Ratings

Tube Unit Ratings and Filtration

Federal regulations and inherent filtration of the tube unit.

SERVICING

Periodic Maintenance Schedule

Requirements for establishing a periodic maintenance program.

User Service and Maintenance Guidelines

Guidelines for cleaning and handling power interruptions.

CHAPTER 3 INSTALLATION

SECTION 1 PREINSTALLATION

Preliminary steps before installing the unit.

SECTION 6 BATTERY

Procedures related to the unit's battery.

SEC. 1 PREINSTALLATION

1-2 Compatibility Requirements for H.E.W. Certification

Components required to meet HEW beam quality regulations.

1-3 Safety Precautions

General safety precautions for installation and maintenance.

Safety Precautions and Tools

Battery Safety Hazards

Warnings about electrical shock and caustic electrolyte from batteries.

1-4 Tools and Materials

List of specialized tools and materials needed for service.

SEC. 2 INSTALL TUBE SUPPORT ASSEMBLY

2-1 Install Vertical Column

Steps for installing the vertical column of the unit.

SEC. 2 A INSTALL HORIZONTAL EXTENSION ASSEMBLY

2-2 Install Telescoping Arm

Procedures for attaching the telescoping arm to the carriage.

2-3 Install X-Ray Tube Unit

Mounting the X-Ray Tube Unit

Carefully placing the tube unit into the trunnion halves.

Tube Unit Installation Details

Adjusting Counterbalance System

Adjusting the counterbalance for proper arm and tube support.

SEC. 3 CABLES

3-1 Install High Voltage Cables

Steps for installing the high voltage cables.

Connecting Stator and Collimator Cables

3-2 Install Stator and Collimator Cables

Connecting stator and collimator cables.

SEC.4 INSTALL HIGH VOLTAGE TRANSFORMER

Checking and Adding Transformer Oil

Procedure for checking and adjusting the transformer oil level.

Installing the HV Transformer

Connecting HV Transformer Terminals

Wiring the HV transformer terminals according to lead labels.

SEC.5 CONNECTING CABLES

5-1 Stator Cable Routing

Routing and connecting the stator cable.

Connecting Collimator and HV Cables

5-2 Collimator Cable Connections

Connecting the collimator cable to the 8TS1 terminal strip.

HV Cable Terminal Installation

Proper HV Cable Connection Procedure

Step-by-step guide for making proper HV cable connections.

SEC. 6 BATTERY

6-1 Unpacking and Preparation

Safety precautions and preparation before battery installation.

Battery Handling Precautions

Safety warnings regarding metal objects and sparks near batteries.

Initial Battery Charge Procedure

Initial Charge Monitoring and Adjustments

Monitoring battery voltage and current during initial charging.

Battery Charging Adjustments and Completion

Completing Charge and Cut-off Setting

Steps for completing the charge and setting the cutoff.

Battery Replacement and Discharge

Cell Group Replacement Procedure

Procedure for replacing a faulty cell group.

PMS DATA RECORD - MOBILE GENERATOR I

Maintenance and Checks Schedule

Table outlining periodic maintenance and checks with frequencies.

FUNCTIONAL CHECK Procedures

Functional Checks Frequency Table

Table listing functional checks and their recommended frequencies.

6-3 Check Electrolyte Level

Electrolyte Level Check Procedure

How to check and adjust electrolyte levels in battery cells.

WARNING: Battery Electrolyte Hazard

Hazards of battery electrolyte and first aid.

6-4 Battery Installation in Unit

Installing and Connecting Battery Packs

Sliding cell groups into the compartment and connecting them.

CHAPTER 4 ADJUSTMENT AND CALIBRATION

SECTION 1 HEW FIELD TESTS

Field tests required for HEW compliance.

SECTION 2 TESTS AND ADJUSTMENTS

Procedures for testing and adjusting various unit functions.

SEC 1. HEW FIELD TESTS

HEW Field Test Procedures and Requirements

Table listing HEW field tests, requirements, and application.

SEC. 2 TESTS AND ADJUSTMENTS

2-1 Adjust Battery Condition Meter, 5 M1

Procedure for calibrating the battery condition meter.

2-2 Check X-Ray Tube Filament

Verifying the X-ray tube filament continuity.

2-3 Check X-Ray Tube Anode Rotation

Verifying Anode Rotation

Checking anode rotation and coasting time.

2-4 Adjust X-Ray Tube Current (MA)

Procedure for adjusting the X-ray tube current (MA).

MA Regulator Adjustment and Timer Test

2-5 Test the Timer

Performing functional checks on the timer.

2-6 Check High Voltage Transformer Primary and Battery Voltage Under Load

HV Transformer and Battery Voltage Checks

Verifying HV transformer primary voltages and battery voltage under load.

Motor Drive Speed Control Check

2-7 Motor Drive Speed Control Check and Adjustment

Checking and adjusting the motor drive speed control.

Motor Drive Speed and Force Checks

Checking Wheel RPM and Voltage

Verifying wheel RPM and motor voltage against table values.

SEC.3 INSTALL SENTRY COLLIMATOR

3-1 Prepare Collimator

Preparing the collimator for attachment.

Collimator Preparation Steps

Detaching Collimator Components

Removing interface plate, adapter plate, and finger guard.

3-3 Collimator Installation

Attaching Collimator to Interface Plate

Securing the collimator to the interface plate.

WARNING: X-RAY TECHNIQUES FOR ALIGNMENT

Recommended X-ray techniques for proper alignment procedures.

Collimator Installation (Continued)

Balancing Telescoping Arm

Adjusting the column nut to balance the telescoping arm.

4-1 Metric Scale Label

Attaching a metric scale label.

4-2 Time Interval Adjustment

Adjusting Field Light Timer

Adjusting the field light timer for different intervals.

SEC. 5 COLLIMATOR CHECKS AND ADJUSTMENTS

5-1 Crosshair Position Check and Adjustment

Checking and adjusting the collimator crosshair position.

Collimator Alignment Checks

5-2 Bucky Centering Light Check and Adjustment

Checking and adjusting the Bucky centering light.

5-3 Extension Cylinder Alignment Check

Checking Extension Cylinder Alignment

Aligning the extension cylinder in the collimator tracks.

5-4 Large Field Size Check

Verifying the collimator's field size accuracy.

5-5 Field Lamp Voltage Check

Measuring Collimator Lamp Voltage

Measuring the voltage of the collimator field lamp.

5-6 Collimator Beam Alignment Tests

Requirements for Beam Alignment

Misalignment limits for light and X-ray fields based on SID.

SEC 6 DIAGNOSTIC SOURCE ASSEMBLY; INHERENT FILTRATION

Half-Value Layer Test Procedure

Test for half-value layer of the useful beam at 80 KVP.

SEC.7 COMPLETING THE INSTALLATION

Demonstrate and Explain Unit Functions

Demonstrating and explaining unit functions to the user.

Finalizing Installation and Documentation

Providing Customer Documentation

Providing operating manual, warranty form, and other documents.

CHAPTER 4 PART II

SECTION 3 TUBE UNIT INSTALLATION

Steps for installing the X-ray tube unit.

Chapter 4 Part II - Section Details

SECTION 9 COLLIMATOR INSTALLATION

Procedures for installing the collimator.

SECTION 13 X-RAY KVP AND MAS ACCURACY

Verifying the accuracy of X-ray KVP and MAS settings.

SECTION 17 MOTOR DRIVE SYSTEM

Checking and adjusting the motor drive system.

SECTION 18 CHARGE BATTERY

Procedures for charging the unit's battery.

SECTION 19 BATTERY CAPACITY CHECK

Verifying the battery's capacity.

SECTION 20 COMPLETING THE INSTALLATION

Final steps to complete the unit installation.

Panel Identification Table

Component Prefixes by Panel

Identifying panels and their corresponding component prefixes.

SEC. 1 PRE-INSTALLATION

1-2 Product identification and Compatibility Requirements for HEW Certification

Identifying AMX-II components and HEW certification requirements.

1-3 Safety Precautions

Electrical and Battery Safety Hazards

Precautions for electrical shock, battery hazards, and hazardous areas.

1-4 Delivery Data

Unit Shipment Details and Transport Caution

Information on unit assembly and transport warnings.

1-5 Battery

Battery Pack Components and Pre-installation Prep

Details on furnished parts and battery prep before installation.

1-6 Tools and Test Equipment

Additional Test Equipment for Installation

Specialized test equipment needed for installation and troubleshooting.

1-7 HEW Field Tests

HEW Field Test Procedures and Requirements

Table listing HEW field tests, requirements, and application.

SECTION 2 INSPECTION AND UNPACKING

CAUTION: Tie Down Straps and Vertical Lock

Warning about releasing tie-down straps and vertical lock prematurely.

DAMAGE IN TRANSPORTATION Procedures

Procedures for handling and reporting shipping damages.

Unit Unpacking and Initial Checks

Checking Tube Unit for Oil Leaks

Inspecting the tube unit for oil leaks or broken inserts.

SEC. 3 TUBE UNIT INSTALLATION

Disassembling Fork Trunnions

Disassembling fork trunnions and removing screws.

Tube Unit Installation Details

Installing Left and Right Trunnions

Installing left and right trunnions with washers.

SEC 4 RELEASE OF HORIZONTAL ARM

CAUTION: Vertical Column Counterbalance

Warning about the vertical column's counterbalance.

Extending Telescoping Arm

Releasing and extending the telescoping arm.

SECTION 5 CASSETTE DRAWER REMOVAL

Removing Cassette Drawer and Kick Panel

Steps for removing the cassette drawer and kick panel.

SEC. 6 BATTERY INSTALLATION

CAUTION: Battery Safety Precautions

Reviewing safety precautions before battery installation.

Installing and Connecting Battery Packs

Interconnecting Battery Packs

Connecting battery packs using No. 6 AWG leads.

SECTION 7 H.V. TRANSFORMER

Checking Transformer for Oil Leaks

Checking the HV transformer for oil leaks.

SEC. 8 PRELIMINARY ELECTRICAL CHECKS

8-1 Calibrate Battery Condition Meter, 5 M1

Calibrating the battery condition meter.

8-2 Check X-Ray Tube Filament and Stator

Checking Filament Glow and Anode Rotation

Verifying filament glow and anode rotation.

8-3 Check Filament and Rotor Interlocks

Checking Rotor Button and Ready Lamp Behavior

Verifying Ready lamp behavior after rotor button press.

SEC. 9 COLLIMATOR INSTALLATION

9-1 Mounting Collimator

Securing the collimator to the interface plate.

Collimator Checks and Adjustments

4-1 Metric Scale Label

Attaching a metric scale label.

4-2 Time Interval Adjustment

Adjusting the field light timer for different intervals.

9-4 Vertical Column and Horizontal Arm Balance

Checking Counterpoise Cable and Counterbalance Force

Ensuring cable is in guide and adjusting counterbalance force.

Horizontal Arm Balance Adjustment

Using Torpedo Level for Arm Balance

Using a torpedo level to check arm balance.

SEC. 10 CONNECT H. V. DIVIDER

Connecting HV Cables to Divider and Tube Unit

Connecting HV cables to the HV divider and tube unit.

SECTION 11 ADJUSTMENT OF MA STABILIZER

MA Stabilizer Adjustment Procedure

Procedure for adjusting the MA stabilizer.

SECTION 12 PRELIMINARY KVP, TIMER, AND LOAD CHECKS

12-1 Timer Check And Adjustment

Checking and adjusting the timer for correct exposure intervals.

Timer and Exposure Interval Checks

12-2 Back-Up Timer Check

Performing checks on the back-up timer.

12-3 Battery Load Voltage Check

Measuring battery voltage drop under load conditions.

SECTION 13 X-RAY KVP AND MAS ACCURACY

Making Exposure and Measuring KVP

Performing exposures and measuring KVP, comparing to waveform.

SECTION 14 COLLIMATOR FUNCTIONAL CHECKS AND ADJUSTMENTS

14-1 Cross Hair Position Check and Adjustment

Checking and adjusting the collimator crosshair position.

Collimator Alignment Checks

14-2 Extension Cylinder Alignment Check (Optional Accessory)

Checking the alignment of the extension cylinder.

14-3 Large Field Size Check

Verifying Collimator Field Size Accuracy

Checking the field size accuracy of the collimator.

14-4 Field Lamp Voltage Check

Measuring the voltage of the collimator field lamp.

SEC. 15 COLLIMATOR BEAM ALIGNMENT CHECKS

Requirements for Beam Alignment

Misalignment limits for light and X-ray fields based on SID.

SEC 6 DIAGNOSTIC SOURCE ASSEMBLY; INHERENT FILTRATION

Half-Value Layer Test Procedure

Test for half-value layer of the useful beam at 80 KVP.

SEC. 17 MOTOR DRIVE SYSTEM

17-1 Motor Drive Controls and Safety Interlocks

Checking motor drive controls and safety interlocks.

SECTION 18 CHARGE BATTERY

18-1 Charge Battery and Check Cutoff Setting

Charging the battery and checking the cutoff setting.

SECTION 19 BATTERY CAPACITY CHECK

Performing Battery Capacity Test

Testing battery capacity by taking exposures.

SECTION 20 COMPLETING THE INSTALLATION

Demonstrate and Explain Unit Functions

Demonstrating and explaining unit functions to the user.

Finalizing Installation and Documentation

Service Follow-up Documents Submission

Submitting installation job sheets and product locator cards.

SEC. 1 PURPOSE AND REQUIREMENTS

1-2 HEW Field Tests

HEW field tests for compliance, references, and data recording.

HEW Field Test Procedures

KVP Accuracy Tests

Tests for KVP accuracy at different settings.

Collimator Alignment Tests

Tests for collimator light and X-ray field alignment.

SEC.2 MOBILE UNIT MECHANICAL CHECKS

2-1 Tube Unit and Collimator Checks

Checking tube unit and collimator rotation.

Mobile Unit Mechanical Checks

2-2 Extension Arm Assembly Checks

Checking the extension arm assembly.

2-3 Column and Vertical Carriage Assembly Checks

Checking column and vertical carriage assembly.

Mobile Unit Mechanical Checks (Continued)

2-4 Base, Cabinet and Brakes Checks

Checking base, cabinet, and brakes.

2-5 Motor Drive System Checks

Motor Drive Controls and Safety Interlocks

Checking motor drive controls and safety interlocks.

SEC.3 ELECTRICAL CHECKS

3-1 Battery Circuit Calibration Check

Calibrating the battery circuit.

Battery Circuit Calibration and Tube Rotation

3-2 Tube Rotation Check

Checking the tube unit's rotation.

3-3 MA and Filament Protection

Measuring MA and Filament Primary Voltage

Measuring MA and filament primary voltage.

MAS (Time) and Overload Check

3-4 MAS (Time) and Overload Check

Checking MAS (time) and overload conditions.

H.V. Divider Check of KVP Calibration and MA

3-5 H.V. Divider Check of KVP Calibration and MA

Checking H.V. divider for KVP calibration and MA.

HV Divider and KVP Measurement Setup

Connecting HV Divider and Scope

Connecting HV divider and scope for measurements.

SEC. 4 COLLIMATOR CHECKS

4-1 Field Light Check

Checking the collimator's field light.

Collimator Checks

4-2 Crosshair Position Check

Checking and adjusting the collimator crosshair position.

4-3 Extension Cylinder Alignment Check

Checking the alignment of the extension cylinder.

Collimator Alignment Checks

4-4 Alignment Checks

Performing alignment checks on the collimator.

SEC. 5 SYSTEM CHECKS

Performing system checks.

5-1 Film and Indicator Checks

Checking film and indicator lights.

5-2 Battery Electrolyte Level Check

Electrolyte Level Check Procedure

How to check and adjust electrolyte levels in battery cells.

5-3 Battery Capacity Check

Performing Battery Capacity Test

Testing battery capacity by taking exposures.

CHAPTER 6 THEORY AND SERVICE

SECTION 1 FUNCTIONAL DESCRIPTION

Overall functional description of the AMX-II.

SECTION 2 BATTERY CHARGER

Theory and service for the battery charger.

SEC. 1 FUNCTIONAL DESCRIPTION

AMX-II Overview

Description of the AMX-II as a battery-powered X-ray unit.

SEC. 3 INVERTER DRIVERS

Inverter Driver Overview

Description of the inverter driver's role and components.

SEC. 4 INVERTER DRIVER OUTPUT COUPLERS

4-1 60 Hz Inverter Driver Output Couplers

Description of the 60 Hz inverter driver output coupler.

4-2 500 Hz Inverter Driver Output Couplers

500 Hz Inverter Driver Circuit Description

Description of the 500 Hz inverter driver circuit and its components.

SEC. 5 INVERTERS

Inverter Operation Principle

Explaining the principle of operation for both 60 Hz and 500 Hz inverters.

SEC.6 X-RAY TUBE FILAMENT SUPPLY AND CONTROL CIRCUITS

Filament Circuit Adjustment Requirements

Requirements for filament voltage and ma regulator adjustments.

X-RAY EXPOSURE CONTROL

7-1 Off to Ready State

Sequence of events leading to the READY state.

7-2 Ready to Exposure Start

Sequence of events to produce an exposure.

SEC. 8 EXPOSURE TERMINATION

8-1 Radiographic Timer Termination by Forced Commutation

How the radiographic timer terminates exposure via forced commutation.

Exposure Termination Methods

8-2 Termination Due to Tube MA Overload

How MA overload trips the main power circuit breaker.

8-3 Termination Due to Handswitch Release

How releasing handswitch buttons terminates exposure.

SEC. 9 COLLIMATOR LAMP CIRCUIT

Collimator Lamp Activation Sequence

How the collimator lamp circuit is initiated.

SEC. 10 MOTOR CONTROL

Motor Speed Control Operation

How operator controls motor speed via potentiometer and sawtooth voltage.

SEC. 11 OSCILLOSCOPE WAVEFORMS

Introduction to Waveform Analysis

Introduction to oscilloscope waveforms for analysis.

Oscilloscope Waveforms (W1-W3)

UJT Oscillator Trigger Signals

Waveforms showing trigger signals to the 60-Hz inverter driver.

Oscilloscope Waveforms (W4-W6)

60-Hz Inverter Driver Output Waveforms

Waveforms of the 60-Hz inverter driver output.

Oscilloscope Waveforms (W7-W9)

X-Ray Tube Stator Signals

Waveforms showing voltage proportional to current in stator winding.

Oscilloscope Waveforms (W10-W12)

3 A2 V5 Signal for Exposure Start Interlock

Signal indicating 3A2V5 actuation for exposure start interlock.

Oscilloscope Waveforms (W13-W14)

7 T2 Filament Transformer Primary Signal

Signal indicating current in 7T2 filament transformer primary.

Oscilloscope Waveforms (W15-W17)

X-Ray Exposure Turn-on Signal

Signal at gate of 2CR2 for exposure turn-on.

Exposure Stop Signal to SCR Gate

Signal at gate of 2CR1 for exposure turn-off.

Oscilloscope Waveforms (W18-W20)

UJT Oscillator Trigger Signals

Trigger signals from UJT oscillator to 500-Hz inverter driver.

Pilot SCR Signals to Inverter Driver

Signals from pilot SCRs to the inverter driver SCRs.

Oscilloscope Waveforms (W21-W23)

Voltage Proportional to Base Current

Voltage proportional to base current of 3A3Q19 and 3A3Q20.

Output Signal from 3 A3 Q55

Output signal from 3A3Q55.

Oscilloscope Waveforms (W24-W26)

Gate Trigger Voltages for 500-Hz Inverter

Gate trigger voltages for 500-Hz inverter SCRs.

High Voltage Transformer Primary Voltages

Waveforms of high voltage transformer primary voltages.

Oscilloscope Waveforms (W27-W28)

Power Supply for X-ray ON Light

Power supply waveform for the X-ray ON light circuit.

Voltage at Base of 3 A2 Q46

Voltage at the base of 3A2Q46 before and during exposure.

Oscilloscope Waveforms (W29-W30)

3 A2 V5 Signal Indicating Exposure Start Interlock

Signal indicating 3A2V5 actuation for exposure start interlock.

Signal Proportional to MA

Signal proportional to MA in HV transformer secondary.

Oscilloscope Waveforms (W31-W32)

MA Regulator Signal Voltage

Signal voltage proportional to MA for MA regulator.

Typical Balance Adjustment Voltages

Typical balance adjustment voltages for 3A2Q60 and 3A2Q63.

Oscilloscope Waveforms (W33-W35)

500-Hz Inverter Signal and Shut Off Capacitors

Signal indicating 500-Hz inverter function and shut off capacitor status.

CAUTION: Scope Connection Reversal

Warning about reversing scope connections to prevent exposure failure.

Oscilloscope Waveforms (W36-W37)

Exposure Stop Signal to SCR Gate

Exposure stop signal to turn off SCR gate.

W37: Interval Timer Adjustment

Adjusting the interval timer for different MAS selections.

Oscilloscope Waveforms (W39)

Kvp Across X-ray Tube

KVP measurement across the X-ray tube.

CHAPTER 6 MOTOR CONTROL WAVEFORMS

W-51 1 K Hz sawtooth from UJT oscillator

Sawtooth waveform from UJT oscillator for 1K Hz inverter driver.

W-52 Output of emitter follower 8 A1-03

Output waveform of emitter follower 8A1-03.

Motor Control Waveforms (W53-W54)

W-53 Output of Q5 at low and max. speeds

Output of Q5 at low and maximum speeds.

Motor Control Waveforms (W55-W57)

W-55 Output of 8 A1-06 at low and high speed

Output of 8A1-06 at low and high speed.

Motor Control Waveforms (W59-W60)

W-59 Output of 8 A1-09 during run conditions

Output of 8A1-09 during run conditions.

Motor Control Waveforms (W61)

W-61 Overload Protection Circuit

Waveform showing overload protection circuit during normal operation.

CHAPTER 7 SCHEMATICS

PANEL IDENTIFICATION TABLE

Table identifying panels and their prefixes.

RELAY FUNCTION CHART

Chart detailing relay functions and their locations.

AMX-110 PANEL IDENTIFICATION TABLE

Panel and Component Prefix Mapping

Identifying panels and their corresponding component prefixes.

RELAY FUNCTION CHART

Relay Coil, Name, Contact, Function, Schematic Location

Table detailing relay information: coil, name, contact, function, and location.

8 K1 Relay Contacts

8 K1 Relay Contact Diagram

Diagram showing the contacts for relay 8K1.

SCHEMATIC DIAGRAM METER BOARD

Meter Board Components and Connections

Schematic of the meter board showing components and connections.

60 HZ INVERTER DRIVER

60 Hz Inverter Driver Circuit Details

Schematic of the 60 Hz inverter driver circuit.

TUBE STATOR & FILAMENT: COLLIMATOR LIGHT

X-RAY TUBE STATOR POWER

Schematic for X-ray tube stator power.

X-RAY TUBE FILAMENT POWER

Schematic for X-ray tube filament power.

COLLIMATOR LIGHT CIRCUIT

Schematic for the collimator light circuit.

500 Hz INVERTER ON-OFF SWITCHES

Inverter ON-OFF Switch Circuit

Schematic of the inverter ON-OFF switches circuit.

TRIGGER AND REGULATION CIRCUITS

Trigger and Regulation Circuit Details

Schematic of trigger and regulation circuits.

MA CIRCUITS

MA Regulator Adjustment

Adjustment procedure for the MA regulator.

HV RECTIFIER AND X-RAY TUBE UNIT

HV Rectifier and Tube Unit Schematic

Schematic of the HV rectifier and X-ray tube unit.

TRIGGER AND REGULATION CIRCUITS (Continued)

Trigger and Regulation Circuit Details (Continued)

Continued schematic details of trigger and regulation circuits.

TIMER AND MAS SELECTOR

Time Selector Adjustment Procedures

Procedures for adjusting the time selector.

TRIGGER AND REGULATION CIRCUITS (Continued)

Trigger and Regulation Circuit Details (Continued)

Continued schematic details of trigger and regulation circuits.

553 MAS SELECTOR

Time Selector and MAS Adjustment Procedures

Procedures for adjusting the time selector and MAS.

Related product manuals