13 Sensor vericaon
189
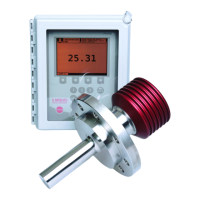
The veriication itself is done by the refractometer system, you only have to follow the
instructions on screen and apply one RI liquid at a time on the sensor and press VERIFY
(right-most soft key). See Figure 13.3.
Figure 13.3 Vericaon display
Important: Clean and dry the prism and the sample holder very carefully between
the RI liquids. Use a suitable solvent, e.g. ethanol or IPA (Isopropyl alcohol).
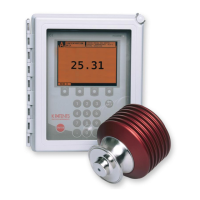
To check that the standard liquid is properly wetting the prism, it is possible to press
soft key OPT. IMAGE. The optical image should show a sharp shadow edge, as e.g. in Fig-
ure 13.4. For more information on the optical image, please see Section 5.4.1.
Sharp opcal image (with IDS) Sharp opcal image (without IDS)
Figure 13.4 Typical opcal images
A veriication data collection method is implemented in the DTR. The instrument mea-
sures each veriication data point ten times and uses the average of these measure-
ments. Measuring each veriication liquid takes approximately ten seconds, during
which the measurement progress display (Figure 13.5) is shown. Please wait until
the veriication step 2 display reappears before proceeding to next veriication liquid.
The sample holder keeps the sample on the prism surface and also blocks the ambi-
ent light from reaching the prism. The K-Patents universal sample holder PR-1012
(Figure 13.1) can be used with any K-Patents sensor.
Pressing COMPLETE in the veriication display inishes the veriication procedure and
calls up the veriication results.
 Loading...