Keyscan Inc. A Member of the Kaba Group – CA150 Rev. B Installation Guide (07.15)
Mounting Guidelines
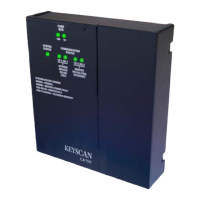
Unfasten the 2 knurled screw heads on the CA150 to remove the right-side cover as shown in Figure 2
Use the enclosed mounting template and drill 4 holes where indicated
Fasten the top 2 screws and the lower left screw until there is a gap of approximately 1/32” between each
of the screw heads and the mounting surface
Mount the CA150 so that the 3 keyway cutouts at the back of the enclosure are over the screw heads as
shown in Figure 3
Slide the enclosure down until the 3 screws are seated at the top of the keyway cutouts
If necessary, remove unit and adjust the screws to have the unit fit tight between the screw heads and
the mounting surface, then slide the enclosure down until the 3 screws are seated at the top of the
keyway cutouts
Fasten and tighten the 4
th
screw in the lower right hole
Leave the right cover off until you have connected all the door hardware, applied power, and tested the
voltages
Figure 2 - Remove the Right Cover
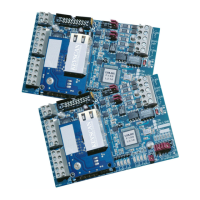
CARD
BITS
10s
1s
SYSTEM
STATUS
COMMUNICATION
STATUS
TD 1
RD 1
TD 2
RD 2
SYSTEM
INPUTS/
RS-485
(TB7)
SERVER
RS-232 (TB5)
ETHERNET
Left Cover - Do not remove.
SYSTEM STATUS LEGEND
GREEN – NORMAL
AMBER - SERVER COMMS FAULT
RED SOLID - RESET/FAULT
RED FLASHING - CLEARING MEMORY
Removable Right Cover
Knurled Screw Head
Knurled Screw Head
KI-00322E-05-12
KEYSCAN
CA150