5-20 LeeBoy Model 8510E Conveyor Paver
Maintenance
The control box consists of the major components
shown in Figure 5-24.
• The system timers, located on the control box cover.
• The element breakers are located in the lower surface
of the box.
• The other block in the center is used as a wire junction
block only.
NOTE: Control boxes are manufactured to t all
screed and paver combinations. If not all
plugs are connected to wires, it may be
normal. Be sure to keep unused plugs
covered with mating protective caps.
• Each element output consists of two wires--one
connects to the L-1 circuit and the other to the L-2
circuit. (Figure 5-24)
• Each breaker has two terminals--one is connected
to the main input and the other terminal to an element
output wire.
• The L-1 circuit is the left bank of element breakers.
• The L-2 circuit is the right bank of element breakers.
Heating element relays “make” or “break” the circuit
to each element to start or stop the heating cycles.
When the HEAT ON button is depressed, 12VDC is
momentarily applied to the main timer relay to start the
timing cycle.
Element Resistance Testing
The breakers are wired into each leg of each element.
If an element has a fault, either in the wiring, or in the
element itself, the breaker will trip and power will no
longer be applied to that leg of the element.
When a breaker in the control box has “tripped,” there
may be a problem in the wiring or an element in the
circuit.
The breakers can be manually reset by depressing the
trip button back into place when they are extended. If
the breaker still does not reset, you need to test or
possibly replace an element.
If the element is functioning correctly, you should read
a resistance between the connector pins when testing.
A faulty element will show high resistance, indicating a
bad element. Refer to the following resistance table and
element testing procedure:
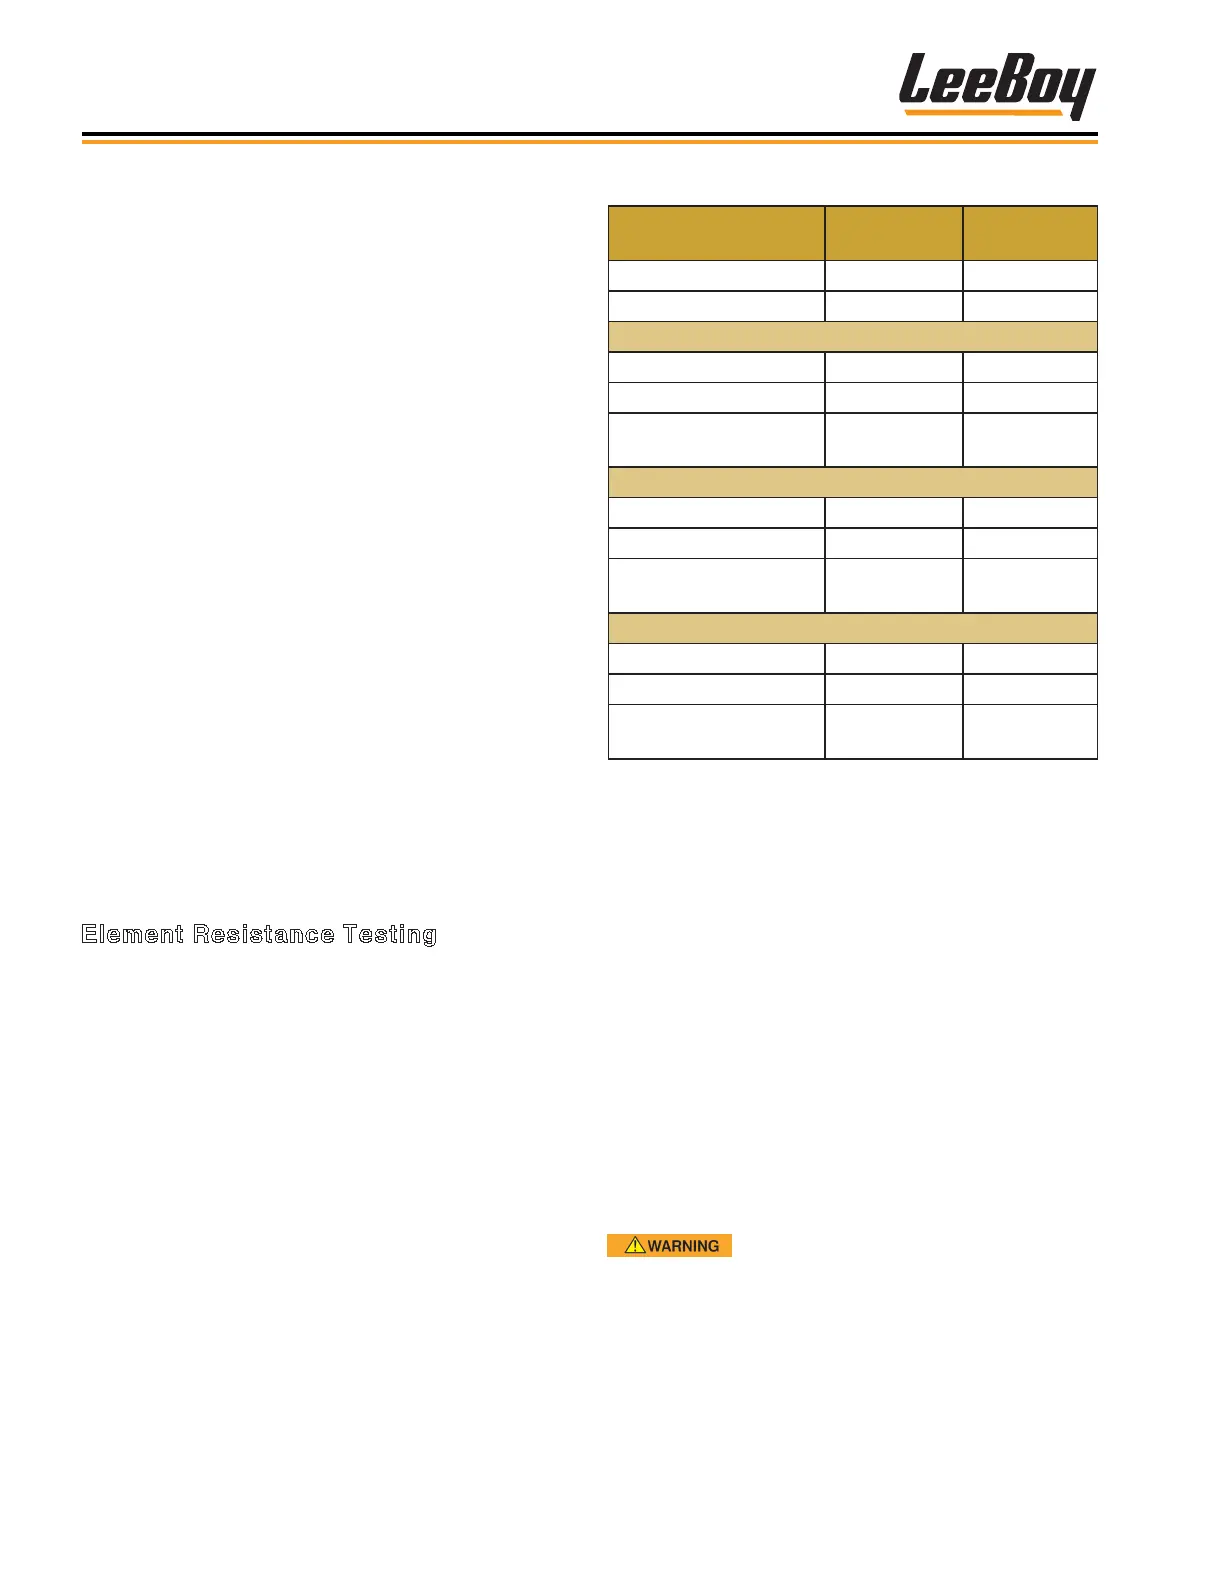
Table 5-7. Element Resistance Table
Item
STD Legend
Screed
HD815
Screed **
Generator Size (kW) 10 kW 10 kW
Breaker Size 40 Amp 40 Amp
Main Screed Elements (2)
Wattage Per Element 1750 W 2000 W
Total Wattage 3500 W 4000 W
Resistance per
Element
24.3 - 26.8 Ω 26 - 32 Ω
Screed Extension Elements (2)
Wattage Per Element 1000 W 1000 W
Total Wattage 2000 W 2000 W
Resistance per
Element
42.5 - 46.8 Ω 62.6 - 32 Ω
Heated Endgate Elements (2) **
Wattage Per Element N/A 500 W
Total Wattage N/A 1000 W
Resistance per
Element
N/A 88.5 - 108 Ω
** Option item.
To test the element:
1. Disconnect elements one at a time from the
connection point on the lower side of the control
box, keeping track of connector placement.
2. Using an ohm meter, test the resistance through the
element between the two pins in the plug. (Figure
5-25)
NOTE: You do not have to test the plug attached to
the lower side of the control box.
3. Before replugging the element, check each wire
pin with an ohm meter test lead, placing the lead
on a steel section of the screed frame. If there is
any continuity through the element to the frame, the
element must be replaced.
DO NOT operate an element with a
known electrical shortage. Replace faulty elements
and wiring immediately.